69
MP-L201
| Version 1
8. RC-010 examples
8 .
RC-010
examples
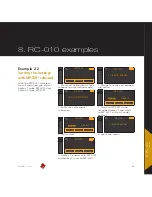
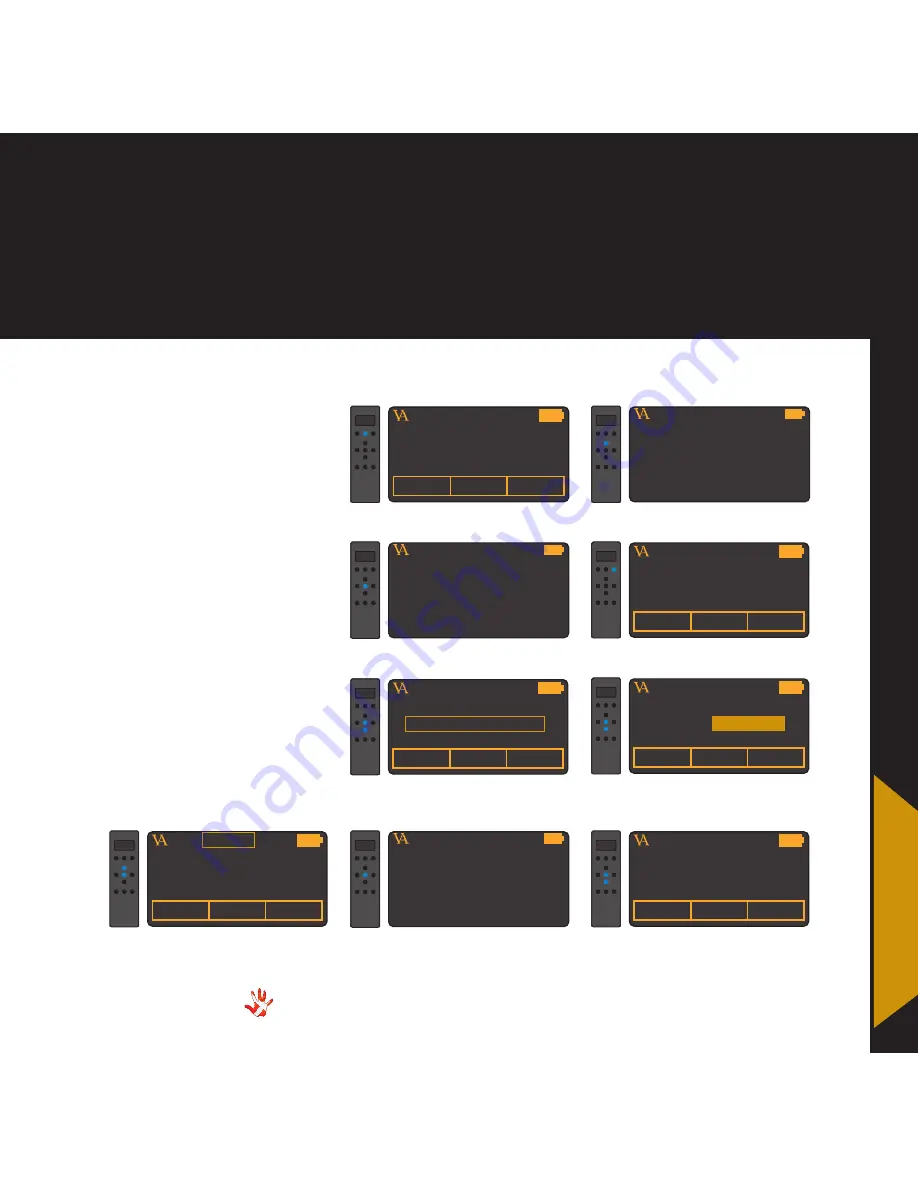
Example 5
Setting hotkey 1 to
INPUT 3.
Only applies to MP-L201
As a standard hotkey 1
(button1) is set to MP-T201 .
In the following steps we will
show how you can change
hotkey 1 from MP-T201 to
INPUT 3 .
VITUS
PRODUCT
MP-T201
MP-P201
1
. Press and hold button 2 for 3
seconds to enter menu mode .
MP-L201
VITUS
LEAVE MENU
2
. Navigate to the edit product
sub-menu
MP-L201
VITUS
LEAVE MENU
8
. Leave the menu
MP-L201
VITUS
EDIT PRODUCT
3
. Enter the edit product
sub-menu
MP-L201
4
. Scroll to INPUT 1 in the list
under hotkey 1
6
. Set KEY 1 to INPUT 3 . The item
under hotkey 1 has now automatically
been updated to INPUT 3
VITUS
PRODUCT
INPUT 3
SP-102
9
. The item under hotkey 1 is
now set to INPUT 3 .
VITUS
PRODUCT
INPUT 3
SP-102
ENABLE
KEY 1 : INPUT 3
KEY 3 : INPUT 2
7
. Select MP-L201 and press
select .
MP-L201
VITUS
PRODUCT
INPUT 1
SP-102
ENABLE
KEY 1 : INPUT 1
KEY 3 : INPUT 2
5
. Select KEY 1 .
MP-L201
VITUS
PRODUCT
MP-T201
INPUT 1
ENABLE
KEY 1 : INPUT 1
KEY 3 : INPUT 2
MP-L201
VITUS
PRODUCT
INPUT 3
INPUT 3
ENABLE
KEY 1 :
INPUT 3
KEY 3 : INPUT 2
INPUT 3
MP-L201
MP-L201
Содержание MP-L201
Страница 1: ...MP L201 Owner s Manual ...
Страница 47: ...47 MP L201 Version 1 7 examples connecting devices 7 examples Connecting devices ...
Страница 48: ...48 MP L201 Version 1 7 examples connecting devices Connecting devices ...
Страница 76: ...76 MP L201 Version 1 9 pictures MP L201 Inside view MP L201 Inside view ...
Страница 77: ...77 MP L201 Version 1 9 pictures MP PSU Inside view MP PSU Inside view 9 pictures ...
Страница 78: ...78 MP L201 Version 1 9 pictures MP L201 Front MP L201 Front view ...
Страница 79: ...79 MP L201 Version 1 9 pictures 9 pictures RC 010 Front RC 010 Front view ...


