5
ENGLISH
•
Tilt the thermopot carefully and pour the
remaining water out of the flask.
Note:
To remove foreign smells boil and pour
out water 2-3 times.
Attention! Be careful when pouring out
water to avoid burns by steam and hot
water.
USAGE OF THERMOPOT
•
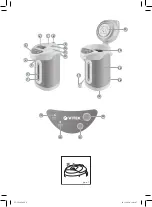
Open the lid (11) by pressing the button (6)
and pulling it (pic. 1).
•
Fill the thermopot with water using the suit-
able bowl, do not exceed the maximal water
level mark (14) «FULL» on the inner surface
of the thermopot flask.
•
Insert the power cord (17) connector into
the socket (16) on the thermopot body, and
the power plug into the mains socket. The
thermopot will switch on in the boiling mode,
the «BOILING» indicator (19) will light up on
the control panel (5).
•
After water starts boiling, the thermopot
will be switched to the keep warm mode,
the «KEEP WARM» indicator (20) will light
up.
•
You can switch the reboiling on after water
boiling, when the unit is operating in the keep
warm mode and the «KEEP WARM» indica-
tor (20) lights on the control panel. Press the
«REBOIL» button (21), the «Reheat» button
(19) illumination will light up.
•
When using the thermopot, ensure that
the water level is not below the mark (1)
«MIN» and not above the maximal level mark
«FULL» (14). If the water level gets below the
mark (1) «MIN», open the lid (11) and refill
the thermopot with water.
•
Pour boiled water into the suitable bowl,
placing it under the spout (4).
•
To dispense hot water press and hold the
«DISPENSE» button (22)
•
You can dispense water by pressing the
water dispense on button (3) with, for
instance, a mug.
•
You can also dispense water using the
hand pump (7) after previously setting the
hand pump lock button (10) in the posi-
tion «
» .
•
After use disconnect the unit from the mains
by removing the power plug (17) from the
mains socket and detaching the power cord
from the socket (16).
•
To pour out the remaining water wait until
the unit cools down completely. While keep-
ing the lid (11) closed, press the lock (9)
and holding the button (6) remove the lid
upwards.
•
Tilt the thermopot carefully and pour the
remaining water out of the flask.
•
To install the lid (11) back to its place, press
the lock (9), insert the metal spindle of the
lid (11) into the lock (9) groove and release
the lock (9).
CLEANING AND CARE
•
Before cleaning, disconnect the unit from
the mains, let the thermopot cool down and
pour out water.
•
Clean the thermopot outer surface with a
soft damp cloth and then wipe it dry. Do not
use metal brushes, abrasives and solvents
to clean the thermopot.
•
Do not immerse the thermopot body, power
cord and plug into water or any other liquids.
•
Do not wash the thermopot in a dishwash-
ing machine.
Stains on the inner surface of the
thermopot
The inner metal surface may change its color
under the influence of different water impurities.
•
To remove the stains wet a cloth with citric
acid or vinegar and wipe the inner surface
of the thermopot flask.
•
To remove the citric acid or vinegar taste boil
the water and pour it out. Repeat this pro-
cedure several times till the smell and taste
vanish completely.
Descaling
•
Scale, appearing inside the thermopot,
influences the water taste and disturbs the
heat exchange between water and heating
element, that can lead to overheating and
malfunction.
•
To remove scale, fill the thermopot flask with
a mixture of one part ordinary vinegar and
two parts water till the maximal water level
mark «FULL» (14). Boil the liquid and leave
it in the unit overnight. In the morning pour
out the liquid, fill thermopot with clean water
till the maximal mark «FULL» (14), boil and
pour out the water; if necessary repeat this
procedure 2 times.
VT-1196.indd 5
10.11.2014 16:49:29
Содержание VT-1196 W
Страница 1: ...1 VT 1196 W 3 7 11 15 19 Thermopot Термопот VT 1196 indd 1 10 11 2014 16 49 27 ...
Страница 2: ...17 18 1 2 3 4 6 7 8 5 9 13 14 15 16 22 11 12 10 21 20 19 рис 1 VT 1196 indd 2 10 11 2014 16 49 27 ...
Страница 24: ... ООО ГОЛДЕР ЭЛЕКТРОНИКС 2014 GOLDER ELECTRONICS LLC 2014 VT 1196 indd 24 10 11 2014 16 49 31 ...


