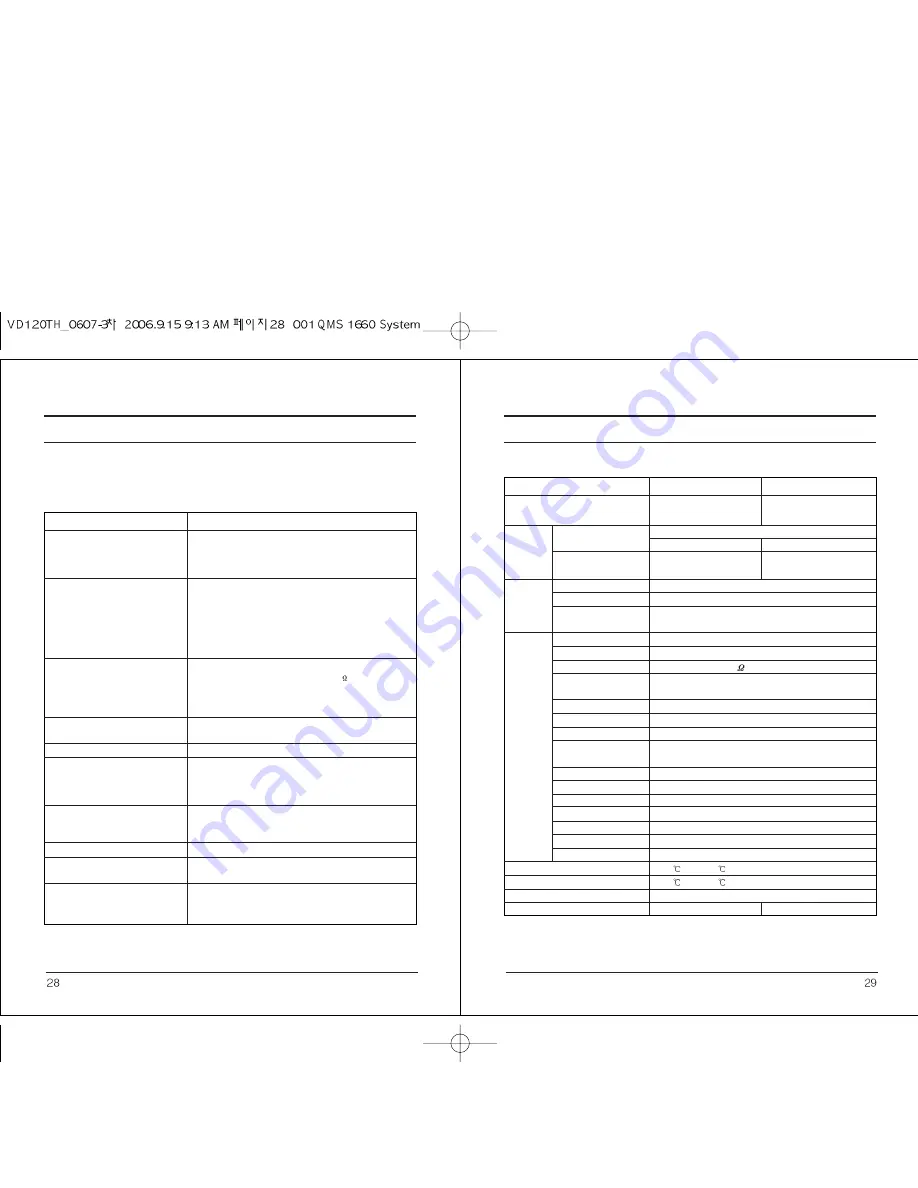
background image

8. Trouble shooting

9. Specification

ITEM

Power Source

Sensor

CCD

Total Pixels
Effective Pixels
Scanning System

Sync

Synchronization

Frequency

Resolution
S/N Ratio
Video Output

Min. Illumination

Electronic
Shutter speed
OSD

Electrical Backlight 

Compensation
Gain Control
DNR
Color
SYNC
PRIVACY
MIRROR
SHARPNESS

Operation Temperature/Humidity
Storage Temperature/Humidity
Dimension
Weight (Approx.)

VD

12

0TH-12

VD1

2

0TH-24

DC12V

DCV12/AC24 Dual Power

140mA

12C(200mA)/24V(110mA)

1/3 inch, Sony Super HAD CCD
NTSC PAL 
811(H) X 508(V)

795(H) X 596(V)

768(H) X 494(V)

752(H) X 582(V)

2:1 Interlace

Internal

Internal / Line Lock

NTSC : Horizontal:15.743KHz  Vertical : 59.94Hz

PAL : Horizontal : 15.625KHz  Vertical : 50Hz

More than 530 TV Lines
50dB(AGC Off)
CVBS : 1.0Vp-p/75
0.3Lux/F1.2 (50IRE, AGC High, DNR High)
0.0002 Lux (Sens-up x128 Max.)
AUTO/MANUAL
(1/60 ~ 1/120,000 NTSC, 1/50 ~ 1/120,000 PAL)
Built-In

Low, Middle, High, Off Selectable

Low, Middle, High, Off Selectable
AUTO(Day& Night)/ ON(Color only)
INT/LL Selectable
ON/OFF(4 Zone)
ON/OFF
ON/OFF(Level Adjustable)
-10

to  + 50

/    30%  to  80% RH

-20

to  + 60

/    20%  to  90% RH

120(Dia) X 56(V)
220g

250g

*Specifications are subject to change without prior notice

Problems

Nothing appears on the screen.

The video image is not clear.

The screen is dark.

Colors are not quite right.

COLOR mode is not working.

SENS-UP function is not

working.

Picture is too bright at day.

The screen is flickering.

L/L mode isn’t able to be

selected.

The camera’s surface is too hot and

black stripes appear on the screen.

Trouble shooting

Please check the power connection.
Please check the video signal line connection
Please check and make sure that the auto iris lens setting is
set to DC (Video) when using Video (DC) lens.

Please check if the lens is clean.
Please clean the lens with a soft cloth or brush.
Please check and adjust contrast feature of the monitor
Please check if the camera is exposed directly toward a bright
light, sunlight, or sun light reflecting area.
Please move the camera’s position in this case.
Please readjust the back focus of the camera.

Please check and adjust contrast feature of the monitor
If there is any interim equipment, set the 75

position properly

and check the terminals.
Please check if the auto iris lens being used and adjust the
brightness level.

Please check if the power supply is regulated and is within the
standard requirement of the product.

Please check the <white balance> setting.

Please check if the camera is facing directly into sunlight or
fluorescent light.
Please check if the auto iris lens is being used.
Please check the connection of the lens connector cable.

Please check if you connected your camera to DC power
source
Connect it to AC Power source.

Please check if the AGC menu is set to the ‘OFF’ position.

Please check if the AGC menu is set to the ‘OFF’ position
Please check if the SHUTTER menu is set to MANUAL mode.

Check if BLC mode is ON in normal backlight condition.
Check if DC Level is set too high.
Adjust the DC level to proper brightness.

If there are problems in operating, please refer to the checklist below. If the problem
persists, please contact the agent where this product is purchased.

Содержание VD120TH-12

Страница 1: ...HIGH RESOLUTION COLOR DOME CAMERA INSTRUCTION MANUAL VD120TH 12 12VDC Only VD120TH 24 12VDC 24VAC Dual power VD120TH ...

Страница 2: ...or moisture The lighting flash with an arrowhead symbol within an equilateral triangle is intended to alert the user to the presence of uninsulated dangerous voltage within the product s enclosure that may be of sufficient magnitude to constitute a risk of electric shock to persons Dear Customers The exclamation point within an equilateral triangle is intended to alert the user to the presence of ...

Страница 3: ... Int LL selection functions are built in Easy to use OSD On Screen Display menu A variety of beautiful functions built in are all easily controlled by selecting text displayed on the monitor Please read the manual carefully before the installation in order to set up the camera correctly and to achieve the best picture quality Follow these safty instructions This will help prevent possible damages ...

Страница 4: ...3 Package 1 High resolution Color CCD Camera 2 User s manual 3 Mounting material 4 Connection cable 4 Dimension mm ...

Страница 5: ...l Keep the top glass of the lens always clear in order to obtain the best picture quality all the time Be careful not to stain the lens by fingerprints Do not point the camera toward artificial lightings the sun the sky or to the direction of a window The best picture quality will be achieved if both camera and lighting point to the area you want to record Do not expose the camera to radioactivity...

Страница 6: ... it by turning it lefthandwise to adjust the camera angle to Horizontal axis Lock it by turning it righthandwise after adjustment 6 Installation 6 1 Overview of 3 directional adjustment 6 2 Name and function of each part Caution Caution Caution Caution Caution Caution Caution Caution Caution Caution Caution Caution Caution Caution Caution Caution Caution Caution Caution Caution Caution Caution Cau...

Страница 7: ...stem connection Make sure to connect the cable with the power off Please locate the impedance switch of each equipment as instructed Locate the switch to Hi z position for the interim equipment Locate the switch to 75 for the last equipment Set the impedance S W to 75 װ position Last equipment Monitor Interim equipment DVR Multiflexer Transmitter etc Set the impedance S W to Hi z position 4mm 9mm ...

Страница 8: ...ction 7 Functions and operation 7 1 On Screen Menu OSD 12V DC type 24V AC type SETUP menu LENS Selection MANUAL DC VIDEO SHUTTER ESC MANUAL FLK condition and speed control WHITE BALANCE control ATW AWC MIDDLE BLC Backlight compensation OFF LOW MIDDLE High AGC Auto Gain Control OFF LOW MIDDLE HIGH DNR Dynamic Noise Reduction OFF LOW MIDDLE HIGH SENS UP Low illumination OFF AUTO SPECIAL CAMERA ID CO...

Страница 9: ...splay DC in the sub menu If this sub menu shows MANUAL please press the sub menu and it will be converted to DC 3 DC Level volume control Brightness level of the screen at DC mode is adjustable Select SHUTTER menu and move the cursor to sub menu DC Press SETUP button and then the BRIGHTNESS CONTROL menu is on Adjust the level by using the LEFT RIGHT buttons 4 Press the SETUP button to finish the c...

Страница 10: ...speed is controlled automatically according to the brightness of the screen Manual The shutter speed is controlled manually Please select MANUAL mode if you wish to adjust the shutter manually You can select speed from 1 60 to 1 120 000 sec NTSC 1 50 to 1 120 000 sec PAL Please use this function only when the light level of the surveillance area is fixed all the time It is useful when there is use...

Страница 11: ... Note Note Note Note Note Note Note Note Note Note Note Note Note Note Note Note Note Note Note Note Note Note Note Note Note Note Note Under the following conditions the WHITE BALANCE function may not operate properly In such cases please select the AWC mode When the object s surroundings have a very high color temperature eg a clear sky and sunset When the object s surrounding is dark If the cam...

Страница 12: ...e Note Note Note Note Note Note Note Note Note Note Note Note Note Note Note Note Note Note Note Note Note Note When the SHUTTER is in the MANUAL mode SENS UP does not operate When the AGC is turned off SENS UP does not operate 3 Please press the SET UP button when all the settings are completed 7 10 SPECIAL 1 Please position the arrow to point to SPECIAL on the SETUP menu by using the UP and DOWN...

Страница 13: ... the appropriate mode for daytime or nighttime The picture displays a Color image in day and it converts to BW mode at night ON It is fixed to Color mode and the image is not changeable to BW for night Note Note Note Note Note Note Note Note Note Note Note Note Note Note Note Note Note Note Note Note Note Note Note Note Note Note Note Note Note Note Note Note Note Note Note Note Note Note Note Not...

Страница 14: ...ets a horizontal image inversion OFF Cancels the inversion F SHARPNESS The outline of video image become clearer and more distinctive as the level of SHARPNESS increases If the level goes up excessively however it may affect the video and generate noise Please press the SETUP button The available range of level is 0 15 G RESET Returns to the default set by the manufacturer H RETURN 1 Save the SPEC...

Страница 15: ...t and black stripes appear on the screen Trouble shooting Please check the power connection Please check the video signal line connection Please check and make sure that the auto iris lens setting is set to DC Video when using Video DC lens Please check if the lens is clean Please clean the lens with a soft cloth or brush Please check and adjust contrast feature of the monitor Please check if the ...

Страница 16: ...Memo Memo ...

Страница 17: ......

Отзывы: