background image

Operation

91

© 2019 Vision Engraving Systems

6.2.3

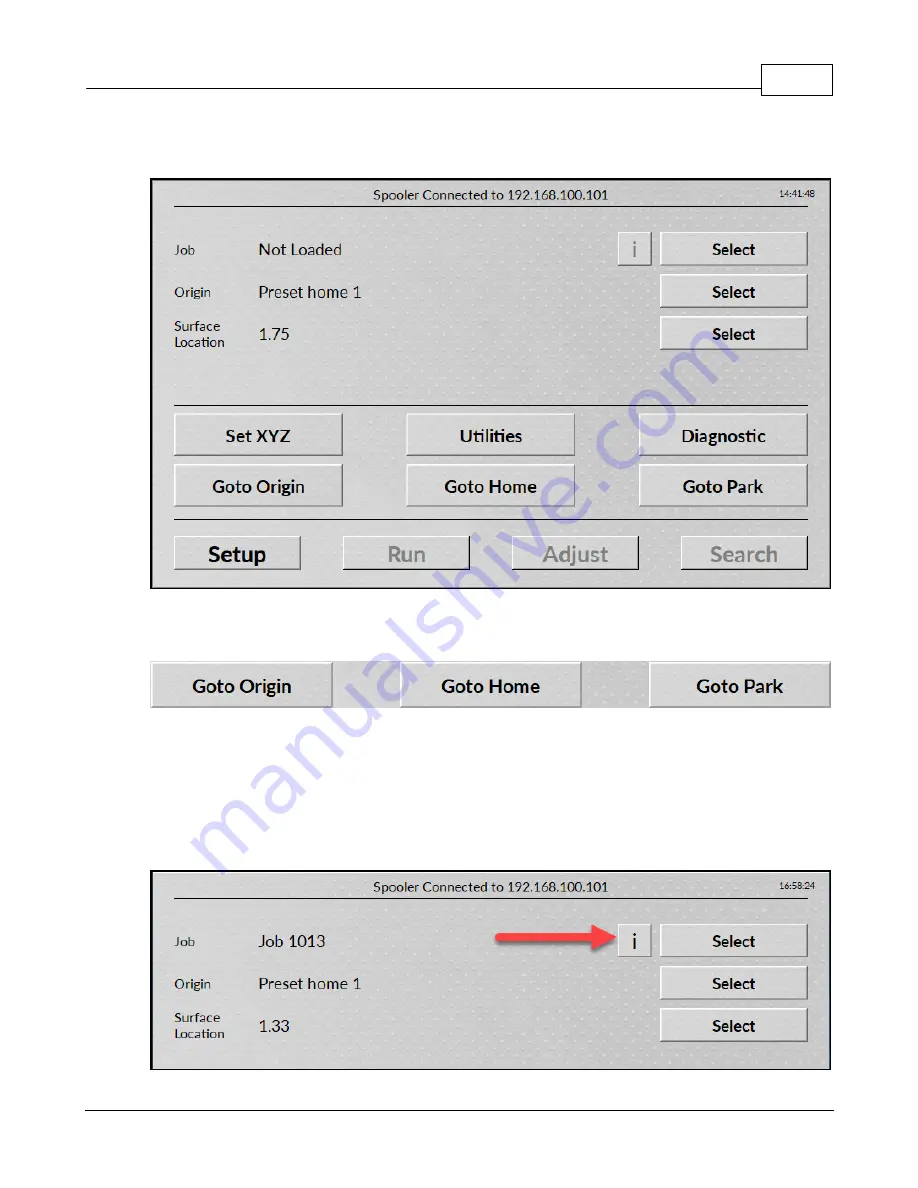
Setup screen

The Setup screen is the main screen.  All of the options start from this screen.

The Setup, Run, Adjust and Search buttons will appear on most other screens allowing for quick access
to them.

Pressing Goto Origin moves the spindle to the currently set origin.

Pressing Goto Home moves the spindle to the machine home location.  This is the location that the
spindle moves to when the machine is first powered on and the start homing button is pressed.

Pressing Goto Park moves the spindle to the park location.  This is set in the utilities screen and is the
location that the spindle moves to when a job is finished.

Information and a graphical preview of the job being run can be displayed.  Press the information button.

Содержание 1624R

Страница 1: ...2019 Vision Engraving Systems Vision 1624R 2525 and 2550 Series 5 User Guide Revised 7 3 2019...

Страница 2: ...claim to these trademarks While every precaution has been taken in the preparation of this document the publisher and the author assume no responsibility for errors or omissions or for damages result...

Страница 3: ...2550 Table Descriptions 28 5 2550 Vacuum Table 31 6 2550 Vacuum Pump Connection Vacuum Table Model Only 33 7 Series 5 Controller Connections 36 8 Pendant Holder Installation 38 9 Spindle Options 38 En...

Страница 4: ...rch screen 112 Origin Select screen 116 Surface Location screen 117 Utilities screen 118 Diagnostic screen 118 3 Set Surface Procedures 121 4 Set Home Procedure Part VII Sending Jobs to Your Machine 1...

Страница 5: ...ously advised of the possibility of such damages In the interest of continued product development Vision reserves the right to make improvements to this manual and the products it describes at any tim...

Страница 6: ...sed within 30 days of the expiration of the original equipment Warranty or within 30 days of the expiration of an existing Extended Warranty the equipment will be in Lapse of Warranty An Extended Warr...

Страница 7: ...quipment in a location with low humidity and a minimum of dust Avoid placing the equipment in direct sunlight or in locations with excessive heat Do not expose the equipment to rain or use it near wat...

Страница 8: ...or smells coming from it immediately unplug it and contact a service technician or your local distributor Unplug the machine when it is going to be left unused for an extended period of time Operator...

Страница 9: ...he Vision Engraving Systems technical support team at 602 439 0600 Do not force the machine to work at excessive speeds The machine will work safely under normal permissible speeds which are material...

Страница 10: ...System Requirements CPU Intel i7 2 6 3 0GHz or faster Hard Drive 500 GB SSD or larger RAM 16 GB or more Operating System Windows 10 64 bit Ports 1 USB port for security dongle 1 USB port for Ethernet...

Страница 11: ...Single Phase vacuum pump One 110 VAC 15 Amp OR One 220 VAC 10 Amp Single Phase Vision controller AND One 220 VAC 30 Amp Single Phase 3 HP router AND One 220 VAC 20 Amp Single Phase vacuum pump Optiona...

Страница 12: ...r people to remove the router from the shipping crate and place it on the included stand 2525 2550 models only once the stand is assembled 6 A stand kit for the 2525 2550 machines is packed under the...

Страница 13: ...1624R 2525 and 2550 Series 5 Installation 13 2019 Vision Engraving Systems 12 If ordered the UNIST Misting System requires a compressed air supply regulated to no more than 60 psi...

Страница 14: ...Vision Series 5 Controller User Manual 14 2019 Vision Engraving Systems 2 2 Installation Layout Diagrams 2 2 1 2525 and 2550 Layout Diagrams Vision 2525 installation layout...

Страница 15: ...1624R 2525 and 2550 Series 5 Installation 15 2019 Vision Engraving Systems Vision 2550 installation layout...

Страница 16: ...Vision Series 5 Controller User Manual 16 2019 Vision Engraving Systems Vision 2550 vacuum table installation layout...

Страница 17: ...am 2 3 1624R Table Descriptions Refer to the diagrams on the following pages 1 Table Base Plate This is the large flat plate upon which everything else is mounted All mechanical alignments are referen...

Страница 18: ...sm and the engraving or router motor The carriage moves across the gantry assembly on a set of sealed bearings The carriage uses the Z axis leadscrew and stepper motor to raise and lower the spindle d...

Страница 19: ...le plugs into this port and also into the DACS Camera 19 Spindle Port Located on the rear of the carriage assembly the motor plug from the router or engraving motor connects to this port and provides...

Страница 20: ...Vision Series 5 Controller User Manual 20 2019 Vision Engraving Systems 1624R Diagrams...

Страница 21: ...1624R 2525 and 2550 Series 5 Installation 21 2019 Vision Engraving Systems...

Страница 22: ...Vision Series 5 Controller User Manual 22 2019 Vision Engraving Systems...

Страница 23: ...e of material is placed on top of the vacuum table and the vacuum pump is turned on the atmospheric pressure of the air above presses the material on to the table and secures it in place 4 Y Axis Lead...

Страница 24: ...t allows communication between the DACS Camera and the DACS Software 16 X Axis Leadscrew The X axis leadscrew is located on the rear of the gantry The X axis leadscrew drives the carriage assembly in...

Страница 25: ...nnect the power cable to the optional UNIST Misting System 24 DACS Power Port Located on the rear of the carriage assembly this port is used to connect to the power cable supplying the optional Ethern...

Страница 26: ...Vision Series 5 Controller User Manual 26 2019 Vision Engraving Systems 2525 2550 Diagrams...

Страница 27: ...1624R 2525 and 2550 Series 5 Installation 27 2019 Vision Engraving Systems...

Страница 28: ...nded as the material may move during processing When using the vacuum table only open the valve to the section which you are using If the entire table is being used open both valves fully Cover the va...

Страница 29: ...1624R 2525 and 2550 Series 5 Installation 29 2019 Vision Engraving Systems Vacuum Table Top View...

Страница 30: ...Vision Series 5 Controller User Manual 30 2019 Vision Engraving Systems Vacuum Valve Diagram The valves controlling the vacuum to the table are mounted on a plate attached to the machine s stand...

Страница 31: ...Model Only The Main Vacuum Port on the 2550 Router is located on the bottom of the valve panel as shown below The user will need to attach the valve panel to the end of the table as shown in the phot...

Страница 32: ...cuum pump has been supplied with an electrical connector designed for a 20 amp 220 VAC single phase power supply A qualified and licensed electrician must be used to complete all wiring and grounding...

Страница 33: ...will not be used if a vacuum chip removal system is not configured with the machine 6 The Pump Mist plug connects to a misting system or water pump NOTE This is not used unless a misting system or wat...

Страница 34: ...Vision Series 5 Controller User Manual 34 2019 Vision Engraving Systems Vision Series 5 controller rear view...

Страница 35: ...n the LCD when the machine is powered on then the emergency stop button is pressed in This can either be the emergency stop button on the table or the emergency stop button on the pendant Release the...

Страница 36: ...ng Systems 2 8 Pendant Holder Installation The 2525 and 2550 machines are shipped with a Pendant Holder to give the user a place to secure the Pendant NOTE Not required for 1624R To install the Pendan...

Страница 37: ...1624R 2525 and 2550 Series 5 Installation 37 2019 Vision Engraving Systems...

Страница 38: ...al 38 2019 Vision Engraving Systems 2 9 Spindle Options 2 9 1 Engraving Head The Motor Plug connects to the Spindle Port and the Proximity Sensor Plug connects to the Proximity Sensor Port on the back...

Страница 39: ...1624R 2525 and 2550 Series 5 Installation 39 2019 Vision Engraving Systems Engraving Head Diagram Installed...

Страница 40: ...ack of the Carriage and place it over the Cable Hose Hanger 2 Loosen the four mounting screws and remove The Engraving Head will be held in place on the Rail Plate by the two Dowel Pins on the back of...

Страница 41: ...d only NOTE The Auxiliary Power Cable is pre wired on all 16 and 25 Series Routers Remove Inverter Cover and feed the Auxiliary Power Cable through hole in bottom of Inverter Connect the three black w...

Страница 42: ...Vision Series 5 Controller User Manual 42 2019 Vision Engraving Systems connect the MOD BUS Cable to the machine controller s MOD BUS port...

Страница 43: ...1624R 2525 and 2550 Series 5 Installation 43 2019 Vision Engraving Systems Carriage Wiring Connections The Motor Plug connects to the Spindle Port on the back of the Carriage Carriage rear view...

Страница 44: ...p left corner of the machine s stand There are two flanges mounted on the rear of the inverter These flanges are placed in the inside of the stand s legs Screws are included with the inverter to secur...

Страница 45: ...1624R 2525 and 2550 Series 5 Installation 45 2019 Vision Engraving Systems High Frequency Router Head Diagram Installed...

Страница 46: ...Systems High Frequency Router Head Removal Procedure 1 Remove the Motor Plug from the back of the Carriage and place the plug over the Cable Hose Hanger 2 Loosen the two thumbscrews holding the Router...

Страница 47: ...l Pins on the back of the Mounting Plate 5 Using two hands pull the Router Head away from the Rail Plate To Install the High Frequency Router Head reverse this procedure 2 9 3 NSK 50 000 RPM Spindle T...

Страница 48: ...connect the Table port on the controller to the Analog Spindle Port on the NSK Power Supply Unit Connect the Power Cable to a standard 110 VAC power outlet and to the NSK Power Supply Unit The cable...

Страница 49: ...tting tools depending on which collet was shipped with the system The spindle will accept standard 2 shank bottom loading cutting tools The collar at the bottom of spindle and the spindle shaft both h...

Страница 50: ...eed Connections to the machine s Controller are the same as when only using the High Frequency Router Motor High Speed Engraving Spindle Installation 1 Remove the Collet Nut and Collet from the bottom...

Страница 51: ...0 Series 5 Installation 51 2019 Vision Engraving Systems Dowel Pin Holes 4 Install and tighten the 4 Mounting Screws 5 Connect the Proximity Sensor Plug into the Proximity Sensor Port on the rear of t...

Страница 52: ...Vision Series 5 Controller User Manual 52 2019 Vision Engraving Systems Router Rail Plate Carriage rear view...

Страница 53: ...gh Speed Engraving Spindle Mounted 6 Install the Drive Belt on to the Drive Pulley then lightly stretch it of the top of the Spindle Pulley NOTE Do not excessively stretch the drive belt The belt can...

Страница 54: ...Vision Series 5 Controller User Manual 54 2019 Vision Engraving Systems...

Страница 55: ...the same diameter 1 375 diameter for a 1 1 ratio and therefore turns the same RPM as the router motor The high speed spindle runs at a ratio of 1 833 1 When determining the RPM of the high speed spind...

Страница 56: ...019 Vision Engraving Systems 2 9 5 Oscillating Knife Place the Oscillating Knife Assembly against the face of the Router Rail Plate and align it to the Mounting Plate with the Alignment Pins Secure th...

Страница 57: ...allation 57 2019 Vision Engraving Systems Carriage Wiring Connections Connect the Oscillating Knife Cable to the rear of the carriage as shown The other end of the cable connects to the top of the Osc...

Страница 58: ...Vision Series 5 Controller User Manual 58 2019 Vision Engraving Systems...

Страница 59: ...rication to the cutting tool and material when processing metals The diagram shown below lists the main components and connections This system requires a compressed air supply 60 PSI Max to be connect...

Страница 60: ...Vision Series 5 Controller User Manual 60 2019 Vision Engraving Systems Additionally the Misting System Power Plug on the router connects to the controller s Pump Mist port with the supplied cable...

Страница 61: ...s shown on a Windows 10 PC For Windows 7 or Windows 8 the screens are slightly different Plug the USB end of the USB to Ethernet adapter into any open USB port on the computer Right click on the Windo...

Страница 62: ...Vision Series 5 Controller User Manual 62 2019 Vision Engraving Systems Select Change adapter options Right click on the Asix USB Ethernet connection Select Properties...

Страница 63: ...Network Connection 63 2019 Vision Engraving Systems Select Internet Protocol Version 4 TCP IPv4 Select Properties...

Страница 64: ...troller User Manual 64 2019 Vision Engraving Systems The screen below will appear Enter the settings below Select Use the following IP address Enter an IP address of 192 168 100 100 Enter a Subnet mas...

Страница 65: ...ug one end of the network cable into the USB to Ethernet adaptor Plug the other end of the network cable into the COMPUTER connection in the back of the Vision Series 5 controller The network connecti...

Страница 66: ...Mov UI Software Installation Power the Vision Series 5 controller on with the switch on the front Insert the Vision USB dongle into the USB port on the computer Navigate to the USB dongle in Windows...

Страница 67: ...Vision Mov UI Software Installation 67 2019 Vision Engraving Systems Select Step 1 Setup Machine...

Страница 68: ...t on the Prerequisites Setup Wizard screen NOTE This screen will not appear if the Windows feature is already installed on the computer Select Next on the Prerequisites installation screen NOTE This s...

Страница 69: ...oft Vision C installation screen NOTE This screen will not appear if the Windows feature is already installed on the computer Select the I have read and accept the license terms box then select Instal...

Страница 70: ...oller User Manual 70 2019 Vision Engraving Systems Select Finish on the Setup Complete screen NOTE This screen will not appear if the Windows feature is already installed on the computer Select Next o...

Страница 71: ...Vision Mov UI Software Installation 71 2019 Vision Engraving Systems Select Next on the Choose a file location screen Select Install on the Begin installation screen...

Страница 72: ...Controller User Manual 72 2019 Vision Engraving Systems Select Close on the Successful Install screen The VisMovUI screen will appear Select the Machine in the Machines Discovered on Network screen a...

Страница 73: ...v UI Software Installation 73 2019 Vision Engraving Systems The VisMovUI program will appear Select the Minimize button The Vision Move UI program is now installed Please continue to the network setup...

Страница 74: ...2019 Vision Engraving Systems 5 Vision Software Installation Insert the Vision USB dongle into the USB port on the computer Navigate to the USB dongle in Windows File Explorer Select the Start or Star...

Страница 75: ...Vision Software Installation 75 2019 Vision Engraving Systems Select Step 2 Install Vision Software Select Next on the Welcome screen...

Страница 76: ...Vision Series 5 Controller User Manual 76 2019 Vision Engraving Systems Select Install on the Ready to Install screen Select Finish on the Complete Install screen...

Страница 77: ...ware Installation 77 2019 Vision Engraving Systems Select the language desired and select OK on the Vision Pro install screen Make sure the USB dongle is installed and select Next on the USB Flash Don...

Страница 78: ...the Vision 10 setup screen NOTE The installation will display Vision Pro 10 Setup Vision Expert 10 Setup or Vision Express 10 Setup depending on which version has been purchased Select the I accept t...

Страница 79: ...Systems Select Next from the Choose Destination Location screen NOTE The installation folder will be either C Vision Pro 10 C Vision Expert 10 or C Vision Express 10 depending on which version has be...

Страница 80: ...Vision Engraving Systems The installation will continue Select Vision S5 Routers and select Next Select the driver for the that matches the machine purchased and select Next NOTE If ADA drivers or a c...

Страница 81: ...Vision Software Installation 81 2019 Vision Engraving Systems Select Continue on the Font Installation screen...

Страница 82: ...er User Manual 82 2019 Vision Engraving Systems The installation will search for Vision fonts Select the disk drive to search for additional fonts that may be on the computer and select Yes NOTE Typic...

Страница 83: ...Vision Software Installation 83 2019 Vision Engraving Systems The installation will search for additional fonts NOTE This may take a few minutes Select OK on the Font Installation Complete screen...

Страница 84: ...Vision Engraving Systems Select Finish to complete the installation NOTE The install may or may not ask to restart the computer Select Exit from the initial screen The Vision 10 software and Vision M...

Страница 85: ...ected before proceeding The Vision Mov UI program should start automatically after the program is installed and when the computer is restarted The screen below will appear when it is running If it is...

Страница 86: ...r be displayed to the right of the up arrow or it will be displayed when the up arrow is selected IMPORTANT Only one Vision Mov UI spooler can be running per machine at a time If two are running at th...

Страница 87: ...87 2019 Vision Engraving Systems 6 2 Pendant Controls The Pendant controls all of the movement of your Vision engraver or router Below is a picture of the Pendant The function of each item is explain...

Страница 88: ...g and the machine will initialize and move to the home position Pressing the Stop button will stop the machine from moving NOTE The stop button can be pressed when the machine is returning to home if...

Страница 89: ...cutter in the down position and will power off the X Y and Z stepper motors It will also power off the spindle motor and auxiliaries such as a vacuum chip removal system or misting system Once you ha...

Страница 90: ...d Press Reset Safety Monitor after the emergency stop button has been released The machine will now move to the home position The job that was running can be restarted or skipped NOTE All emergency st...

Страница 91: ...e to the currently set origin Pressing Goto Home moves the spindle to the machine home location This is the location that the spindle moves to when the machine is first powered on and the start homing...

Страница 92: ...ller User Manual 92 2019 Vision Engraving Systems The job information screen will be displayed Select the image button to display a graphical preview of the currently loaded job Press the zoom in and...

Страница 93: ...ars can also be used as needed when the view is zoomed in Select back two times to return to the setup screen 6 2 4 Run screen The run screen will be displayed automatically when either a job is sent...

Страница 94: ...p the machine immediately When the stop button is pressed the restart and continue buttons will appear Pressing restart will re run the job from the beginning Pressing continue will continue running t...

Страница 95: ...achine is configured on the Utilities screen Speed Z The speed that the spindle moves down into the material at This will be displayed in inches per second mm per second feet per second or meters per...

Страница 96: ...on is used to automatically set the material surface 1 Insert the surface senor plug into the carriage assembly plug as shown below 2 Attach the surface block clip to the spindle as shown below 3 Plac...

Страница 97: ...e Start button to run the job The dust extractor button manually activates the dust extractor Pressing the button again will deactivate the dust extractor NOTE This only works if the Vision dust extra...

Страница 98: ...machine the show outline button will be grayed out The skip job will unload the job from the controller This button will appear if a job is stopped or if a job was manually selected 6 2 5 Set XYZ scre...

Страница 99: ...the spindle HINT The laser pointer can be used in conjunction with the set origin button to set the origin at the pointer location instead of the spindle location Press the Laser Pointer button The r...

Страница 100: ...the Y absolute box and enter 0 Select Set Origin The default origin will now be set NOTE 14 different origins can be stored in the Vision Series 5 controller To select a different origin to be saved s...

Страница 101: ...Surface button The cutter will raise to the lift height 4 The status on the pendant will say Lifting Z to Free Height 5 Press the goto origin button to move the spindle all the way up and move to the...

Страница 102: ...pindle will stop moving down and the surface will be set NOTE Pressing Abort will stop the sense surface procedure 6 Remove the clip from the spindle before starting the job NOTE This feature is used...

Страница 103: ...lected spindle motor Select the spindle RPM button Enter the desired RPM value and press enter The Spindle RPM value will be changed Press the spindle button The spindle will start turning and the but...

Страница 104: ...ob select screen is used to manually load a job into the machine Pressing the job select button on the setup screen will allow a job to be selected Select the job to load in the job list and then pres...

Страница 105: ...achine It is not deleted from the job folder If a job needs to be deleted from the job folder permanently select the job in the list and select the delete job button A warning will appear Select OK to...

Страница 106: ...Vision Series 5 Controller User Manual 106 2019 Vision Engraving Systems Select the job folder button Select the desired folder location and select OK and then close...

Страница 107: ...Operation 107 2019 Vision Engraving Systems 6 2 7 Adjust screen The adjust screen allows the XY speed Z speed and spindle speed to be adjusted while the machine is running a job...

Страница 108: ...uble the speed Increasing or decreasing this value will not go above or below the minimum and maximum speeds available for the machine When either the XY speed or Z speed overrides are entered it will...

Страница 109: ...d while running When a job is loaded or stopped press the search button Pressing the next or previous button in search to shape will move the tool forward or backwards one object at a time in the job...

Страница 110: ...losest point to where the tool was jogged to HINT Pressing the laser pointer button will enable the laser pointer The jog buttons can then be used to move the red laser pointer to the location desired...

Страница 111: ...ocation of the tool The X Y values display the location of the tool This will be displayed in inches millimeters feet or meters depending on how the machine is configured on the Utilities screen To co...

Страница 112: ...2 9 Origin Select screen The origin select screen is used to select the origin to be used Pressing the origin select button on the setup screen will allow a different origin to be selected Fourteen di...

Страница 113: ...OK To set the location for the selected preset home origin press the Set XYZ button from the setup screen Use the jog buttons to the spindle left right front back to the desired location HINT Pressing...

Страница 114: ...he set origin button to set the origin at the pointer location instead of the spindle location Press the Laser Pointer button The red laser pointer will turn on Then follow the steps above but jog the...

Страница 115: ...gin back to the machine s default location at the upper left corner of the table select the X absolute box and enter 0 Then select the Y absolute box and enter 0 Select Set Origin The default origin w...

Страница 116: ...on Engraving Systems 6 2 10 Surface Location screen The surface location screen is used to select a flat or irregular shaped surface Pressing the surface location select button on the setup screen wil...

Страница 117: ...en The Utilities screen is used to for several options The Dust Extractor button allows the default state of the dust extractor vacuum chip removal system to be set Pressing this button toggles betwee...

Страница 118: ...on software The Autoload button changes how the machine starts running jobs Pressing this button toggles between Load Load_Start and Disabled The default setting is Load A setting of Load will display...

Страница 119: ...e first point to be engraved and pause You can then jog the Z down until it touches the surface and press Set Surface then Press Enter to set the surface Pressing Start will then begin the engraving p...

Страница 120: ...inch and stop 7 Release the Set Surface button 8 Press the Go to Home button on the Pendant NOTE The design of the Sensor Block is such that if the sensor does not detect the cutter tip contacting the...

Страница 121: ...using the depth that was entered in the software or the controller Burnishing 1 Send a job to the Vision controller 2 Make sure you are using a burnishing adapter on the burnishing cutter 3 With the...

Страница 122: ...new home position move the spindle to the desired position and press Set Home as described above If the machine is turned off the user defined home position will be replaced with the factory home posi...

Страница 123: ...up in the Vision 9 software select the Engrave icon from the left toolbar The Cut Toolbox window will appear and the top toolbar will change to the Engrave toolbar Make sure the Device is set to the m...

Страница 124: ...Select the appropriate material from the Material Selection drop down list then select OK Verify the Cut Toolbox settings settings available will depend on device selected and version of Vision 9 sof...

Страница 125: ...of your controller It is recommended that the input fan filter be removed weekly and cleaned to ensure proper cooling of the electronics i Remove the filter guard this is easiest if you pull from a c...

Страница 126: ...ol that can be used to set up both the machine s home position and the plate size in the Vision 9 software To use this feature turn on the engraver and press the Go to Home button Open the Vision 9 so...

Страница 127: ...nter Move the spindle over the material and position the laser pointer so that it is in the upper left hand corner of the engraving area you wish to define Then click on Next in the Measure Wizard win...

Страница 128: ...Vision Series 5 Controller User Manual 128 2019 Vision Engraving Systems...

Страница 129: ...llow the instructions on your machine or controller to have the machine outline this engraving area with the red dot laser pointer If the area appears to be correct click on OK in the Plate Size windo...

Страница 130: ...Vision Series 5 Controller User Manual 130 2019 Vision Engraving Systems...

Страница 131: ......

Отзывы: