background image

13

Main Menu  Sub-Menu

Options

Description

Multi-
Window

Multi-Window

Off, PIP Mode, 
PBP 2Win

Select PIP/PBP modes according to the
number of input signals etc.

Sub Win2 Input

DVI, HDMI, DP

Select according to input signal for PIP/
PBP mode

PIP Size

Small, Medium, 
Large

Adjust the PIP/PBP display window size 

PIP Position

Top Right, Top 
Left, Bottom 
Right, Bottom Left

Adjust the PIP/PBP window position

Swap

NONE

Swap the PIP/PBP signal sources

Other

Language

English,

 简体中文,

한국어,

Español

Set OSD language

OSD H-Position 0-100

Adjust the OSD’s horizontal position 

OSD V-Position 0-100

Adjust the OSD’s vertical position

OSD 
Transparency

0-100

Adjust OSD’s overall transparency

OSD Time Out

5-100

Set how long the OSD remains open after 
non-use

OSD Rotation

Normal, 90, 180, 
270

When the user flips the display, this 

function can also flip the OSD to achieve 

the best display angle

Reset

Reset monitor configurations

Section 10:  ECO Modes and Gameplus Switching
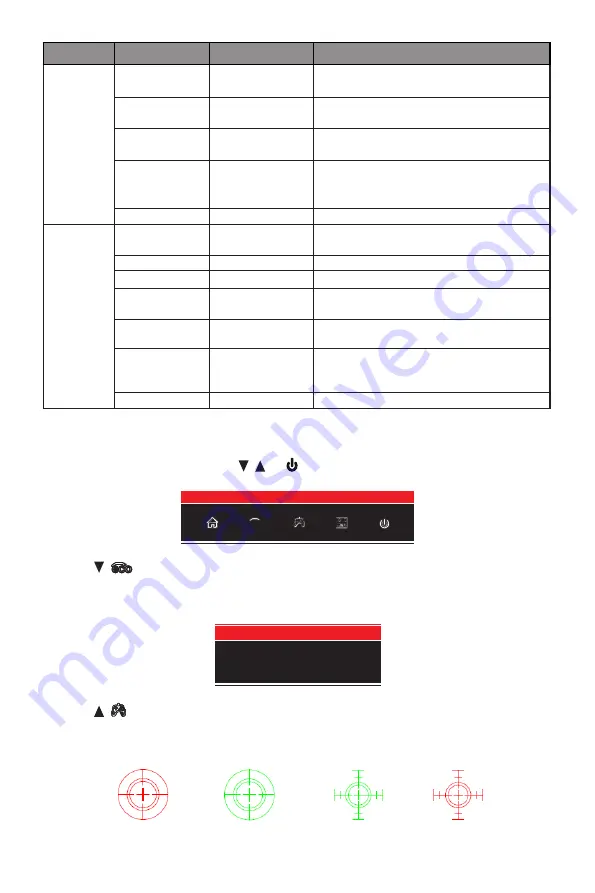
• 

Press any one of the buttons (

M

,  ,  , E,  ) to activate the navigation window.

eco

• 

Press   (

eco

) button to switch ECO modes. These modes include Standard, Text, Movie, 

Game, FPS, and RTS and can be used to optimize settings according to your activity. 

Standard mode is suitable for most activities.

Standard

• 

Press   (

) button to switch Gameplus modes. According to the needs of your game, 

choose the corresponding game icon. These game icons are primarily designed to 

optimize your aim during shooting games, though they can be used for other scenarios.

Содержание GN32DA

Страница 1: ...er to continue serving our customers and providing the best products our product information including our user manuals may receive updates from time to time Please check our website for the latest us...

Страница 2: ...nnectivity 9 6 4 HDMI Connectivity 9 6 5 DVI Connectivity 9 Section 7 Basic Operation 10 Section 8 Indicator Light 10 Section 9 OSD 11 9 1 OSD Menu Functions 12 Section 10 ECO Modes and Gameplus Switc...

Страница 3: ...cause damage to your monitor 5 Do not spray cleaner and or any kind of liquid directly onto the monitor s screen or any part of the monitor 6 Do not insert anything into ventilation openings 7 Always...

Страница 4: ...1 Stand Base x 1 Cable Clip x 1 Power Cable x 1 AC 100 240V 50 60Hz NO 2 Screws x 2 NO 3 Screws x 4 for Wall Mounting NO 1 Screw x 1 DP Cable x 1 Screwdriver x 1 User Manual x 1 Note The NO 3 Screws...

Страница 5: ...mputer s DVI output and connect the other end to the monitor s DVI port 8 9 10 11 1 3 4 5 6 7 2 1 Power Connector Insert the power cable to supply power to the monitor 2 M Menu Button Press to display...

Страница 6: ...Stand Stem NO 1 Screw x 1 Stand Base Stand Stem Cable Clip 3 Press the button to remove the stand plate and use two NO 2 screws to install the it onto the stand stem Stand Plate NO 2 Screws x 2 Butto...

Страница 7: ...in the back of the monitor 1 3 Follow the directions received with your mount stand or accessory and install the monitor on the wall or fixture as desired Remember to use the included NO 3 screws when...

Страница 8: ...in your headphones or any 3 5mm compatible external audio device to receive audio signals from your monitor If your headphones are connected to the monitor while audio devices are connected to your c...

Страница 9: ...cluded 6 4 HDMI Connectivity In order for the monitor to receive HDMI signals from the computer use an HDMI cable to connect the monitor to the computer HDMI OUTPUT PC HDMI Cable not included 6 5 DVI...

Страница 10: ...onitor and press it to turn the monitor on AMD FreeSync This feature itself is off by default In order to use this feature please note you must have hardware with FreeSync capability a DP cable and th...

Страница 11: ...Press M button to enter the OSD screen DP Resolution 2560x1440 144Hz Input Source Brightness Contrast Color Setting Picture Quality Setting Display Multi Window Audio Other DVI HDMI DP Window 1 Input...

Страница 12: ...t hue and saturation levels Picture Quality Setting Bypass On Off Turn the bypass function on off Sharpness 0 100 Adjust display sharpness Response Time Off High Middle Low Adjust response time Noise...

Страница 13: ...OSD s overall transparency OSD Time Out 5 100 Set how long the OSD remains open after non use OSD Rotation Normal 90 180 270 When the user ips the display this function can also flip the OSD to achie...

Страница 14: ...e a bad signal Try connecting to another video source for comparison The screen appears to be scrolling rolling or moving unusually Check that your source frequency is within 55 76Hz Reconnect and ens...

Страница 15: ...ture in Picture Additional Input Source Interchange Window Picture Mode DP HDMI DVI Mode 1 DP X Mode 2 HDMI X Mode 3 DVI X means this feature is supported while X means it is not supported 11 3 PBP Pi...

Страница 16: ...32 F to 95 F Storage 4 F to 140 F 10 90 RH non condensation VESA Mounting 75 x 75 mm Dimension with stand 28 3 x 22 4 x 9 8 in Net Weight with stand 17 7Ibs 8 05kg 12 2 Resolution Compatibility for DV...

Страница 17: ...mes WP s property This warranty only covers technical hardware defectiveness during the warranty period and under normal use conditions WP does not warrant uninterrupted or error free operation of thi...

Страница 18: ...articular installation If this equipment does cause harmful interference to radio or television reception which can be determined by turning the equipment off and on the user is encouraged to try to c...

Страница 19: ......

Страница 20: ...COPYRIGHT 2019 VIOTEK ALL RIGHTS RESERVED...

Отзывы: