29
www.vintageair.com
900194 REV B 09/16/19, PG 29 OF 42
Driver Side Underdash
Louver Installation
1.
2.
3.
4.
5.
6.
7.
8.
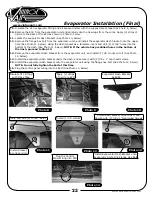
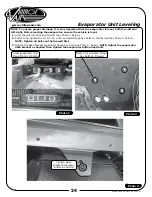
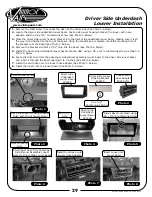
Remove the OEM screw from under the dash on the driver side (See Photo 1, below).
Locate the driver side underdash louver bezel, driver side louver housing bracket, the louver with hose
adapter, and the #8 x 3/4” countersunk screw (See Photo 2, below).
Place the driver side louver housing bracket into the driver side underdash louver bezel, making sure it is all
the way in and flushed to the top of the bezel. Using the bracket as a template, mark the mounting hole of
the bracket onto the bezel (See Photo 3, below).
Remove the bracket and drill a 7/32” hole into the bezel (See Photo 4, below).
Install the driver side underdash louver bezel onto the dash using a #8 x 3/4” countersunk screw as shown in
Photo 5, below.
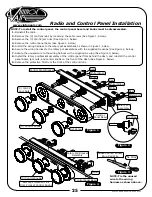
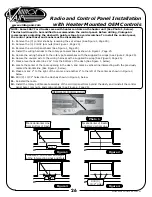
Route the duct hose from the passenger side plenum assembly louver bezel to the driver side louver bezel,
and insert it through the bezel opening 2 to 3 inches (See Photo 6, below).
Install the duct hose onto the louver hose adapter (See Photo 7, below).
Insert the louver into the louver bezel (See Photo 8, below).
Photo 3
Photo 4
Install Bezel onto Dash Using
#8 x 3/4” Countersunk Screw
Photo 2
Driver Side
Underdash
Louver Bezel
491658
Driver Side Louver
Housing Bracket
646975
#8 x 3/4”
Countersunk Screw
Photo 1
Remove OEM Screw
Route Duct Hose from Passenger
Side Plenum Assembly Louver
Bezel to Driver Side Louver Bezel
Photo 5
Photo 6
Install Duct Hose onto
Louver Hose Adapter
Photo 7
Insert Louver into
Louver Bezel
Louver with
Hose Adapter
49052-VUL
Photo 8
Place the Louver Housing Bracket
Flush with Top of Louver Bezel
Mark Mounting
Hole
Drill 7/32”
Hole
Driver Side
Underdash
Louver Bezel
491658


