background image

2

Vincent

Sehr geehrter Kunde,

wir danken Ihnen für das Vertrauen, welches Sie uns durch die Entscheidung für dieses hochwertige Audio-
Produkt, das Ihrem hohen Anspruch an Klang- und Verarbeitungsqualität gerecht wird, entgegenbringen.
Auch wenn Sie verständlicherweise sofort beginnen wollen, das Gerät zu verwenden, lesen Sie bitte vor
dem Aufstellen und Anschließen dieses Handbuch sorgfältig durch. Es wird Ihnen bei der Bedienung und
der optimalen Nutzung des Gerätes in Ihrem System helfen, selbst wenn dieses durch Ihren Fachhändler
installiert wurde.
Bitte beachten Sie vor allem die Sicherheitshinweise, auch wenn einige davon offensichtlich erscheinen mögen.
Um Ihnen verwendete Fachbegriffe zu erläutern, ist ein kleines Lexikon im Anhang enthalten. Bei eventuel-
len Fragen steht Ihnen Ihr Fachhändler gern zur Verfügung, er ist auch Ihr Ansprechpartner im Fall der
Garantie-Inanspruchnahme oder für Reparaturen nach dem Gewährleistungszeitraum. Er ist in jedem Fall
interessiert daran, dass Sie ihm Ihre Erfahrungen mit Vincent-Produkten mitteilen. 
Viel Freude mit unserem / Ihrem Produkt wünscht Ihnen 

Ihr Vincent-Team

Dear Customer,

we thank you for the confidence you prove in purchasing our product. It will match your high demands
towards sound and manufacturing quality. Though it is understandable that you want to plug and play
this product instantaneously, we encourage you to read this manual carefully before installation.
It will help you in handling and operating this machine in your system and obtaining the best possible
performance, even if it was installed by your dealer.
Please follow the security precautions, though some of those things may seem obvious.
In the appendix to this manual you will find a glossary explaining some established technical terms.
If there are open questions your audio specialist dealer will help you. He also represents your contact
person in case of needed warranty service or repairs after the warranty period and is interested to hear
from your experiences with Vincent products.
We wish you plenty of joy with your / our product,

your Vincent-Team

Содержание SV-800

Страница 1: ...Vincent SV 800 Class A Stereo Vollverst rker Integrated Class A Stereo Amplifier Bedienungsanleitung deutsch Instructions for use english...

Страница 2: ...m Er ist in jedem Fall interessiert daran dass Sie ihm Ihre Erfahrungen mit Vincent Produkten mitteilen Viel Freude mit unserem Ihrem Produkt w nscht Ihnen Ihr Vincent Team Dear Customer we thank you...

Страница 3: ...tion 11 Bedienung des Ger tes 17 Weitere Tipps 18 Fehlersuche 19 Technische Daten 20 Lexikon Wissenswertes 21 Safety guidelines 22 Other instructions 23 Included in delivery 24 Description of the appl...

Страница 4: ...das Netzkabel nicht mit nassen oder feuchten H nden an Verwenden Sie das im Lieferumfang enthaltene oder andere Netzkabel von Vincent Ausschalten Schalten Sie das Ger t jedes Mal aus bevor Sie andere...

Страница 5: ...g ltigen EU Richt linien zur Erlangung des CE Zeichens und ent spricht damit den Anforderungen an elektrische und elektronische Ger te EMV Richtlinien Sicherheitsrichtlinien und den Richtlinien f r Ni...

Страница 6: ...haltung den oft harten Transistor Klang eliminiert Auch die Haptik des Verst rkers zeigt hier hat die Premium Line von Vincent einen w rdigen Vollverst rker erhalten welcher nahtlos an die Erfolge der...

Страница 7: ...Schaltet das Ger t ein und aus Im ausgeschalte ten Zustand ist das Ger t vom Stromnetz getrennt sofern Power Control Output 8 nicht verwendet wird Ansonsten Ger te die an Power Control Output 8 anges...

Страница 8: ...Sie hier wenn gew nscht z B ein Aufnahmeger t an Das Stereo Signal dieses Ausgangs ist mit dem Ausgangssignal der momentan gew hlten Quelle an einem der Input Anschl sse identisch und unabh ngig von...

Страница 9: ...orrek ten Polarit t eingelegt werden wie dies im Innern des Batteriegeh uses angezeigt ist Verwenden Sie neue und verbrauchte Batterien nicht gemeinsam um die Batterielebensdauer voll auszusch pfen Ac...

Страница 10: ...schaltung Diese taste schaltet die Lautsprecher sowie die Ausgangssignale von Aufnahmeausgang REC OUT 10 ab 14 Eingangswahltasten S1 S6 W hlen Sie hiermit die Musikquelle die Sie h ren m chten 15 VOLU...

Страница 11: ...oder des Verst rkers Sorgen Sie daf r dass blanke Lautsprecherdr hte sich niemals gegenseitig oder das Metall der Ge h user ckwand ber hren k nnen Achten Sie auf korrekten Anschluss der positiven und...

Страница 12: ...leing nge installiert wird Einige Plattenspieler Modelle enthalten bereits diese Vorstufe und k nnen direkt angeschlossen werden Weitere Informationen erhalten Sie in der Bedienungsanleitung dieses Ge...

Страница 13: ...s jedes Ein bzw Ausschalten eines Ger tes des Systems blicherweise des Verst rkers automatisch das Ein Ausschalten aller daran angeschlossenen Ger te die diese Funktion unterst tzen bewirkt Beachten S...

Страница 14: ...precherpaares Soll ein zweites Lautsprecherpaar ange schlossen werden so werden auf hnliche Weise die Klemmen der unteren Anschlussreihe mit den zus tz lichen Lautsprechern verbunden Dies ist jedoch n...

Страница 15: ...indet in den nun aufgetrennten Weichen der Lautsprecher statt F r jeden Lautsprecher wird ein Kabel mit dem f r die h heren das andere mit dem f r die niedrigeren Frequenzen vorgesehenen Lautsprechera...

Страница 16: ...die Netzbuchse an der Ger ter ckwand Verbinden Sie das andere Ende des Netzkabels mit einer Netzsteckdose Alle verwendeten Lautsprecher m ssen eine Nennimpedanz von mindestens 8 aufweisen wenn zwei P...

Страница 17: ...st Vor dem Umschalten des Eingangskanals sollte vorsichtshalber die Lautst rke reduziert werden Lautst rke des Systems ver ndern VOLUME p q 5 15 Am Ger t Drehen Sie den Drehknopf VOLUME im Uhrzeigersi...

Страница 18: ...verst rkern hervor gerufen sofern eine Audioverbindung zum Verst rker besteht Eine weitere m gliche Quelle f r Brummst rungen stellt die elektromagnetische Einstrahlung des Netzteiles anderer Ger te z...

Страница 19: ...verbunden Falscher Eingangskanal am Verst rker gew hlt Lautst rke VOLUME zu niedrig eingestellt Der Verst rker ist stummgeschaltet Mute Funktion Die Lautsprecherkabel sind nicht richtig mit den Ansch...

Страница 20: ...fen und ersetzen Sie ggf die Batterien Versuchen Sie die Fernbedienung nur bei frei er Sicht auf die Ger tefront innerhalb von 7m Entfernung und m glichst frontal auf das Ger t zu richten Schalten Si...

Страница 21: ...SWERTES Pegel Eine Art der Darstellung jeder physikalischen Gr e und ein gebr uchliches Ma f r Signal spannungen und Lautst rke Wird in Dezibel dB angegeben Als Spannungen auf Line Pegel werden Signal...

Страница 22: ...uch the power lead with wet or damp hands Use the power cable supplied or another one from Vincent Switching Off Switch the appliance off every time before you con nect or remove other components or l...

Страница 23: ...product of Sintron Vertriebs GmbH 76473 Iffezheim and may not be copied or distributed partly or in full without express written consent Vincent is a registered trademark of Sintron Vertriebs GmbH 764...

Страница 24: ...r of the transistor The power is thereby realized by Toshiba tran sistors They work without negative feedback a Class A amplifier whose circuit eliminate the harshsound of the transistors Also the hap...

Страница 25: ...is separated from the mains voltage in case it is not connected to Power Control Output 8 Otherwise please every device which is connected to Power Control Output 8 switch off 5 VOLUME Volume dial Th...

Страница 26: ...ine level audio output 10 REC OUT recording output If desired you can connect a recording device like a CD recorder or a tape recorder to this out put The stereo signal of this output is identical to...

Страница 27: ...ote control at an angle to the appliance as beyond an angle of 30 to the centre axis the appliance may not respond as well to the remote control Change both batteries if the distance at which the remo...

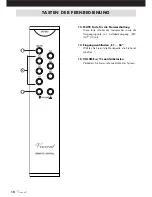
Страница 28: ...eakers and the recording output 10 Pressing it again returns to the original volume 14 Input selector buttons Select the input source you want to listen to with these buttons 15 VOLUME und VOLUME Thes...

Страница 29: ...tact with each other or with the metal on the back of the housing Make sure that the positive and negative loudspea ker wires are connected correctly You will notice a reduced sound quality if the con...

Страница 30: ...record player and one of the high level inputs Some models of record player already include this preamplifier and can be connected directly You will find further information in this appliance s operat...

Страница 31: ...ifier automatically brings about the switching on or off of all the connected devices which support this function Please keep in mind that all devices which respond to the power con trol are not disco...

Страница 32: ...the connector screws of the lower row must be connected in a similar fashion to the additional speakers input connectors However this is only permitted if both loudspeakers have a nomi nal impedance...

Страница 33: ...ire frequency range occurs in the now separated loudspeaker crossover networks One cable is to be connected to the loudspeaker s sockets provided for the higher frequencies treble and the other with t...

Страница 34: ...2 Connect the other end of the mains cable to a mains socket If you intend to connect two pairs of speakers all loudspeakers must have a nominal impedance of at least 8 If only one pair of speakers is...

Страница 35: ...iance Before switching over the input channel the volume 5 15 should be turned down as a precaution Change the volume VOLUME p q 5 15 At the front panel Turn the knob VOLUME clockwise to turn up the v...

Страница 36: ...s record players or headpho ne amplifiers that are connected to the audio inputs of the amplifier Another possible reason for humming noise is electromagnetic interference of other components power su...

Страница 37: ...erminal of the amplifier Wrong input channel has been selected at the amplifier Volume is set too low The amplifier is muted MUTE Function The speaker cables are not properly connec ted to the amplifi...

Страница 38: ...tors are dirty or a cable is defective A record player has been connected to a line level input without using a phono preampli fier Check the cables and cable connections Interconnect a phono preampli...

Страница 39: ...d to as line level inputs or high level inputs Those signal inputs must not be confused with inputs that accept preamplified signals RCA RCA is the American name for coaxial RCA con nectors and socket...

Страница 40: ...store it together with this manual The receipt is your proof for the beginning of the warranty period Note the serial number in the following box you can read it from the rear side of the device Garde...

Отзывы: