background image

SIVOIA QED

TM

Roller 64 Dual Mount 

Installation Instructions

4

1

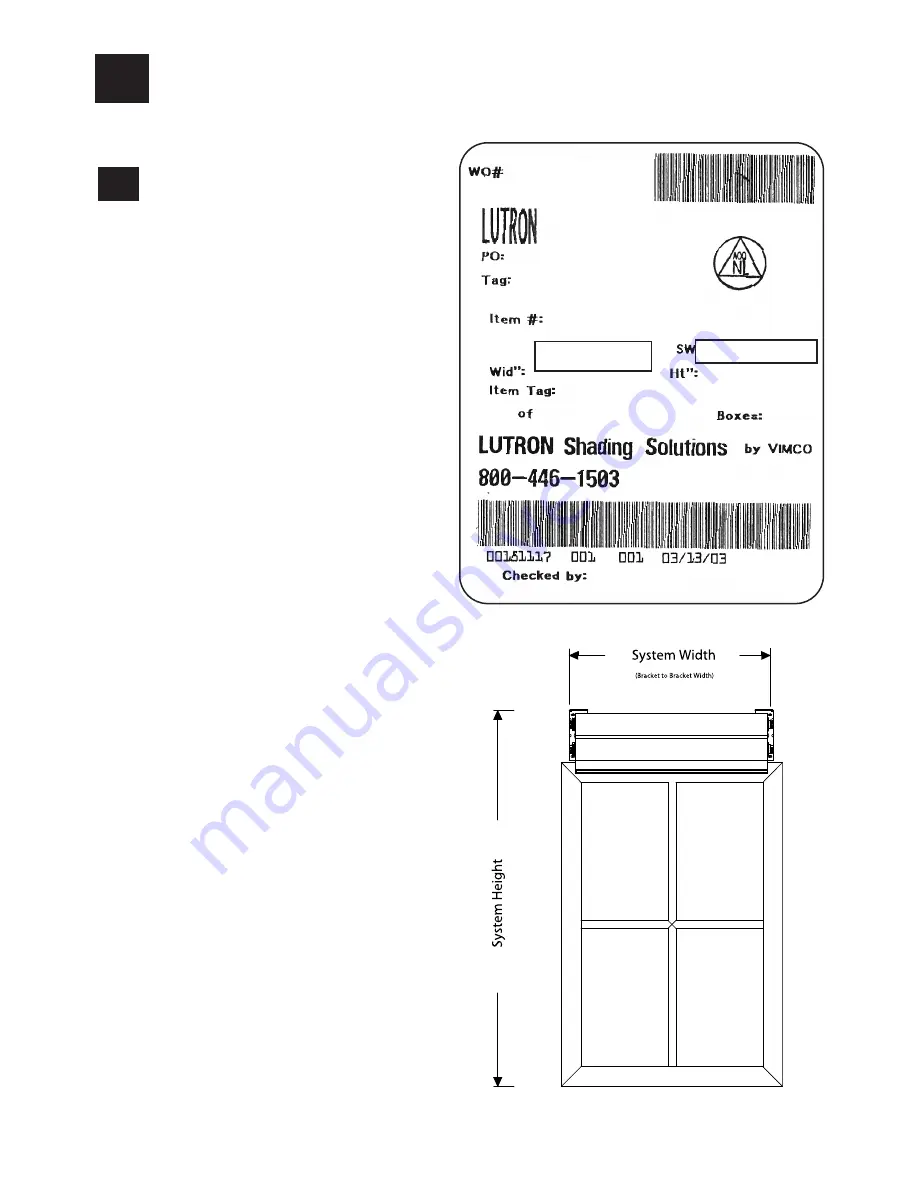
Confirm System Dimensions  

1.1

1

System Width

System Height

Compare system dimensions on
the package label with the window
dimensions to verify appropriate
window/shade combination.  

1.1

Package Label

Содержание Lutron Roller 64 Dual Mount

Страница 1: ...Sivoia QED Roller 64 Dual Mount Installation Instructions ...

Страница 2: ..._______________________________________________ _________________________________________________ _________________________________________________ _________________________________________________ _________________________________________________ _________________________________________________ _________________________________________________ _________________________________________________ SI...

Страница 3: ...voia QED Roller 64 Left and Right Dual Brackets 10 Mounting Screws 8x1 3 4 8x44mm Hex Head Screws 2 7 Pin Terminal Block Actual Size 1 Programming Stylus 1 Screwdriver 4 4 102mm Cable Ties Notes 1 Complete wiring and programming information can be found in the Sivoia QED Wire and Programming Guide P N 045 038 or at www lutron com 2 The Electronic Drive Unit EDU will need to be powered to complete ...

Страница 4: ...ectrician according to national wiring rules Before shade installation remove any unnecessary cords and disable any equipment not needed for powered operation The Sivoia QED Roller 64 has a maximum rated operating time of 8 min The Sivoia QED Roller 64 must be used only with window systems approved by Lutron and should not be taken appart from the window system Codes Install in accordance with all...

Страница 5: ...unt Installation Instructions 4 1 Confirm System Dimensions 1 1 1 System Width System Height Compare system dimensions on the package label with the window dimensions to verify appropriate window shade combination 1 1 Package Label ...

Страница 6: ...of the mounting brackets so they are centered over the window Note Bracket to Bracket Distance Fabric Width 1 5 38mm System Width Note For a ceiling and jamb mount allow clearance to prevent fabric from rubbing against trim window top treatment etc Note Wall mount may require blocks not provided to clear trim 2 1 ...

Страница 7: ...for cable access Note Cables may exit through any of the large holes in the dual brackets on the EDU side of the shades Note Leave 12 18 30 45 cm cable exposed for each of the two shades 3 1 DANGER Locate and lock breaker to the shade power supply in the OFF position or unplug the power plug in transformer before doing any wiring ...

Страница 8: ...mount is closest to the glass 4 1 Install the second mounting bracket as shown in the figure below Note Each bracket should use four mounting screws in either the ceiling holes or the wall holes Note The brackets should be mounted to support at least 300 lbs 136 kg The fasteners provided may not be appropriate for use in all applications 4 2 Upper and Lower shade positions ...

Страница 9: ...Mount Installation Instructions 8 5 Wire 7 Pin Terminal Block Strip 2 50mm of jacket off the cables that run from the wall 5 1 Wire 7 Pin terminal blocks provided to cables using the included screwdriver Note SVQ CBL 250 shown 5 2 ...

Страница 10: ...d Wiring Wire Slot Buttons For the following bracket and button orientations route the wires as shown 6 1 Note The buttons should be accessible when the shade is installed Note Make sure the wires are not pitched or damaged Note The wires may go in either or both of the indicated slots ...

Страница 11: ... Installation Instructions 10 7 Mount the Shade Install the idler side of the shade onto its bracket 7 1 Depress the spring loaded idler by pressing the shade towards the idler and install the EDU side of the shade onto its bracket 7 2 ...

Страница 12: ... the shade is level and centered by shimming the bracket Note You do not need to level the second shade 8 1 Adjust shade by removing the necessary screws and moving the brackets as needed Note You may have to remove the shade to access the bracket screws 8 2 Reinstall and tighten the screws 8 3 ...

Страница 13: ...tion Instructions 12 9 Connect Terminal Blocks Plug 7 pin terminal block on cable into EDU terminal block a cable tie can be used to secure the terminal blocks together 9 1 Dress wires to ensure fabric does not rub while the shade is moving 9 2 ...

Страница 14: ...ceiver Connection if applicable Plug in the IR receiver Position the IR receiver Note The IR receiver can not be covered from view of the remote control or interfere with the shade Note Dress wires to ensure the fabric does not rub while the shade is moving 10 10 1 10 2 ...

Страница 15: ...SIVOIA QEDTM Roller 64 Dual Mount Installation Instructions 14 11 Secure and Check the Shade Tighten retaining screws in each bracket to secure the shade 11 1 ...

Страница 16: ... side or the other Tip Slight telescoping is normal However if the shade is telescoping severely to one side and it is level press the Close Limit Button and lower the shade all the way down using the adjustment buttons Place a piece of tape on the side of the tube that the fabric is telescoping away from when finished press the Close Limit Button once This technique is referred to as SHIMMING The...

Страница 17: ...imit using the adjustment buttons Note Setting the Open Limit lower than the Close Limit will cause the shade to move down when raise is pressed and up when lower is pressed Setting the Open Limit from the EDU 12 Setting Limits from the EDU Tap the Open Limit Button the green LED on the roller shade EDU will turn on steady indicating that the EDU is in Set Open Limit Mode 12 1 12 2 12 3 SIVOIA QED...

Страница 18: ...utton for 5 seconds The green LED on the roller shade EDU will flash for 2 seconds then go dark indicating that the current position has been stored as the Close Limit Tap the Close Limit Button The green LED on the roller Shade EDU will turn on steady indicating that the EDU is in Set Close Limit Mode Adjust the position of the EDU to the desired Close Limit using the adjustment buttons ...

Страница 19: ...SIVOIA QEDTM Roller 64 Dual Mount Installation Instructions 18 13 Install the Second Shade Install the lower shade by repeating steps 6 12 13 1 ...

Страница 20: ...ontact closure interface in the system a unique address number or name allowing proper communication between components 2 Verify wiring of each EDU keypad and interface using the LED feedback from each system component during addressing 3 Assign shades EDUs to keypads IR hand controls and or contact closure interfaces Tell the system which shades EDUs respond to which keypads IR hand controls and ...

Страница 21: ...t fabric is tracking correctly on the shade tube Fabric not centered over window Check that brackets are centered Shade does not move smoothly Check for binding of shade fabric on side channels Check fabric tracking IR controls will not operate shade IR transmitter does not have line of sight to IR receiver Out of range move to within 40 feet 12m of IR receiver EDUs not assigned to IR receiver IR ...

Страница 22: ...______________________________________________ _________________________________________________ _________________________________________________ _________________________________________________ _________________________________________________ _________________________________________________ _________________________________________________ _________________________________________________ SIV...

Страница 23: ...______________________________________________ _________________________________________________ _________________________________________________ _________________________________________________ _________________________________________________ _________________________________________________ _________________________________________________ _________________________________________________ SIV...

Страница 24: ...tronics Co Inc 7200 Suter Road Coopersburg PA 18036 United States Tel 1 610 282 3800 Fax 1 610 282 1243 EUROPEAN HEADQUARTERS Lutron EA Ltd 6 Sovereign Close London E1W 3JF United Kingdom Tel 44 0 20 7702 0657 Fax 44 0 20 7480 6899 CUSTOMER SERVICE ORDERING UK 44 0 20 7702 0657 09 00 18 00 GMT USA 1 800 446 1503 08 00 20 00 EST CUSTOMER SERVICE E MAIL shadinginfo lutron com TECHNICAL SUPPORT SERVI...

Отзывы: