background image

15

TAB: 40507

EN

If the entry panel is equipped with a camera, both the video and the audio channels will be activated on the 

monitor. If not, only the audio channel will be activated. 

On the Master panel, assign the ID to the monitor by pressing the button to be associated or, in the case of 

alphanumeric panel, enter the address (ID) you wish to use and then press the confirm button to complete the 

configuration.

N.B.: You have 20 seconds to complete this operation.

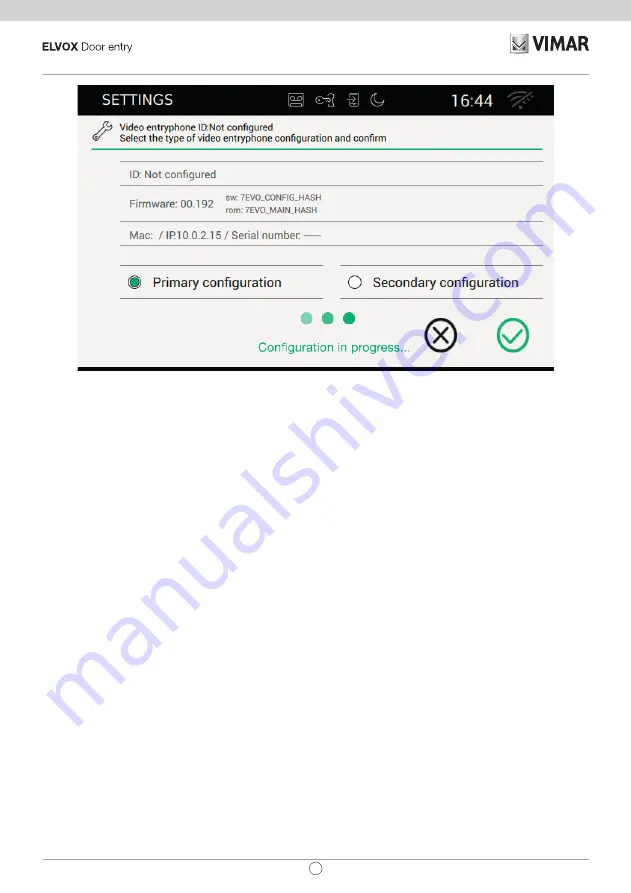
If a problem occurs during configuration and the procedure is interrupted, the installer will be notified by a 

message similar to that in the figure below.

Содержание ELVOX TAB 40507

Страница 1: ...User Manual TAB 40507 TAB 7S Due Fili Plus WiFi handsfree video entryphone ...

Страница 2: ...2 TAB 40507 EN ...

Страница 3: ...ra 19 Operation of the LEDs 20 Receiving an intercom call 21 Operation of the LEDs 21 Receiving an intercom call without camera image 25 Operation of the LEDs 25 Call from a switchboard 26 Organization of the Home page 27 Top bar section 27 Applications section 28 Quick Commands 28 Voicemail 29 Automatic door opening Professional Studio 30 Forwarding a call from the video entryphone 30 Do Not Dist...

Страница 4: ...5 Customizing the registry 45 Starting video connection 45 Connection problems 46 Add to favourites 46 Camera startup in progess 46 Operation of the LEDs 47 Actuators 49 Commanding actuators 49 Add to favourites 49 Note 50 Operation of the alarm button 51 Settings 55 General 56 Language 57 Commands 57 Date 58 Commands 58 Time 59 Commands 59 Date and Time format 60 Commands 60 Cleaning the device 6...

Страница 5: ... favourites list 67 Commands 67 Screen brightness and timeout 69 Changing the brightness of the screen 69 Setting the timeout 69 Commands 69 LED brightness 70 Key light level 70 LED operation with display off 70 Commands 70 Audio 71 Entry Panel call ringtone 72 Commands 72 Intercom call ringtone 73 Commands 73 Landing call ringtone 74 Commands 74 Key tone 75 Commands 75 Volume 76 Commands 76 Call ...

Страница 6: ...g the daily schedule 84 Commands 84 Advanced settings 85 Commands 86 End Call on Opening 87 Commands 87 WiFi Mobile Devices 88 Operating mode 89 Commands 89 WiFi settings in ON operating mode 89 Commands 90 Network selection 90 Commands 91 WiFi security in ON operating mode 91 Commands 91 WiFi settings in HOTSPOT operating mode 92 Commands 93 WiFi security in HOTSPOT operating mode 93 Password pro...

Страница 7: ...mmands 97 Problems with call forwarding 97 Advanced WiFi options 98 Commands 99 System 100 Change PIN 101 Commands 101 Updating firmware 102 Updating firmware from a computer via USB 102 Updating firmware from the internet 104 Device restart and reset 106 Commands 106 ...

Страница 8: ...ted Wi Fi for call forwarding to smartphone with dedicated app with 7 touch screen colour LCD display capacitive keypad for video entryphone functions and intercom calls video voicemail induction loop for hearing aids complete with bracket for fixing in round or rectangular mounting box ...

Страница 9: ...ssion power 100 mW 20dBm Main functions Receiving video calls from speech unit Speech unit self starting Speech unit lock opening Intercom audio calls Call transfer Activating system actuations stair light auxiliary functions Favourites menu for rapid access Programmable video voicemail Automatic lock opening programmable for weekly time bands Text message creation Multiple ringtones configurable ...

Страница 10: ...TKIP and AES ciphers are supported for WPA and WPA2 networks o WPS function for WPA WPA2 networks AP Access Point Hotspot o WPA2 PSK AES network Vimar is not responsible for the selection of technical equipment for accessing the Internet that the Customer needs to use the service and which is based on an agreement that the Customer has signed with an Internet Service Provider ISP such agreement ma...

Страница 11: ...er connecting the device to the 2 wire system the installer must proceed with the configuration operation in order to assign the 7 EVO a unique ID within the system Press the button located on the left of the Top Bar in the Home page ...

Страница 12: ...12 TAB 40507 EN Step 1 Access System settings ...

Страница 13: ...ystem The configuration procedure starts by choosing whether the device is to be installed as a primary or secondary device this choice depends on the characteristics of the system The information displayed on the screen is as follows ID unique number identifying the device Prior to configuration the screen shows Not configured ...

Страница 14: ...PIN entered matches that set The default PIN vlaue is 0000 to change the PIN see the chapter Changing the PIN To assist the installer during the configuration operation and to enable communication with anyone at the entry panel audio and video are activated on the 7 EVO display Commands starts configuration On completion of the procedure returns you to the settings screen quits without saving the ...

Страница 15: ...n the ID to the monitor by pressing the button to be associated or in the case of alphanumeric panel enter the address ID you wish to use and then press the confirm button to complete the configuration N B You have 20 seconds to complete this operation If a problem occurs during configuration and the procedure is interrupted the installer will be notified by a message similar to that in the figure...

Страница 16: ...nformation On completion of the procedure the installer may proceed with customization of the parameters of the device alternatively the default settings may be maintained and the device may be used for call functions For details regarding call functions and all configuration parameters refer to the later chapters in this manual ...

Страница 17: ...fore answering by pressing the button printed on the monitor casing printed on the monitor casing opens the door Pressing this button when there is no call in progress opens the lock of the last door to be opened Operation of the LEDs The physical buttons printed on the monitor casing are equipped with LEDs for backlighting The LED of the lock button flashes when at least one door in the system is...

Страница 18: ...and contrast slide controls Brightness and contrast slide controls The brightness contrast and volume controls described above have immediate effect and also apply during subsequent calls calls up the favourites list The commands are presented in a scrolling menu When the menu is displayed the user can command any action included in the favourites list Activating the favourites function displays a...

Страница 19: ...ate favourite commands Deactivate favourite commands Receiving a call from an audio entry panel without camera On receipt of a call from an entry panel without a camera the screens display an animation depicting the following image accepts the call and starts communication Pressing the button printed on the monitor casing has the same effect ends or rejects the call You can also reject the call be...

Страница 20: ...ry panel or internal unit from which the call was made is displayed at the top left corner of the screen along with the date time of the call microphone enabled icon Pressing this button disables audio transmission to the entry panel and disables the microphone The icon changes to microphone disabled icon Pressing this button enables audio transmission to the entry panel and enables the microphone...

Страница 21: ...r Pressing this button when there is no call in progress opens the lock of the last door to be opened Operation of the LEDs The physical buttons printed on the monitor casing are equipped with LEDs for backlighting The LED of the lock button flashes when at least one door in the system is open The same notification is presented on the right hand side of the touch screen display and on the top bar ...

Страница 22: ...ast slide controls The brightness contrast and volume controls described above have immediate effect and also apply during subsequent calls calls up the favourites list The commands are presented in a scrolling menu When the menu is displayed the user can command any action included in the favourites list Activating the favourites function displays a list of all the commands designated by the user...

Страница 23: ...all from an entry panel without a camera the screens display an animation depicting the following image accepts the call and starts communication Pressing the button printed on the monitor casing has the same effect ends or rejects the call You can also reject the call before answering by pressing the button printed on the monitor casing printed on the monitor casing opens the door Pressing this b...

Страница 24: ... the entry panel and disables the microphone The icon changes to microphone disabled icon Pressing this button enables audio transmission to the entry panel and enables the microphone The icon changes to When a call is in progress other commands appear on the right of the touch screen display volume control for incoming calls Pressing the button activates the volume slide control Volume slide cont...

Страница 25: ...board You can contact and receive calls from any porter switchboards present in the residential complex The device allows you to call a switchboard in order to coordinate the start of an intercom connection with another unit or it can be called by a switchboard interceding in a call from an entry panel ...

Страница 26: ... The icons shown on the right of the top bar serve to inform the user of the operating status of the most critical services of the device if present in the top bar the video voicemail is activated if present in the top bar the device is operating in professional studio mode i e the door opens automatically for all calls made within the time periods defined by the user if present in the top bar the...

Страница 27: ...mail intercom calls connection to entry panels connection to CCTV surveillance cameras actuator activation notes management The current date and time are displayed in the lower part of the Home page The buttons used to call up favourites are on the right of the Home page Favourites are managed by selecting or deselecting the symbol in the applicable applications entry panels intercoms CCTV actuato...

Страница 28: ...splay mode If you want to close the menu sooner simply press the close tab Voicemail This function answers the call after the preset time period by first playing a welcome message after which it prepares to record a message left by the caller The voicemail function is only available on the master unit On secondary units however the function can never be made operative even when activated by the us...

Страница 29: ...he time given to the user to answer the call On intercom calls the value is fixed at 30 seconds while on the entry panel the user can set any value between 1 and 255 seconds You can set a voicemail time delay i e the time allowed the user before the recording starts to play The two times should be coordinated to ensure that the call does not end before the voicemail function intervenes For this re...

Страница 30: ...e time period during which the door lock can be opened automatically Settings Call options Professional Studio Forwarding a call from a video entryphone This function allows you forward a call to associated mobile devices see the section Association of mobile devices further on in this manual To activate this function simply press the relative button When the function is activated the button will ...

Страница 31: ...ated at least one mobile device with the entryph one Settings Mobile WiFi Devices Associate new mobile device Do Not Disturb function DND Activating this function puts the device in DND mode for all calls originating from entry panels or external units To activate this function simply press the relative button When the function is activated the button will be highlighted and the icon will appear i...

Страница 32: ...ton will return to its original form and the icon will disappear from the top bar Do Not Ring function Activating this function puts the device in Do Not Ring mode for all calls originating from entry panels or internal units To activate this function simply press the relative button When the function is activated the button will be highlighted and the icon will appear in the top bar as shown in t...

Страница 33: ...n is activated it is not possible for the user to activate the Do Not Disturb function To deactivate this function simply press the Do Not Ring command again The button will return to its original form and the icon will disappear from the top bar ...

Страница 34: ... the commands on the page requires selection of the Display favourites option from the specific page Settings Display Display favourites further on in this manual When the Display favourites option is enabled a list of all the commands is presented on the right hand side of the touch screen display see example below If the user chooses not to enable the Display favourites option the favourites can...

Страница 35: ...35 TAB 40507 EN ...

Страница 36: ...the call was made plus the date and time at which the recording started If there any new messages that have not yet been listened to the icon on the Home page changes colour to alert the user How to listen to a video message Select the video message highlighted by a green bar A preview of the recording is displayed in the box on the right of the screen Starts playback of the recording in full scre...

Страница 37: ... volume controls described above only have effect during calls The levels are not saved in the settings of the 7 EVO video entryphone To listen to an audio only message i e without a video image the procedure is the same as that described above We recommend to keep only a short list of messages on the device no more than 10 and to delete excess messages To return to the Home page press the green b...

Страница 38: ...ude video Customizing the registry The name of each internal unit can be customized by accessing the call options page from Settings Call Customization Making a call To make a call proceed as follows Select the desired internal unit it will be highlighted by a green bar Press the start call button While waiting for the user to open the connection and accept the call the circle around the icon chan...

Страница 39: ... is in progress the video entryphone will interrupt the connection and prepare to answer the call To return to the Home page press the green bar located on the left of the screen which can be easily identified by the X Connection problems Connection can be prevented by one the problems listed below call aborted by the user called bus occupied by another call internal unit engaged Add to favourites...

Страница 40: ...e right hand side of the touch screen display and on the top bar same icon The LED of the talk listen button flashes when there is at least one voicemail message that has not been listened to During a connection the name associated with the entry panel or internal unit from which the call was made is displayed at the top left corner of the screen along with the date time of the call microphone ena...

Страница 41: ...ols described above have immediate effect and also apply during subsequent calls calls up the favourites list The commands are presented in a scrolling menu When the menu is displayed the user can command any action included in the favourites list Activating the favourites function displays a list of all the commands designated by the user as favourites closes the favourites list The commands are ...

Страница 42: ...nection to an entry panel proceed as follows Select the desired entry panel it will be highlighted by the green bar Press the start video button On connection to the entry panel the video entryphone switches to full screen display mode This operation can be completed successfully only if there are no other video entryphone calls in progress In fact a call from an entry panel will have top priority...

Страница 43: ...e a button available on the Home page to command the self start of a particular entry panel select the symbol at the bottom of the page When selected the symbol changes to Call in progress The following commands are available during a call ends or rejects the call You can also reject the call before answering by pressing the button printed on the monitor casing printed on the monitor casing opens ...

Страница 44: ...ernal unit from which the call was made is displayed at the top left corner of the screen along with the date time of the call microphone enabled icon Pressing this button disables audio transmission to the entry panel and disables the microphone The icon changes to microphone disabled icon Pressing this button enables audio transmission to the entry panel and enables the microphone The icon chang...

Страница 45: ... subsequent calls calls up the favourites list The commands are presented in a scrolling menu When the menu is displayed the user can command any action included in the favourites list Activating the favourites function displays a list of all the commands designated by the user as favourites closes the favourites list The commands are removed from the screen ...

Страница 46: ...eed as follows Select the desired camera it will be highlighted by the green bar Press the start video button On connection to the entry panel the video entryphone switches to full screen display mode The operation can only be completed successfully if there are no other video entryphone calls in progress as these always have priority over intercom calls camera startup calls to entry panels etc A ...

Страница 47: ...e to command the self start of a particular entry panel select the symbol at the bottom of the page When selected the symbol changes to Camera startup in progress The following commands are available while viewing a video image from a camera The following commands are available during a call ends or rejects the call You can also reject the call before answering by pressing the button printed on th...

Страница 48: ... During a connection the name associated with the entry panel or internal unit from which the call was made is displayed at the top left corner of the screen along with the date time of the call microphone enabled icon Pressing this button disables audio transmission to the entry panel and disables the microphone The icon changes to microphone disabled icon Pressing this button enables audio trans...

Страница 49: ...ed above have immediate effect and also apply during subsequent calls calls up the favourites list The commands are presented in a scrolling menu When the menu is displayed the user can command any action included in the favourites list Activating the favourites function displays a list of all the commands designated by the user as favourites closes the favourites list The commands are removed fro...

Страница 50: ...of OFF ON actuator in the system e g plant watering in the 2 wire system Command activation To activate the available commands proceed as follows Select the desired actuator Press the button the colour of the button changes from grey to green when the command is transmitted via the 2 wire bus Add to favourites If you want to have a button available on the Home page to activate the command select t...

Страница 51: ...AB 40507 EN Notes Gives access to the page containing the voice and or text notes recorded on the device allows you to add a note deletes the selected note If there are no notes the page appears as follows ...

Страница 52: ...ge and serves to send a message to the switchboard The system must include a switchboard that can respond to the call Pressing the button activates the call If the button is pressed accidentally the user can cancel the call by pressing the button a second time within three seconds ...

Страница 53: ...the three seconds have elapsed the switchboard sends a message to the device to confirm that the request has been received The device awaits a response from the switchboard operator When the switchboard operator confirms receipt of the request the Alarm button on the device monitor displays ...

Страница 54: ...If an error occurs during in the sending of the Alarm request the Alarm button on the monitor displays the message shown below If the switchboard does not respond to the request the Alarm button on the monitor displays the message shown below ...

Страница 55: ...55 TAB 40507 EN ...

Страница 56: ...at Display customization of the appearance with the desired background selection and arrangement of applications management of favourite commands Sounds ringtone settings and volumes Call options video voicemail settings management of automatic door opening Professional Studio dictionary customization WiFi Mobile Devices network configuration and association of mobile devices for call forwarding S...

Страница 57: ... opens a page which displays on the right a series of buttons from which you can access the general settings of the 7 EVO video entryphone These include name language etc Each button in the list presents 2 items of information the name of the parameter and the current setting ...

Страница 58: ...Español Ελληνικά Português To select a new language proceed as follows Select the desired language by pressing the corresponding option The colour of the circle changes to green to indicate that the corresponding language has been selected Commands to save the selection and return to the previous screen to quit without saving and return to the previous screen ...

Страница 59: ...e To change the date rotate the values in the three columns corresponding to the year moth and day Commands to save the selection and return to the previous screen to quit without saving and return to the previous screen ...

Страница 60: ...me To change the time rotate the values in the two columns corresponding to the hours and minutes Commands to save the selection and return to the previous screen to quit without saving and return to the previous screen ...

Страница 61: ...re displayed by the device Set the time format to either 12 h am pm or 24 h by pressing the corresponding button or Set the date format choosing between the options MM dd yyyy dd MM yyyy yyyy MM dd Commands to save the selection and return to the previous screen to quit without saving and return to the previous screen ...

Страница 62: ...ring any commands The operation requires confirmation Commands Ok to proceed Cancel to cancel the request The function gives you a 30 second window within which the device will not respond to any commands including those from the physical buttons on the monitor casing If a call is received during this period the cleaning function is interrupted to allow you to answer ...

Страница 63: ...63 TAB 40507 EN ...

Страница 64: ...Settings page displays a list of parameters on the right of the screen Each parameter in the list presents 2 items of information the name of the parameter and the current setting Below we describe specifically how to change each of the current settings ...

Страница 65: ... page contains a series of images and a range of solid colours Select the image or colour you wish to use as a background for the display The selected image or colour is highlighted with a green frame Commands to save the selection and return to the previous screen to quit without saving and return to the previous screen ...

Страница 66: ...into the desired square The selected destination square will turn green Release the function to confirm its position The function will obviously no longer be available for selection and will be shown with a grey background Removing a function from the Home page Select the function and drag it while holding it pressed lightly to any area of the right hand box along with the other functions availabl...

Страница 67: ...When the Alarm button is enabled the appearance of the Home page is as shown in the image below Commands to save the selection and return to the previous screen to quit without saving and return to the previous screen ...

Страница 68: ...es of the various categories Entry panels Intercoms Actuators CCTV Remember that you can use to deactivate a favourite You can obtain the same function by pressing the button on the Favourites page To arrange the items in the favourites list in your preferred order use the buttons to move the items to the desired positions Enabling display of the favourites list If the user enables this function t...

Страница 69: ...e page Favourites list not displayed on Home page If the list contains at least one item the Home page will display the command Commands to save the selection and return to the previous screen to quit without saving and return to the previous screen ...

Страница 70: ...g the slider to the left to increase it drag the slider to the right The brightness percentage value is shown on the right of the slide control Setting the timeout The timeout is adjusted using the horizontal slider control The adjustment range is from 10 to 60 seconds To reduce the screen timeout drag the slider to the left to increase it drag the slider to the right The number of seconds is show...

Страница 71: ...the light level at which the LEDs switch on If the function is disabled the LEDs are always off LED operation with display off The touch screen display goes to sleep and switches off after the preset timeout This option allows you to choose whether or not to switch on the key backlighting LEDs Commands to save the selection and return to the previous screen to quit without saving and return to the...

Страница 72: ...ttings page displays a list of parameters on the right of the screen Each parameter in the list presents 2 items of information the name of the parameter and the current setting Below we describe specifically how to change each of the current settings ...

Страница 73: ...call Ringtone function let s you choose the ringtone to use when a call is received from an entry panel Commands to listen to the selected ringtone to save the selection and return to the previous screen to quit without saving and return to the previous screen ...

Страница 74: ... Ringtone function let s you choose the ringtone to use when a call is received from an internal unit Commands to listen to the selected ringtone to save the selection and return to the previous screen to quit without saving and return to the previous screen ...

Страница 75: ...g call ringtone function let s you choose the ringtone to use when a landing call is received Commands to listen to the selected ringtone to save the selection and return to the previous screen to quit without saving and return to the previous screen ...

Страница 76: ...e device when a function is activated using the touch screen display You can also set the volume or enable disable the sound completely Commands to listen to the selected sound effect to save the selection and return to the previous screen to quit without saving and return to the previous screen ...

Страница 77: ...r the ringtones in all other cases voicemail message playback voice notes To set the desired levels move the corresponding sliders to find the optimum volume Press the Reset Default Volumes to reset all volumes to the factory settings Commands to save the selection and return to the previous screen to quit without saving and return to the previous screen ...

Страница 78: ... Settings page displays a list of parameters on the right of the screen Each parameter in the list presents 2 items of information the name of the parameter and the current setting Below we describe specifically how to change each of the current settings ...

Страница 79: ...e voice message a beep will signal the start of recording This sound can be customized If there is no customized message the voicemail function will play the default message Start recording message Pressing the button starts recording of the welcome message the colour of the button changes to Pressing the button a second time interrupts the recording Play back message allows you to listen to the r...

Страница 80: ...80 TAB 40507 EN allows you to listen to the sound that precedes recording Commands to save the selection and return to the previous screen to quit without saving and return to the previous screen ...

Страница 81: ...e between 1 and 255 seconds The voicemail function allows you to set a start delay i e the time allowed the user before the recording starts to play The two times should be coordinated to ensure that the call does not end before the voicemail function intervenes For this reason on receipt of a call the monitor asks the caller for the set answer time If this is less than the voicemail delay time re...

Страница 82: ...een Change name The name associated with a command is very important and therefore must chosen carefully A badly chosen name could lead to misinterpretation To avoid problems the first time that you use to change a name you will be asked to enter a PIN If the PIN is entered incorrectly you will be returned to the Customization page and the display will show the message PIN incorrect If the PIN is ...

Страница 83: ...CCTV follow the same procedure Customization of names and mobile Apps The name customization function is used by the App installed on the mobile device The essential information is obtained from the 40507 and sent to the remote device In this way the user will find working with the App just as easy as operating the installed device Names that have not been customized are presented on the mobile de...

Страница 84: ...mands menu The page shows a summary of the programmed daily schedules If a schedule has been programmed for a certain day of the week then that day is displayed with a green background and can contain a maximum of six time periods If no schedule has been programmed for automatic opening the day will be shown without any additional information The Settings button allows you set advanced functions d...

Страница 85: ... all the programmed time periods and returns you to the previous page returns you to the previous summary page This command does not save the settings as this operation can only be performed using the confirmation command displays the previous time period displays the next time period allows you to add another time period cancels the current time period If you cancel the last time period the video...

Страница 86: ...o entryphone as shown on the next page The summary page with all the scheduled time periods is only updated after the user has pressed one of the available buttons The modified data must be saved from the main page of the Professional Studio function Advanced settings The page displays two parameters ...

Страница 87: ...he randomness more apparent we recommend setting a delay of more than five seconds enables random opening The lock release command will be activated at a time between 5 seconds and the set delay time disables random opening The lock release command will be activated when the set delay time has elapsed Commands returns you to the previous summary page The modified data must be saved from the main p...

Страница 88: ...eby the call is automatically ended the moment the door is opened Operate the sliding button to enable the function enables the End Call on Opening function disables the End Call on Opening function Commands to save the selection and return to the previous screen to quit without saving and return to the previous screen ...

Страница 89: ...evices In the WiFi Mobile devices section you can set the parameters for connection to a Wi Fi network or for activation of the Hotspot function network router and also specify the mobile devices you wish to use for call transfers ...

Страница 90: ... case you will need the data set on the router during installation HOTSPOT allows you to use the built in router to create an Access Point network OFF puts the device offline Commands saves the configuration and in the cases of the ON and HOTSPOT operating modes takes you to the second configuration stage quits without saving the changes made and returns you to the Settings page ...

Страница 91: ... TAB 40507 EN WiFi settings in ON operating mode Commands saves the configuration and takes you to the second configuration stage quits without saving the changes made and returns you to the Settings page ...

Страница 92: ...a visible network in the area in which the device is installed or enter the name of a hidden network Commands saves the configuration and takes you to the third configuration stage quits without saving the changes made and returns you to the Settings page ...

Страница 93: ... WPA WPA2 enter the password keypad WPS manual direct association Both the router and the 7 EVO must be set to WPS to enable their association Commands saves the configuration and goes to the PIN entry prompt only in ON mode quits without saving the changes made and returns you to the Settings page On completion of network configuration the WiFi Mobile devices settings page is displayed ...

Страница 94: ...94 TAB 40507 EN WiFi settings in HOTSPOT operating mode Commands saves the configuration and quits ...

Страница 95: ...made and returns you to the Settings page WiFi security in HOTSPOT operating mode The security level is set at WPA WPA2 There are no other options Password protection When necessary the user can enter the security password used by the selected network ...

Страница 96: ...required to configure the Elvox App for interaction with the 2 wire video entry phone system The following operations must be carried out after the successful installation of theApp on anAndroid or iOS device More detailed information on the App is available in the specific manual ...

Страница 97: ...ou need to use the QR Code generated by the video entryphone The QR Code contains all the configuration information necessary to establish the connection to the network Ssid network identification Security security criterion Password Commands returns you to the Settings page ...

Страница 98: ...d by the icon in the right hand column To create a new link you must first assign a name to the link and then photograph the QR Code using the App installed in your mobile device Commands for managing links between the device and Apps allows you assign a customized name to the link using the keypad Once the name has been saved the device will be represented by the symbol in the first column cancel...

Страница 99: ... by the servers installed in the system In order to enable the service the network must be activated and the designated servers must authorize the connection If the user enters an incorrect network access PIN or if the connection to the server is lost the network icon at the top right of the screen will first flash and then show the error symbol ...

Страница 100: ...e precision of a single video fragment or fluidity movement precision Audio amplification level this parameter sets the level of amplification for the audio signal transmitted to mobile devices As this value applies to all the associated devices the level should be set to obtain the best compromise Renew This pushbutton allows renewal of the credentials that enable the device to connect to associa...

Страница 101: ...101 TAB 40507 EN Commands saves the configuration and quits quits without saving the changes made and returns you to the Settings page ...

Страница 102: ...102 TAB 40507 EN System In the System section you can access advanced system parameters ...

Страница 103: ...tting is 0000 To change the PIN first enter the old PIN and then the new PIN Confirm the new PIN to ensure that you have not entered the wrong PIN by mistake From this page you can also reset the default PIN set in the factory Commands saves the changes made and returns you to the settings screen quits without saving the changes made and returns you to the Settings page ...

Страница 104: ...y the monitor must be connected to a computer using the specific cable Press Start then enter the password this operation is subject to access control because it is highly sensitive and wait until the device connects to the computer This could take a few seconds As soon as the connection is established a new external resource will appear on the computer update and the device will display the follo...

Страница 105: ...t of a power failure occurring during the sensitive firmware update procedure it may be necessary to switch the device off and on again for a maximum of five times Once the device has been restarted the firmware will not have been updated with previously copied version The operation must therefore be repeated If the user does not wish to continue to update the firmware pressing Cancel will abort t...

Страница 106: ...enter the password this operation is subject to access control because it is highly sensitive and follow the on screen instructions This operation could take a few minutes On completion of the updating procedure the device will restart au tomatically Cancel and return to the previous page OK proceed with the updating of the firmware from the internet ...

Страница 107: ...chase or restart of the device Commands confirms the operation and restarts the device quits and returns you to the Settings page Use of the 40507 from a mobile device The VIDEO DOOR app allows remote control of the video entryphone services provided by the device 40507 e g call forwarding call home etc The app is compatible with Android and iOS operating systems ...

Страница 108: ...Internet address www vimar com WEEE Information for users If the crossed out bin symbol appears on the equipment or packaging this means the product must not be included with other general waste at the end of its working life The user must take the worn product to a sorted waste center or return it to the retailer when purchasing a new one Products for disposal can be consigned free of charge with...

Страница 109: ...109 TAB 40507 EN ...

Страница 110: ...Viale Vicenza 14 36063 Marostica VI Italy www vimar com 49401093A0_MU_EN 02 1802 ...

Отзывы: