


41
DE
FR
NL
IT
ES
PT
NO
SV
DA
EL
RU
EN
0478 121 9920 C - EN
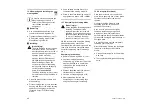
●
Fasten the electric cable (3) to the
upper handlebar with the cable clip (H).
Ensure a distance of 25 - 27 cm
between cable clip and switch on upper
handlebar.
●
Insert the electric cable (3) into the
holder (4) of the handlebar console as
shown.
7.4 Assembling the grass
catcher box
●
Fit the upper part of the grass
catcher box (B) onto the lower part of
the grass catcher box (C). Ensure
correct location in the guides.
●
Push pin (D) through the bores
provided from inside.
●
Allow the upper part of the grass
catcher box (B) to engage in the lower
part of the grass catcher box using
slight pressure.
●
Attach the grass catcher box (
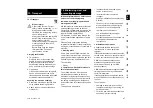
8.
1
Mono handlebar (ME 443 C)
The lawn mower
ME 443 C
is
equipped with an adjustable mono
handlebar.
1
Folding down the handlebar:
Transport position
(for cleaning, for
space-saving transport and for storage of
the machine):
●
Press the detent lever (1) downwards
and hold.
●
Fold the handlebar (2) down forwards,
ensuring that the electric cable is not
damaged.
Working position
(to push machine):
●
Fold the handlebar (2) up rearwards
and ensure that the handlebar is fully
engaged.
2
Height adjustment:
The height of the mono handlebar can be
adjusted to 2 levels:
●
Press the detent lever (1) downwards
and hold.
●
Move the handlebar (2) into the
required position.
●
Release the detent lever (1) and ensure
that the handlebar is again fully
engaged.
8.2 Dual handlebar (ME 443)
Transport position
(for cleaning, for
space-saving transport and for storage of
the machine):
●
Open the quick-clamping devices (1) –
fold downwards – and fold the upper
handlebar (2) forwards, ensuring that
the electric cable is not damaged.
Working position
(to push machine):
●
Fold up the upper handlebar (2)
rearwards and hold with one hand.
●
Close the quick-clamping devices (1) –
fold upwards.
5
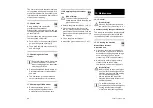
8. Controls
Danger of electric shock!
The electric cable must always be
attached to the quick-release clamp
body and the handlebar console.
Danger of pinching!
Before actuating the detent
lever (1), hold the upper
handlebar (2) with one hand at its
highest point and lift (relieve load)
slightly.
After actuation of the detent lever,
the upper handlebar can fall to the
lowest position under its own
weight.
Never place your finger between
the handlebar and the handlebar
console (under the detent lever).
6
Danger of pinching!
The upper handlebar can be folded
down by releasing the quick release
caps. For this reason, always hold
the upper handlebar (2) with one
hand at its highest point when you
open the quick-release caps.
7
Содержание ME 443
Страница 2: ...0478 121 9920 C M6 A14 Eco Printed in Germany 2014 VIKING GmbH A 6336 Langkampfen Kufstein ...
Страница 3: ...1 0478 121 9920 C 1 ...
Страница 4: ...0478 121 9920 C 2 2 3 ...
Страница 5: ...3 0478 121 9920 C 4 5 6 7 8 ...
Страница 6: ...0478 121 9920 C 4 9 10 11 12 13 14 ...
Страница 7: ...5 0478 121 9920 C 15 16 17 ...
Страница 8: ...0478 121 9920 C 6 18 19 ...
Страница 9: ...7 0478 121 9920 C 20 ...
Страница 10: ...0478 121 9920 C 8 ...
Страница 54: ...0478 121 9920 C EN 52 ...
Страница 122: ...0478 121 9920 C IT 120 ...
Страница 146: ...0478 121 9920 C ES 144 ...
Страница 190: ...0478 121 9920 C NO 188 ...
Страница 212: ...0478 121 9920 C SV 210 ...
Страница 234: ...0478 121 9920 C DA 232 ...
Страница 258: ...0478 121 9920 C EL 256 ...
Страница 260: ...0478 121 9920 C RU 258 2 1 EG 2006 42 EC VIKING 2 2 Ö 2 1 1 2 276 277 278 Э 278 278 279 279 281 281 281 2 ...
Страница 262: ...0478 121 9920 C RU 260 4 1 16 Э 4 ...
Страница 263: ...261 DE EN FR NL IT ES PT NO SV DA EL RU 0478 121 9920 C RU VIKING VIKING 4 2 4 3 Ö 13 1 4 4 ...
Страница 264: ...0478 121 9920 C RU 262 VIKING VIKING VIKING Ö 4 8 4 5 5 C Ö 11 ...
Страница 265: ...263 DE EN FR NL IT ES PT NO SV DA EL RU 0478 121 9920 C RU 25 46 6 25 46 6 100 ...
Страница 266: ...0478 121 9920 C RU 264 4 6 Ö 12 2 Э VIKING VIKING VIKING VIKING ...
Страница 268: ...0478 121 9920 C RU 266 Ö 11 1 30 4 9 5 ...
Страница 272: ...0478 121 9920 C RU 270 Ö 11 5 9 1 VIKING 9 2 9 3 9 4 9 ...
Страница 273: ...271 DE EN FR NL IT ES PT NO SV DA EL RU 0478 121 9920 C RU Ö 11 1 10 Ö 11 10 1 10 2 Э 10 3 3 10 VIKING VIKING ...
Страница 277: ...275 DE EN FR NL IT ES PT NO SV DA EL RU 0478 121 9920 C RU 2 4 5 2 1 3 10 15 12 7 VIKING Ö 12 6 30 12 8 15 2 Ö 12 5 ...
Страница 278: ...0478 121 9920 C RU 276 13 1 1 3 2 1 К 4 ME VIKING VIKING 1 VIKING 13 Ö 4 VIKING 18 14 ...
Страница 279: ...277 DE EN FR NL IT ES PT NO SV DA EL RU 0478 121 9920 C RU 2 VIKING Э VIKING 3 VIKING VIKING VIKING Ö 4 9 15 ...
Страница 282: ...0478 121 9920 C RU 280 Ö 11 1 Ö 8 4 Ö 12 6 Ö 12 7 Ö 12 7 Ö 8 4 Ö 8 4 Ö 12 2 Ö 12 7 Ö 8 4 ...
Страница 283: ...281 DE EN FR NL IT ES PT NO SV DA EL RU 0478 121 9920 C RU 21 1 21 2 VIKING 21 20 ...
Страница 284: ...www viking garden com 04781219920C 0478 121 9920 C ...