background image


3

3

.

.

2

2


W

W

a

a

l

l

l

l

-

-

M

M

o

o

u

u

n

n

t

t

i

i

n

n

g

g


t

t

h

h

e

e


V

V

i

i

g

g

o

o

r

r


R

R

o

o

u

u

t

t

e

e

r

r


DrayTek Vigor 2765

/2766

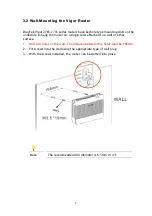
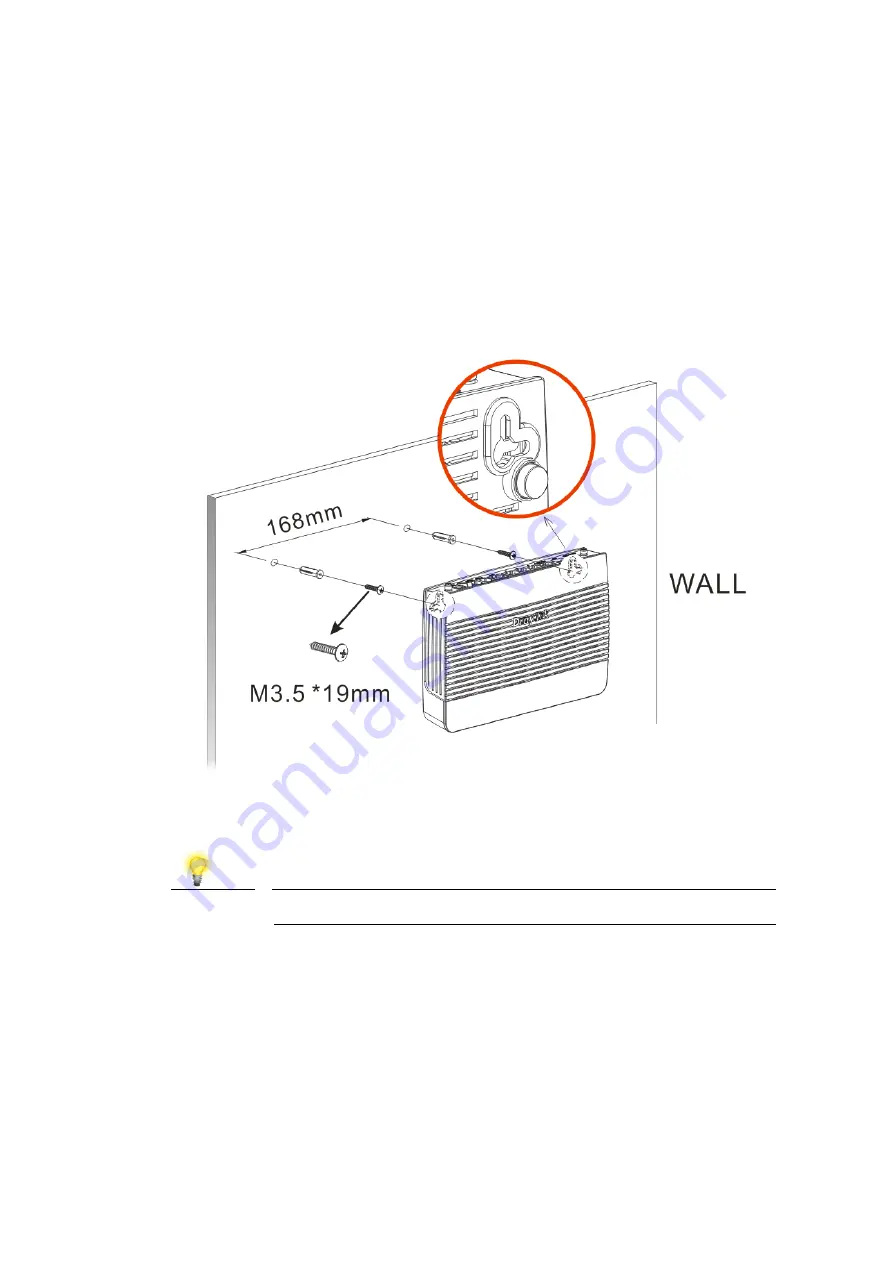
 series routers have keyhole type mounting slots on the 

underside to hang the router on, using screws attached to a wall or other 
surface. 

1.


Drill two holes on the wall. The distance between the holes shall be 168mm. 

2.


Fit screws into the wall using the appropriate type of wall plug 

3.


With the screws installed, the router can be slotted into place 


Note 


The recommended drill diameter is 6.5mm (1/4”).


Содержание 2765 Series

Страница 1: ...lity For all models please check that you have been supplied with a device intended for your geographic region and networks Hardware and software varies by region as well as local support and warranty...

Страница 2: ...nual and online documentation and to make changes from time to time in the contents hereof without obligation to notify any person of such revision or changes External Power Supply Power Adapter Infor...

Страница 3: ...or DSL and 2 4GHz 5GHz WLAN network use in the UK Ireland Declaration of Conformity Hereby DrayTek Corporation declares that the radio equipment type Vigor2765 is in compliance with Directive 2014 53...

Страница 4: ...ADSL VDSL Connection Setup 11 4 2 1 PPPoE connection with FTTC VDSL2 11 4 2 2 DHCP Static IP connection with FTTC VDSL2 14 4 2 3 PPPoA connection with ADSL ADSL2 17 4 3 WAN2 Ethernet Connection Setup...

Страница 5: ...art Guide This document RJ 45 Cable Ethernet Connects to your PC or Switch RJ 11 to RJ 11 Cable Connects to your DSL line UK Power Adapter Antenna The maximum power consumption is 17 23 Watts Importan...

Страница 6: ...is active Blinking Green Data is being transmitted on the router s 2 4 GHz wireless interface Blinking Orange WPS pairing mode is active for two minutes Wireless LAN On Off WPS Off 2 4GHz Access Point...

Страница 7: ...enable WPS pairing mode Factory Reset Restore the default settings Usage Turn on the router ACT LED is blinking Press gently and hold for more than 5 seconds When the ACT LED blinks rapidly release th...

Страница 8: ...en 2 4GHz Access Point is active Blinking Green Data is being transmitted on the router s 2 4 GHz wireless interface Blinking Orange WPS pairing mode is active for two minutes Wireless LAN On Off WPS...

Страница 9: ...et Restore the default settings Usage Turn on the router ACT LED is blinking Press gently and hold for more than 5 seconds When the ACT LED blinks rapidly release the button Then the router will resta...

Страница 10: ...itch 3 Wireless Antennas Connect the wireless antennas to the router 4 Power Supply Connect the power adapter to the Vigor 2765 s PWR socket on the rear and plug the power adapter into a suitable main...

Страница 11: ...ing slots on the underside to hang the router on using screws attached to a wall or other surface 1 Drill two holes on the wall The distance between the holes shall be 168mm 2 Fit screws into the wall...

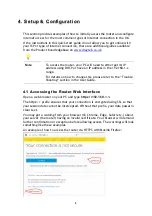
Страница 12: ...nge For details on how to change this please refer to the Trouble Shooting section in the User Guide 4 4 1 1 A Ac cc ce es ss si in ng g t th he e R Ro ou ut te er r W We eb b I In nt te er rf fa ac c...

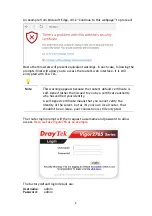
Страница 13: ...router s default certificate is self signed rather than issued to you by a certificate authority who has verified your identity A self signed certificate means that you cannot verify the identity of...

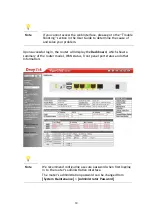
Страница 14: ...uccessful login the router will display the Dashboard which shows a summary of the router model WAN status front panel port status and other information Note We recommend configuring a secure password...

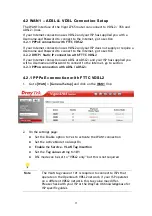
Страница 15: ...your ISP has supplied you with a Username and Password to connect to the Internet go to section 4 2 3 PPPoA connection with ADSL ADSL2 4 4 2 2 1 1 P PP PP Po oE E c co on nn ne ec ct ti io on n w wi...

Страница 16: ...ettings tab Select the Enable radio button at the top of the page to ensure that the PPPoE interface is enabled In the ISP Access Setup section input the ISP username into the Username field and passw...

Страница 17: ...t to restart Click the OK button to restart the router 5 Once the router has restarted the Online Status Physical Connection page will display the VDSL information and PPP connection status if the WAN...

Страница 18: ...DS SL L2 2 1 Go to WAN General Setup and click on the WAN1 link 2 On the settings page Set the Enable option to Yes to activate the WAN1 connection Set the Active Mode to Always On Enable the Service...

Страница 19: ...ck the Details Page button to proceed 4 In the MPoA Static or Dynamic IP settings Select the Enable option and select Obtain an IP address automatically which will obtain an IP from the ISP using DHCP...

Страница 20: ...t to restart Click the OK button to restart the router 5 Once the router has restarted the Online Status Physical Connection page will display the VDSL information and DHCP connection status if the WA...

Страница 21: ...sage with 0 and 38 being the defaults In most cases it will not be necessary to change these The Modulation setting can be left on its default of Multimode which will auto detect the correct ADSL type...

Страница 22: ...rd match the details supplied by your ISP 4 4 3 3 W WA AN N2 2 E Et th he er rn ne et t C Co on nn ne ec ct ti io on n S Se et tu up p The WAN2 interface of the Vigor 2765 router can connect to an ISP...

Страница 23: ...the WAN2 Ethernet WAN options cannot be selected in the router s web interface To enable the router s Ethernet WAN port on port P4 instead of LAN mode 1 Go to WAN General Setup and click WAN2 2 In its...

Страница 24: ...will typically be used with a modem such as the Vigor 130 VDSL2 modem which passes through the PPPoE connection from the ISP to the router 1 Go to WAN Internet Access Firstly set the WAN2 Access Mode...

Страница 25: ...ch indicates that the connection is active and ready for use 4 4 3 3 3 3 S St ta at ti ic c o or r D Dy yn na am mi ic c I IP P 1 Go to WAN Internet Access Firstly set the WAN2 Access Mode to Static o...

Страница 26: ...to restart the router Once the router has restarted log back into the web interface and select Online Status Physical connection if it has connected the relevant WAN Interface status text will be in...

Страница 27: ...used where the modem operates as a virtual network adapter router and will usually have diagnostics and usage information shown in a web interface When configuring the 3G 4G modem the router will req...

Страница 28: ...nitial String to indicate that it has been saved Click OK to save and apply the changes If the modem is detected successfully the WAN interface should be able to connect Status information can be view...

Страница 29: ...ill use whichever mode the base station recommends Setting this to a specific mode will force that connection type for instance 4G Only will connect using 4G specifically The APN Name will typically n...

Страница 30: ...nhanced services see www draytek co uk vigorcare You should keep your proof of purchase original invoice safely in case warranty or other service is ever required 5 5 1 1 A Ad dd di it ti io on na al...

Страница 31: ...ur ri it ty y R Ro ou ut te er r B Be es st t P Pr ra ac ct ti ic ce e Your router is the gateway to an entire business network and data Even the best security equipment requires correct usage in orde...

Отзывы: