background image

17

To  keep  the  warranty  valid,  never  try  to  repair  the 
system  yourself.  If  you  encounter  problems  when 
using  this  unit,  check  the  following  points  before 
requesting service.

No power.

-  Ensure that the AC cord of the apparatus is  
 

connected properly.

-  Ensure that there is power at the AC outlet.
-  Press standby button to turn the unit on. 

No disc detected

-  Check if the disc is inserted upside down.
-  Wait until the moisture condensation at the lens  
 

has cleared.

-  Replace or clean the disc.
-  Use a finalized CD or correct format disc.

No picture

-  Check the video connection.
-  Turn on the TV to the correct Video-In channel. 

Black and white or distorted picture

-  The disc does not match the TV color system  
 

standard (PAL/NTSC). 

-  Sometimes a slight picture distortion may    
 

appear. This is not a malfunction.

-  Clean the disc.

The aspect ratio of the TV screen cannot be 
changed even though you have set the TV 
display format.

-  The aspect ratio if fixed on the loaded DVD disc.
-  The aspect ratio may not be changed for some  
 

TV systems.

Remote control does not work

-  Before you press any function button, first select  
 

the correct source.

-  Reduce the distance between the remote control  
 

and the unit.

-  Insert the battery with its polarities (+/-) aligned  
 

as indicated.

-  Replace the battery.
-  Aim the remote control directly at the  ensor on  
 

the front of the unit.

Disc does not play

-  Insert a readable disc and ensure that the label  
 

side faces up.

-  Check the disc type, color system and regional  
 

code. Check for any scratches or smudges on  


the disc.  

-  Press MENU to exit the system setup menu.
-  Disable the password for parental control or  
 

change the rating level.

-  Moisture has condensed inside the system.  
 

Remove the disc and leave the system turned  


on for about an hour. Disconnect and reconnect  


the AC power plug, and then turn on the system  


again.

Poor radio reception

-  Increase the distance between the unit and your  
 

TV or VCR.

-  Fully extend the FM antenna.
-  Connect an outdoor FM antenna instead.

Audio or subtitle languages cannot be set

-  The disc is not recorded with sound or subtitles  
 

in multiple languages.

-  The audio or subtitle language setting is    
 

prohibited on the disc.

Cannot display some files in USB device 

-  The number of folders or files in the USB device  
 

has exceeded a certain limit. This phenomenon  


is not a malfunction.

-  The formats of these files are not supported. 

USB device not supported

-  The USB device is incompatible with the unit. Try
 

 another one.

Timer does not work

-  Set the clock correctly.
-  Switch on the timer.

Clock/timer setting erased

-  Power has been interrupted or the power cord  
 

has been disconnected.

-  Reset the clock/timer.

Can't operate

-  This unit contains a microcomputer for signal  
 

processing and control functions. In very rare  


situations, severe interference, noise from an  


external source, or static electricity may cause


it to lockup. In the unlikely even that this should


happen, unplug the power cord from the wall 


outlet, wait at least 5 seconds, and then plug it


back in again.

Using iPhone to play music

-  While the iPhone is playing the music throught
 

the docking, there may be a chance that the  


iPhone may not be under a good receiption  


mode to get the incoming call signal.

Troubleshooting

Содержание VH-SB550BK

Страница 1: ...o para futura refer ncia Please read the user manual first before using the product keep well for future referring Veuillez lire le manuel utilisateur avant d utiliser le produit et de le ranger pour...

Страница 2: ...de vida depende de la frecuencia de uso 11 Fallos menores o variaciones en la calidad del producto que no afecten a su valor o el prop sito para el cual fue creado 12 Negligencia 13 Accesorios Estuch...

Страница 3: ...Seleccionar el sonido envolvente 10 Sonido silenciado 10 Ajuste del brillo del panel de visualizaci n 10 Reproducci n 11 Reproducci n de un disco 11 Reproducci n desde USB 11 Reproducci n de archivos...

Страница 4: ...specificados por el fabricante 12 Use el producto nicamente con el carrito soporte tr pode fijaci n o mesa especificados por el fabricante o suministrados con el producto Si usa un carrito tenga cuida...

Страница 5: ...icado antes de volver a utilizarlo No intente limpiar la unidad con disolventes qu micos puesto que podr an da ar el acabado Use un trapo limpio seco o ligeramente humedecido Al extraer el enchufe de...

Страница 6: ...4 Identificaci n de las partes de la unidad Unidad principal Vista trasera Vista del panel...

Страница 7: ...a conexi n de una televisi n Vista frontal 1 STANDBY Toque este bot n para encender este producto o para cambiar al modo standby Eco Power 2 Compartimento para el disco 3 USB Sirve para conectar una m...

Страница 8: ...MUTE Al pulsar este bot n se silencia o se reanuda el sonido 10 Sirve para pasar al t tulo cap tulo pista anteriores Sirve para sintonizar una emisora de radio buscando hacia atr s 11SETUP Sirve para...

Страница 9: ...scar hacia delante dentro de una pista disco Sirve para sintonizar una emisora de radio buscando hacia delante 32ZOOM Permite ampliar o reducir la imagen en pantalla 33SUBTITLE Selecciona un idioma pa...

Страница 10: ...cable SCART a el conector SCART OUT de esta unidad los conectores de entrada SCART correspondientes de la televisi n 4 Empleo del conector HDMI Para lograr la mejor calidad de imagen conecte mediante...

Страница 11: ...efectivo 5 m es posible que no pueda realizarse el control a trav s del mando a distancia en caso de que haya obst culos entre este y la unidad Si el mando a distancia se emplea cerca de otros product...

Страница 12: ...uste del reloj El reloj incorporado muestra la hora correcta en la pantalla 1 En el modo standby mantenga pulsado el bot n CLOCK para activar el modo de ajuste del reloj el indicador de la hora parpad...

Страница 13: ...e el bot n AUDIO Aparecer n las opciones de idioma Si el canal de audio seleccionado no est disponible se emplea el canal de audio predeterminado del disco Nota En algunos DVD el idioma solo puede cam...

Страница 14: ...a extra do pulse el bot n Para cancelar el modo de reanudaci n y detener la reproducci n por completo En el modo de parada pulse el bot n Nota Esta funci n solo est disponible para la reproducci n de...

Страница 15: ...ota Para reproducir v deos desde un iPad iPhone iPod con ctelo a la terminal AV VIDEO Algunas teclas de funci n no est n disponibles para el iPad 1 Pulse el bot n DOCK del mando a distancia o el bot n...

Страница 16: ...quedan recortados NORMAL LB Este modo se emplea en televisiones con una relaci n de 4 3 Las im genes con la relaci n 4 3 se muestran con normalidad Las im genes con una relaci n de 16 9 se ven con su...

Страница 17: ...p 60Hz 720p 60Hz 1080i 60Hz 1080p 60Hz 576p 50Hz 720p 50Hz 1080i 50Hz y 1080p 50Hz HDMI CEC SETUP Configuraci n HDMI CEC Puede emplear un solo mando a distancia para controlar los dispositivos HDMI CE...

Страница 18: ...r al que usted ha establecido el sistema solicitar una contrase a Introduzca la contrase a y pulse el bot n ENTER para iniciar la reproducci n 1 Seleccione el nivel de control parental deseado en el m...

Страница 19: ...ta Tambi n puede usar el teclado num rico para seleccionar directamente la emisora programada Otras funciones Ajuste del temporizador de alarma En el modo standby puede usarse el ajuste del temporizad...

Страница 20: ...r de apagado podr quedarse dormido escuchando m sica sabiendo que el sistema se apagar solo en lugar de continuar funcionando toda la noche 1 Reproduzca un disco o sintonice la emisora que desee 2 Par...

Страница 21: ...uebe si el disco est rayado o manchado Pulse MENU para salir del men de configuraci n del sistema Deshabilite la contrase a del control parental o cambie el nivel de clasificaci n Hay humedad condensa...

Страница 22: ...kHz 3 dB Rango de sintonizaci n 87 5 108 0 MHz Dimensiones del equipo An x Al x Pr 990 x 299 x 84 mm Altavoz Delantero Impedancia 3 Potencia nominal 40 W Bafle Impedancia 6 Potencia nominal 80 W Mando...

Страница 23: ...antes de uso e desgaste 10 Baterias recarreg veis e ou descart veis o tempo de vida depende da frequ ncia de uso 11 Falhas menores ou diferen as na qualidade do produto que n o afetem o seu valor ou o...

Страница 24: ...eito Super Bass Boost 10 Selecionar o efeito Surround 10 Desligar o som 10 Ajustar o brilho do painel de exibi o 10 Reproduzir 11 Reproduzir um disco 11 Reproduzir a partir de USB 11 Reproduzir MP3 WM...

Страница 25: ...veis danos provocados por queda 13 Desligue o equipamento durante trovoadas ou quando se ausentar por um longo per odo de tempo 14 Todas as interven es de repara o devem ser realizadas por pessoal qu...

Страница 26: ...mente humedecido Quando desligar a ficha da tomada de parede nunca puxe pelo fio Dependendo das ondas eletromagn ticas usadas por uma emiss o de televis o se um televisor for ligado perto desta unidad...

Страница 27: ...4 Unidade Principal Identifica o dos componentes Vista Traseira Vista do Painel...

Страница 28: ...para o modo de poupan a de energia Eco Power modo Standby 2 Tabuleiro do disco 3 Entrada USB Ligar atrav s um sistema de USB 4 MP3 LINK Ligar a um aparelho externo de udio 5 KDISC Ejetar o disco Pres...

Страница 29: ...Navegar esquerda atrav s dos menus Pesquisa anterior de faixa disco Pesquisar uma esta o de r dio anterior 14 Navegar abaixo atrav s dos menus Sintonizar uma esta o de r dio Rodar uma imagem 15 TITLE...

Страница 30: ...ma sele o 31 C Navegar direita atrav s dos menus Pesquisa seguinte de faixa disco Pesquisar uma esta o de r dio seguinte 32 ZOOM Zoom aproximar afastar a imagem no ecr 33 SUBTITLE Selecionar legenda d...

Страница 31: ...a unidade tomada SCART correspondente na TV 4 Usar Liga o HDMI Ligue o HDMI High Definition Multimedia Interface DVI Digital Visual Interface ou HDCP High bandwidth Digital Contents Protection a uma T...

Страница 32: ...o for usado perto de outros equipamentos que emitam raios infravermelhos ou se forem usados outros dispositivos de controlo remoto que emitam raios infravermelhos perto da unidade poder operar incorre...

Страница 33: ...esenta no mostrador o tempo correto 1 No modo Standby pressione durante algum tempo o bot o CLOCK para ativar o modo de configura o do rel gio o indicador hora piscar 2 Defina a hora com o bot o ou o...

Страница 34: ...disco predefinido de udio usado Nota Em alguns DVDs o idioma s pode ser alterado a partir do menu do disco Pressione o bot o SETUP CONFIGURA O para aceder ao menu Selecione o idioma da legenda Pode se...

Страница 35: ...u o Mostrar informa o da reprodu o Durante a reprodu o pressione o bot o OSD repetidamente para exibir informa es Programar Para os discos de v deo udio CDs 1 Durante a reprodu o ou no modo de parado...

Страница 36: ...o Para navegar no menu pressione o bot o MENU a seguir os bot es para selecionar e ENTER para confirmar Para selecionar a fun o de repeti o pressione o bot o REPEAT repetidamente Para selecionar a fu...

Страница 37: ...duas sa das RESOLU O As op es incluem a resolu o 480p 60Hz 720p 60Hz 1080i 60Hz 1080p 60Hz 576p 50Hz 720p 50Hz 1080i 50Hz e 1080p 50Hz Fa a essa configura o enquanto a reprodu o estiver parada n o o...

Страница 38: ...sejado a partir do menu de Controlo Parental em seguida pressione o bot o Enter 2 Ser solicitado para digitar uma senha Use os bot es 0 9 para inserir 000000 ou a sua senha privada se j configurada N...

Страница 39: ...TER o indicador das horas piscar Acerte a hora com o bot o ou o bot o 4 Pressione o bot o ENTER ou TIMER o indicador dos minutos piscar Configure os minutos com os bot es ou Por defeito Todos os itens...

Страница 40: ...corretamente ligado Verifique se h energia na tomada AC Pressione o bot o STANDBY para ligar a unidade N o deteta nenhum disco Verifique se o disco foi inserido de cabe a para baixo Aguarde at que a c...

Страница 41: ...n mero de pastas ou arquivos no dispositivo USB ultrapassou certo limite Isto n o significa mau funcionamento do equipamento Os formatos desses arquivos n o s o suportados O Dispositivo USB n o suport...

Страница 42: ...to use and wear and tear 10 Rechargeable and or disposable batteries life cycle depends on usage frequency 11 Small faults or variations in the quality of the product that do not affect its value or t...

Страница 43: ...10 Select a Preset Sound Effect 10 Super Bass Boost 10 Select Surround Sound 10 Mute Sound 10 Adjust Brightness of Display Panel 10 Play 11 Play a Disc 11 Play from USB 11 Play MP3 WMA Picture Files 1...

Страница 44: ...om tip over 13 Unplug this apparatus during lightning storms or when unused for long periods of time 14 Refer all servicing to qualified service personnel Servicing is required when the apparatus has...

Страница 45: ...wall outlet always pull directly on the plug never yank on the cord Depending on the electromagnetic waves used by a television broadcast if a TV is turned on near this unit while it is also on lines...

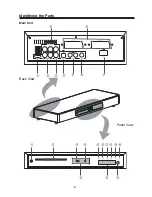
Страница 46: ...4 Main Unit Identifying the Parts Back View Panel View...

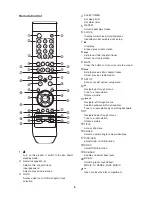
Страница 47: ...o turn on this product or switch to the Eco Power standby mode 2 Disc Compartment 3 USB Connect to a USB flash drive 4 MP3 LINK Connect to an external audio device 5 KDISC Touch this button to open or...

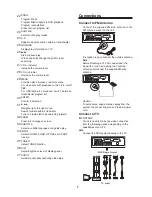
Страница 48: ...tate a picture 13 D Navigate left through menus Search backward within a track disc Tune to a radio station by searching backward 14 Navigate down through menus Tune to a radio station Rotate a pictur...

Страница 49: ...radio station by searching forward 32 ZOOM Zoom in out image on screen 33 SUBTITLE Select a subtitle language during video play 34INPUT Select AUX MP3 LINK OPTICAL or SCART function 35 TUNER Select T...

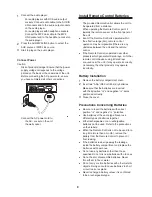
Страница 50: ...put jacks on the TV 4 Using HDMI socket Connect HDMI High Definition Multimedia Interface DVI Digital Visual Interface or HDCP High bandwidth Digital Contents Protection compliant TVs through HDMI for...

Страница 51: ...generate infrared rays or if other remote control devices using infrared rays are used near the unit it may operate incorrectly Conversely the other products may operate incorrectly Battery Installat...

Страница 52: ...time in the display 1 In standby mode press and hold the CLOCK button to activate the clock setting mode hour indicator will blink 2 Set the hour with the button or button 3 Press the ENTER or CLOCK b...

Страница 53: ...enu Select a Subtitle Language You can select a subtitle language on DVDs discs During play press the SUBTITLE button Note For some DVDs the language can only be changed from the disc menu Press the S...

Страница 54: ...program list 2 Repeat steps 2 until the program is complete 3 Press MENU to display program list then select program file 4 Press the ENTER button to play the program To delete a file from the Progra...

Страница 55: ...utton 2 Press the buttons to select a setup page 3 Press the buttons to select an option and then press the button 4 Press the buttons to select a setting and then press the ENTER button To return to...

Страница 56: ...this to turn off one touch play function Off The screen saver does not start up Last Memory On Select this to make last memory function available Off Select this to make last memory function invalid A...

Страница 57: ...eed your password to change the level of control in the future as well as to temporarily unlock discs for playback If you forget your password use 000000 One Touch Standby When you press and hold butt...

Страница 58: ...nd know that your system will turn off by itself rather than play all night 1 Play a disc or tune in to the desired station 2 To set the sleep timer by press the SLEEP TIMER button repeatedly select a...

Страница 59: ...ges on the disc Press MENU to exit the system setup menu Disable the password for parental control or change the rating level Moisture has condensed inside the system Remove the disc and leave the sys...

Страница 60: ...se 40Hz 20kHz 3dB Tuning Range 87 5 108 0MHz Unit Dimensions W x H x D 990 x 299 x 84mm Speaker Front Impedance 3 Rated Power 50W Woofer Impedance 6 Rated Power 100W Remote Distance 6m Angle 30O FM An...

Страница 61: ...eries rechargeables et ou jetables dont le temps de vie d pend de la fr quence d utilisation 11 Les d fauts mineurs ou variations de la qualit du produit n affectant par sa valeur ou l objectif pour l...

Страница 62: ...eux 12 R glage de la luminosit du panneau d affichage 12 Programmation de la t l commande intelligente pour contr ler la t l vision 12 Lecture 13 Lecture d un disque 13 Lecture depuis une cl USB 13 Le...

Страница 63: ...cordon d alimentation ou de la fiche en cas de d versement de liquide ou chute d objets l int rieur de l appareil d exposition de l appareil la pluie ou l humidit de dysfonctionnement ou chute de l a...

Страница 64: ...personnel qualifi avant de l utiliser de nouveau Ne pas essayer de nettoyer l appareil avec des solvants chimiques car ils peuvent endommager le fini Utiliser un chiffon sec ou l g rement humide Au mo...

Страница 65: ...6 Unit principale Vue arri re Vue du panneau Identification des parties de l appareil...

Страница 66: ...nt 1 STANDBY Appuyer sur ce bouton pour allumer l appareil ou passer en mode veille Eco Power 2 Compartiment disques 3 USB Sert connecter une cl USB 4 MP3 LINK Permettent la connexion d un dispositif...

Страница 67: ...une station de radio ant rieure 14 Navigation dans les menus vers le bas R glage d une station de radio Rotation d une image 15 TITLE Acc s au menu des titres 16 ANGLE R glage d un angle de cam ra pou...

Страница 68: ...es 23 SHUFFLE AL ATOIRE S lection du mode al atoire 24 A B R p tition d une section sp cifique d une piste un chapitre 25 OSD RDS Affichage information de lecture sur la TV 26 12 Initiation ou mise en...

Страница 69: ...e sortie audio du dispositif externe 2 Utilisation du connecteur OPTICAL Brancher le c ble optique connecteur OPTICAL le connecteur d entr e num rique de l enregistreur num rique Note Le mode Mute sil...

Страница 70: ...Ne jamais jeter les piles dans le feu ou dans l eau Ne pas transporter ou garder les piles proximit d objets m talliques Auquel cas elles pourraient se court circuiter pr senter des fuites ou explose...

Страница 71: ...uminosit du panneau d affichage Appuyer sur DIM plusieurs fois pour s lectionner divers niveaux de luminosit du panneau d affichage Programmation de la t l commande intelligente pour contr ler la t l...

Страница 72: ...tilis Note Certains DVD permettent de changer la langue depuis le menu du disque Appuyer sur le bouton SETUP pour acc der au menu S lection de la langue des sous titres possible de choisir la langue d...

Страница 73: ...ire l image Lors de la lecture vid o appuyer sur le bouton ZOOM plusieurs fois pour agrandir r duire l image Une fois l image agrandie appuyer sur pour parcourir l image Programme Pour les vid o disqu...

Страница 74: ...cture normale Pour se d placer dans le menu appuyer sur le bouton MENU puis appuyer sur pour s lectionner et appuyer sur ENTER pour confirmer Pour s lectionner les options de r p tition ap puyer plusi...

Страница 75: ...pectivement par les haut parleurs FL et FR St r o Le canal audio 5 1 est mix dans le canal st r o puis diffus par les haut parleurs FL et FR Des Choisir cette option pour que cette fonction soit dispo...

Страница 76: ...nt et se positionnera sur le canal d entr e vid o correspondant Si un disque est ins r dans l appareil la lecture du disque commencera automatiquement sauf CD Des Choisir cette option pour d sactiver...

Страница 77: ...passe oubli utiliser 1234 Radio FM S lection d une station 1 V rifier qu une antenne FM est branch e et compl tement d ploy e 2 Appuyer sur le bouton TUNER pour s lectionner la source TUNER 3 Utiliser...

Страница 78: ...int R glage de la minuterie de sommeil Utiliser la minuterie de sommeil pour teindre l appareil avec un nombre d termin de minutes en mode lecture Ce r glage permet de s endormir en coutant de la musi...

Страница 79: ...u des sous titres n est pas autoris sur ce disque Impossible d afficher certains fichiers du dispositif USB Le nombre de dossiers ou de fichiers enregistr s sur le dispositif USB d passe la limite Il...

Страница 80: ...W Distortion harmonique totale 1 1kHz 1W Sensibilit entr e audio Imp dance LINE 500mV 47k R ponse fr quence 40Hz 20kHz 3dB Amplitude r glage 87 5 108 00MHz Dimensions unit s 990 x 299 x 84mm Haut parl...

Страница 81: ...www vieta es...
Отзывы: