10
Power
You can use all the functions on the panel of the
unit or the remote control after connecting to power
supply (called Standby Mode).
Turning the System On
Press the button to turn the system on from
standby mode.
Note:
The set switch to last selected source
Turning the System Off
Press the button again to turn the system off
and go to standby mode.
Note:
Be sure to unplug the power cord from the outlet
when the system is not in use for an extended
period of time.
Select the Correct TV System
Change this setting if the video does not appear
correctly. By default, this setting matches the most
common setting for TV in your country.
1
No disc mode, press the SETUP button.
2
Select [Preference Setup Page].
3
Select [TV Type] and then press the
button.
4
Select a setting and then press the ENTER
button.
- [PAL] - For TV with PAL color system.
- [Auto] - For TV that is compatible with both
NTSC and PAL (multi-system).
- [NTSC] - For TV with NTSC color system.
5
To exit the menu, press the SETUP button.
Change System Menu Language
1
Press the SETUP button.
2
Select [General Setup Page].
3
Select [OSD language] and then press the
button.
4
Select a setting and then press the ENTER
button.
5
To exit the menu, press the SETUP button .
Set the Clock
The built-in clock shows the correct time in the
display.
1
In standby mode, press and hold the CLOCK
button to activate the clock setting mode, hour
indicator will blink.
2
Set the hour with the
button or
button.
3
Press the ENTER or CLOCK button to confirm,
minute indicator will blink.
4
Set the minute with the
button or
button.
5
Press the ENTER or CLOCK button to confirm,
the built-in clock starts operating and the
seconds start counting from 0.
Note:
* The operating time of every step shouldn’t be
longer than 10 seconds or it will return to the
original display.
* If there is a power failure or the power system is
turned off, the clock will lose its setting.
To confirm the clock time
When you press the CLOCK button, the clock time
is displayed. Wait for a few seconds until the display
returns to the original display.
Adjust Volume Level
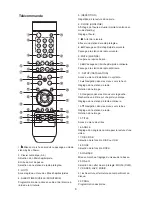
During play, press the VOL+/- buttons to
increase/decrease the volume level.
Select a Preset Sound Effect
During play, press the RS-EQ button repeatedly
to select:
- [MOVIE]
- [TV]
- [DANCE]
- [JAZZ]
- [MUSIC]
Super Bass Boost
Press the RS-BASS button repeatedly to select
the base boost level.
Select Surround Sound
Press V-SUR. button to get surround sound.
Press this button again to cancel the effect.
Mute Sound
During play, press the MUTE button to mute
or restore sound. Press this button again or
button to cancel the effect.
Adjust Brightness of Display Panel
Press the DIM button repeatedly to select
different levels of brightness for the display
panel.
Basic Operation
Содержание VH-SB550BK
Страница 6: ...4 Identificaci n de las partes de la unidad Unidad principal Vista trasera Vista del panel...
Страница 27: ...4 Unidade Principal Identifica o dos componentes Vista Traseira Vista do Painel...
Страница 46: ...4 Main Unit Identifying the Parts Back View Panel View...
Страница 65: ...6 Unit principale Vue arri re Vue du panneau Identification des parties de l appareil...
Страница 81: ...www vieta es...


