Victrola E-69EB Скачать руководство пользователя страница 45

45 


RECORDING OPERATION 

To download music and save into computer: 

1. Place the record on the turntable. 

2. Move the tone-arm over to the record to start playing. 

3. Click the Record (

) button to start recording. 

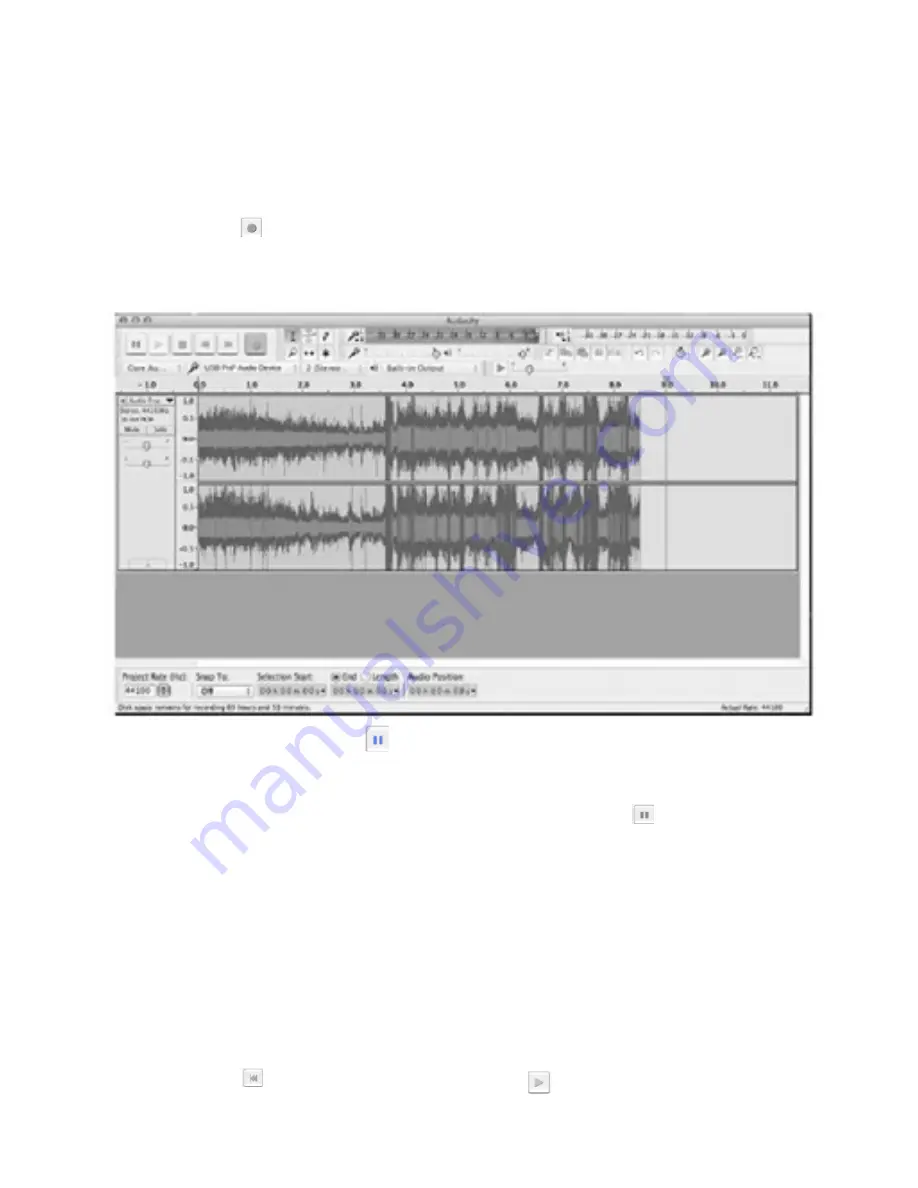
The waves (left and right tracks) will show on the interface. 


4.  At  end  of  the  song,  click  “pause”  (

)  button  on  computer  and  press  Stop  button  on  turntable, 

move cursor to the wave area and left click at the end of the song. 

For the next song, replace the album or move tone-arm to another desired song. Press Play button 

on the turntable to start playing the next song. Immediately press “pause” (

) button on computer 

and downloading will continue and another R/L track will appear on the interface. 

NOTE: 

Pause button will not work during recording process if the ‘Sound Activated Recording’ in the 

Preferences  Recording  is  selected.  Clear  the  checkbox  next  to  the  ‘Sound  Activated  Recording’  if 

you want to pause recording manually. 


5. Repeat steps 3 and 4 until you have finished downloading. 

NOTE: 

Do not click stop button on computer while continuously downloading songs. Remember to 

click pause button in between your desired songs. Press stop button on

 the

 computer only when all 

your desired songs have been downloaded. 

After your have finished downloading, you may play back the songs through your computer. In stop 

mode, simply click (        ) SKIP TO START button then the (          ) PLAY button. 

Содержание E-69EB

Страница 1: ...1 Wooden Music Center with Bluetooth MODEL E 69EB...

Страница 2: ...a CD 9 Listening to the FM Radio 10 Listening to an External Audio Device AUX Mode 10 Listening to an External Audio Device Bluetooth Mode 10 Listening to a Cassette Tape 11 Maintenance Proper Handli...

Страница 3: ...hese instructions The safety and operating instructions should be retained for future reference 3 Heed all warnings All warnings on the appliance and in the operating instructions should be adhered to...

Страница 4: ...l triangle is intended to alert the user to the presence of important operating and maintenance instructions in the literature accompanying the appliance 16 This equipment is a Class or double insulat...

Страница 5: ...O TUNER KNOB In FM mode turn to tune in a station 15 FM Press to listen to the FM Radio function 16 TAPE Press to listen to a CASSETTE TAPE 17 CD Press to listen to CD 18 PHONO Press to listen in PHON...

Страница 6: ...8 LINE OUT jacks For amplifier device with RCA auxiliary input sockets insert the white and red plugs on the RCA cable into the unit Insert the opposite end into the amplifier device Be sure to connec...

Страница 7: ...urn the screw clockwise using a coin or screwdriver Important When you transport the unit turn the screw counterclockwise to secure the turntable C Speed Selector D Tone Arm holder E Tone Arm Before i...

Страница 8: ...white plug to the white jack and the red plug to the red jack Listening through Headphones not included For private listening first reduce the volume level to minimum Insert your headphones plug into...

Страница 9: ...sponding skip button or Pressing once will restart the current track Pressing twice in succession will return to the beginning of the previous track 8 To fast forward rewind within a track press and h...

Страница 10: ...Listening to the FM Radio 1 Press the FM button 2 Tune to the desired station using the Radio Tuner Knob Note In FM Mode the red FM ST indicator lights up when the station reception is in tune Adjusti...

Страница 11: ...from the center hole outward towards the outer edge with a soft dry cloth Never use such chemicals as record spray antistatic sprays or fluid benzine or thinner to clean discs they will irreparably d...

Страница 12: ...er it is recommenced that the stylus be replaced as soon as you notice a change in sound quality Prolonged use of a worn out stylus may damage the record The highest speed of 78 RPM records would wear...

Страница 13: ...2003 should support this Please use the legacy Audacity 2 0 6 version if your machine lacks SSE2 support Audacity for Mac is a Universal Binary for OS X 10 6 and later Audacity runs best with at leas...

Страница 14: ...k on OK to continue Note The language choice in the Windows EXE Audacity installer only selects the language for the installer 4 The Audacity Setup Wizard will appear Click on Next to install the soft...

Страница 15: ...15 6 Click on the Install button to start installation...

Страница 16: ...16 7 Click on Next to continue 8 Click on Finish to complete installation 9 You can now open the Audacity software and start recording your files...

Страница 17: ...ous Beta versions before installing current Audacity 6 Audacity 2 1 2 requires the CPU to support the SSE2 instruction set which should be available on any Intel hardware produced after 2001 and any A...

Страница 18: ...screen to go to beginning Pause Play Stop Record etc Use the File Edit View Transport Tracks Generate Effect and Analyze menus to Save Export and edit the music 1 Click the button to pause the record...

Страница 19: ...acity interface select Preferences In the pop up window of the Audacity Preferences tabs of Devices Playback Recording Quality Interface Tracks Spectrograms Import Export Extended Import Projects Libr...

Страница 20: ...ce below Recording and choose USB PnP Audio Device Click the arrow on Channels to select 2 Stereo Do not click OK until you finish all of the settings Note If you cannot find the USB PnP Audio Device...

Страница 21: ...laythrough Listen while recording or monitoring new track Click the checkbox beside Sound Activated Recording and adjust the Sound Activation Level dB to 36 NOTE Once the Sound Activated Recording is...

Страница 22: ...driver disc is inside your computer Click Libraries on the left side then in MP3 Export Library interface click Locate button to find lame_enc dll 5 You can download the lame software from the website...

Страница 23: ...zip under ZIP OPTION to download Click Save select the Folder you want to save it in then click Save again to save it Close the webpage then click OK to close the Audacity preference Minimize Audacity...

Страница 24: ...ick OK on Audacity Preferences to close and to complete your settings Now you can Record Export and save your favorite music 6 For detailed information about how to run this program please click Help...

Страница 25: ...another R L track will appear on the interface NOTE Pause button will not work during the recording process if the Sound Activated Recording in Preferences Recording is selected Clear the checkbox ne...

Страница 26: ...on your computer but the music needs to be saved and converted to WAV OGG or MP3 formats before exporting GENERAL PROBLEMS FOR WINDOWS VERSION 1 If you do not have the fluctuating wave on the interfa...

Страница 27: ...veal the settings In Sound recording select USB PnP Audio Device and click the Volume button to set the recording input level The WAVE IN window will appear In WAVE IN interface Adjust the recording v...

Страница 28: ...is possible that the default playback device has been changed to USB PnP Audio Device when the turntable connects to the PC Recommended Remove the USB cable from the PC Alternative This solution requ...

Страница 29: ...work For Other Windows versions users e g Windows XP Click Start and find Settings Control Panel In the Control Panel window find and double click into Sounds and Audio Devices In the Sounds and Audi...

Страница 30: ...ick SKIP TO START button and click then the PLAY button 1 Press button to return to the beginning of the first song 2 Move cursor to the wave graphic area left click mouse and hold then drag from left...

Страница 31: ...t of space and MYA AAC most iPod devices can play audios with this format You can also choose alternative formats such as AIFF WAV OGG or FLAC if these formats are supported on both your computer and...

Страница 32: ...IF YOU COPY THE FILE ONTO A CD DISC CD R OR CD RW AND PLAY WITH ANOTHER CD PLAYER YOU HAVE TO MAKE SURE THE CD PLAYER SUPPORTS THOSE FORMATS OTHERWISE THE COPIED CD DISC WILL NOT PLAY THE SAME THING...

Страница 33: ...hoose the file format of the recording that should be exported and put in the title in the file name and the folder of the location where it will be saved i e desktop Then click Save 4 Edit Metadata w...

Страница 34: ...tting the language 1 Click Edit and select Preferences 2 Another window titled with Audacity Preferences will appear Click the Interface tab and click the pull down arrow to select the language you wa...

Страница 35: ...rements Audacity for Mac is a Universal Binary for OS X 10 6 and later Audacity runs best with at least 1 GB RAM and a 1 GHz processor 2 GB RAM 2 GHz on OS X 10 7 and later For lengthy multi track pro...

Страница 36: ...sion you can click the Apple icon then select About This Mac The next window will display and the processor type and the OS version will display as below 3 Double click on the PPC folder 4 Then double...

Страница 37: ...on the window 5 Double click the Audacity folder and in the Audacity window files will be displayed in the folder 6 Double click the Audacity icon to start the software running alternatively drag the...

Страница 38: ...the play control buttons you will see the input and output level meters labeled L and R Under the output level meter is an icon that looks like a microphone Next to the microphone is a black arrow tha...

Страница 39: ...t and Analyze menus to Save Export and Edit the music 1 Click the button to pause the recording 2 Click the button to play 3 Click the button to stop the recording 4 Click the button to skip to start...

Страница 40: ...ear on the screen 2 In the window of Audacity Preferences click Devices on the left hand side Then on the right side within the Recording Device column set Device to USB PnP Audio Device Channels to 2...

Страница 41: ...beside Software Playthrough Listen while recording or monitoring new track In the Sound Activated Recording column click the checkbox beside Sound Activated Recording then slide the meter to 36 db NOT...

Страница 42: ...n select 44100 Hz in Default Sample Rate and select 16 bit in Default Sample Format 5 Click Libraries on the left then on the right side in MP3 Export Library column check if the program has detected...

Страница 43: ...Click the Browse button to find it If you cannot find it or the LAME file you found is not compatible click the Download button and a website will show automatically Scroll down the webpage to find a...

Страница 44: ...later Intel and then click Lame Library v3 98 2 for Audacity on OSX dmg or here to download the file Then locate LAME and click OK 6 Click OK to close the Preferences interface SETTING THE RECORDING I...

Страница 45: ...pause button on computer and downloading will continue and another R L track will appear on the interface NOTE Pause button will not work during recording process if the Sound Activated Recording in t...

Страница 46: ...t Release the mouse when the highlighter has reached the end of the first song 3 Click File tab then select Export Selected Audio 4 The window will pop up a dialog box for you to complete the Metadata...

Страница 47: ...inutes until the saving is complete EXPORT AND SAVE FILES AFTER RECORDING IS COMPLETED When the recording is finished click the on the screen and stop the cassette playback You have a music download o...

Страница 48: ...o export and save individually click the File tab on the Audacity window then select Export Selected Audio To export and save into one file click the File tab on the Audacity window then select Export...

Страница 49: ...can select other formats by clicking the arrow located at the right of the MP3 Files 3 Complete the Save As and Save in location click the Save button and the Edit Metadata window will display Complet...

Страница 50: ...he turntable and reopen Audacity If you are not able to hear any audio as you play the record please click on the microphone drop down arrow and select Start Monitoring This will enable you to hear th...

Страница 51: ...System Preference and double click it In the new interface find the Sound icon and double click it Adjust the Output volume under Sound Effects Under Input select USB PnP Audio Device and adjust the...

Страница 52: ...your RCA plugs are plugged into a source or not touching bare metal If you are experiencing noise through the USB you may have interference from the RCA plugs Ensure the USB cable is not touching or...

Страница 53: ...A CASSETTE PLAYER Track System 4 Track 2 channel stereo Tape Speed 4 8 cm sec Wow and Flutter 0 4 WRMS Frequency Response 125 to 6300 Hz 6 dB RECORD PLAYER Motor DC servo motor Drive System Belt Drive...

Страница 54: ...rly A TV set is being used nearby and is interfering with the radio reception Properly tune in the desired station Turn off the interfering TV set The sound is distorted The antenna is not oriented pr...

Страница 55: ...e unit and device again USB PC No sound Have not selected the USB PnP Audio Device for the recording device in the devices Microphone slider it is not at full volume Go back to the preferences as show...

Страница 56: ...quipment off and on the user is encouraged to try to correct the interference by one of the following measures Reorient or relocate the receiving antenna Increase the separation between the equipment...

Отзывы: