Vicon Vantage V16 Скачать руководство пользователя страница 6

Page 6 of 12

August 2015

Vantage 
Quick Start 
Guide

Set up your Vicon Vantage system

Vicon Lock+, Vicon Bonita Video 
cameras, etc.


To add more cameras, you can connect 
further PoE+ switches to the primary PoE+ 
switch via a non-powered Gigabit switch 
(see the 

Vicon Vantage Reference)

.

 4 

Turn on the PoE+ switch.

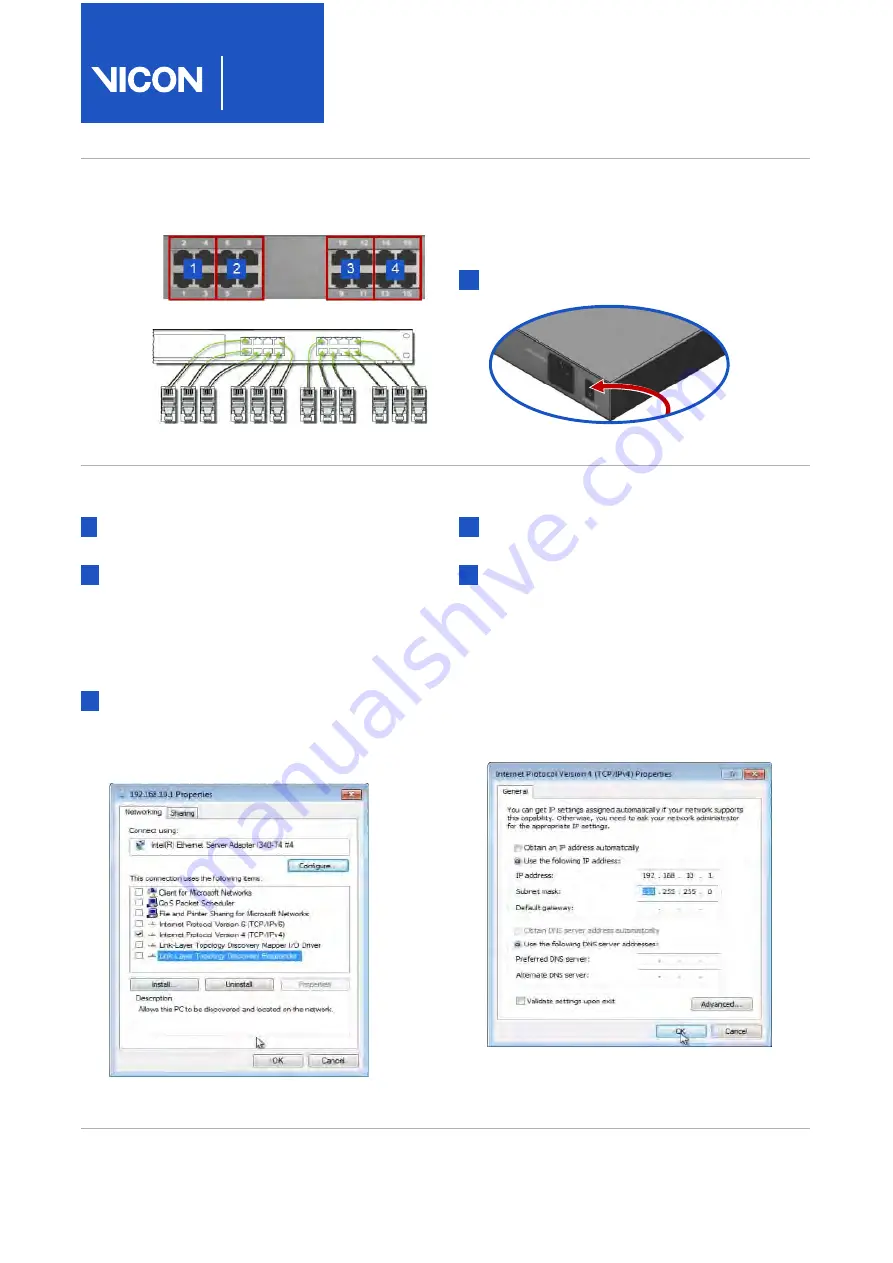
Connect and configure the PC

 1 

With the supplied network cable (RJ-45), 
connect the PoE+ switch to the PC.

 2 

On the PC open Windows 

Network 

Connections

, right-click the NIC to which 

the system is to be connected and then 
click 

Properties

. (If you are connecting 

more than one card, right-click the first 
NIC.)

 3 

In the 

Properties

 dialog box, on the 

Networking

 tab, clear all the unwanted 

items, leaving only 

Internet Protocol 

Version 4 (TCP/IPv4)

 selected.

 4 

Click on this option to highlight it and then 
click 

Properties

.

 5 

In the 

Internet Protocol Properties 

dialog 

box, on the 

General

 tab enter the following 

information:

a.

IP address

 box, enter 

192.168. 10.1

b.

Subnet mask

 box, enter 

255.255.255.0

.

c.

Default gateway

 box, leave the box 

blank.

Содержание Vantage V16

Страница 1: ...Quick Start Guide...

Страница 2: ...tion Systems Limited reserves the right to make changes to information in this document without notice Companies names and data used in examples are fictitious unless otherwise noted No part of this p...

Страница 3: ...h power strobes on board processing Gigabit Ethernet connectivity and a new design Available in high performance resolutions up to 16 megapixels at 120 fps full frame capture speeds PoE switch The sup...

Страница 4: ...cables Camera cables include a ferrite at the camera end only If you are using one or more Vicon Lock units or MX T Series cameras with a Giganet additional cables are supplied Vantage calibration de...

Страница 5: ...r to include height as well as width and depth in your volume calculations Install and connect the cameras 1 Installeachcameraonatripod onthewall or on a ceiling mounted rig You can order mounting bra...

Страница 6: ...PC open Windows Network Connections right click the NIC to which the system is to be connected and then click Properties If you are connecting more than one card right click the first NIC 3 In the Pr...

Страница 7: ...to dongles 3 If you are prompted to restart your PC do so as soon as possible License the Vicon application software Vicon application software uses Safenet licensing and a built in licensing utility...

Страница 8: ...ade the Selection editor make sure all of the cameras in your system are listed 4 Ensure that at the top left of the screen thesystemisshownasliveandconnected Position the cameras 1 In the System Reso...

Страница 9: ...volume Zoom in to a marker by right clicking and draggingthemouse Noticehowthepixels change as you lower the light to view pictures from a grayscale blob Grayscale Mode must be set to All 7 Notice th...

Страница 10: ...otate the focus ring note that the marker images get smaller and then begin to get larger again Good focus is when the marker is at its smallest size c Observe that with the aperture fully open the ma...

Страница 11: ...the system You calibrate the system to enable the cameras to capture subject movements throughout the volume You can also set the volume origin and orientation of axes in relation to the capture volu...

Страница 12: ...old is not too high a good default is 0 2 When I tap a calibrated camera to select it the camera indicates that it has been bumped To change the sensitivity of the camera to taps in the camera s Prope...

Отзывы: