

For more information on this and
other VIA products, please visit
www.viaembedded.com
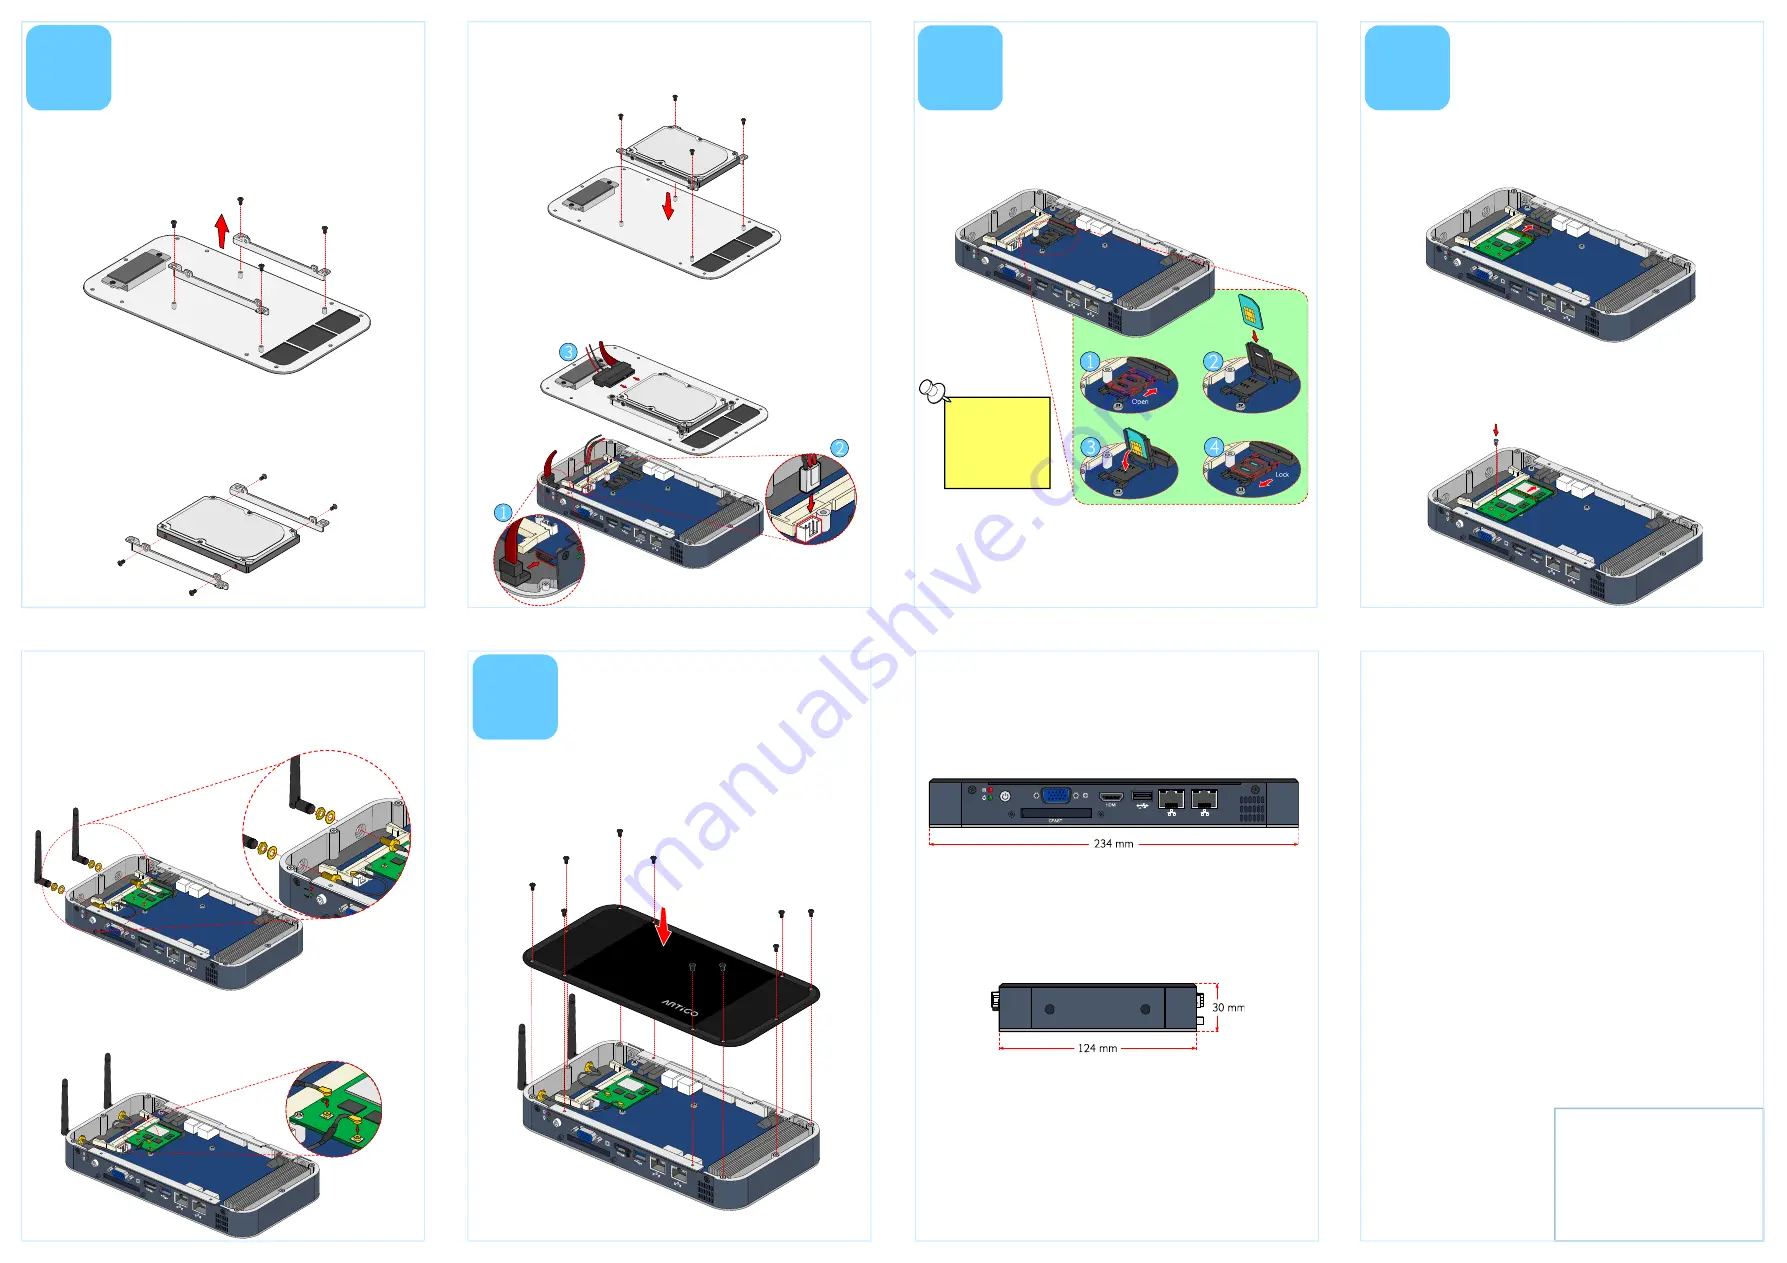
Step 3
Step 3
Step 3
Step 3
Reinstall the brackets with 2.5” SATA hard disk by aligning the
brackets on the standoff mounting holes. Then secure the
brackets with four screws.
VIA Technologies, Inc.
VIA Technologies, Inc.
VIA Technologies, Inc.
VIA Technologies, Inc.
1F, 531, Zhong-zheng Road,
Xindian District, New Taipei City 231,
Taiwan
Tel: 886-2-2218-5452
Fax: 886-2-2218-5453
Web: www.via.com.tw
Copyright © 2012 VIA Technologies, Inc. All rights reserved.
Step 1
Step 1
Step 1
Step 1
On the bottom side of the top cover, remove the SATA 2.5” hard
disk drive brackets.
3
Installing 2.5
Installing 2.5
Installing 2.5
Installing 2.5----inch
inch
inch
inch
SATA Hard Disk
SATA Hard Disk
SATA Hard Disk
SATA Hard Disk
Step 4
Step 4
Step 4
Step 4
Connect the SATA data and power cables into the system board
and connect the other end of the cables into the 2.5” SATA hard
disk.
Step 2
Step 2
Step 2
Step 2
Attach the brackets to the 2.5-inch SATA hard disk then secure it
with four screws.
4
Inserting 3G SIM Card
Inserting 3G SIM Card
Inserting 3G SIM Card
Inserting 3G SIM Card
Step 1
Step 1
Step 1
Step 1
Push back firmly the SIM card socket to unlock and open. Pull up
the socket and place the SIM card in the socket.
Step 2
Step 2
Step 2
Step 2
Gently close the socket by pulling down the SIM socket
containing with SIM card then carefully lock the SIM slot as
indicated in the figures.
Note:
Note:
Note:
Note:
Ensure the angled
corner of the SIM
card is placed in
the correct way
before closing the
socket.
5
Installing 3G and
Installing 3G and
Installing 3G and
Installing 3G and
WLAN kit
WLAN kit
WLAN kit
WLAN kit
Step 1
Step 1
Step 1
Step 1
Align the notch on the miniPCIe (3G/WLAN) module with the
notch on the miniPCIe slot then insert the module at 30° angle.
Step 2
Step 2
Step 2
Step 2
Once the module has been fully inserted, push down the
module until the screw hole align with the standoff hole then
secure the module with screw.
Step 3
Step 3
Step 3
Step 3
Locate the 3G/WLAN antenna holes at the rear side of the
chassis. Insert the 3G/WLAN port connectors into the antenna
holes from the inside of the chassis. Insert the washer and fasten
it with the nut then install the external antenna.
Step 4
Step 4
Step 4
Step 4
Gently connect the mini coaxial cables of the 3G/WLAN port
connectors to the mini RF connectors on the 3G/WLAN miniPCIe
module.
Dimensions
Dimensions
Dimensions
Dimensions
6
Installing the Chassis
Installing the Chassis
Installing the Chassis
Installing the Chassis
Top Cover
Top Cover
Top Cover
Top Cover
Front View
Front View
Front View
Front View
Side View
Side View
Side View
Side View
Step 1
Step 1
Step 1
Step 1
Align and install the top cover with the chassis and secure it with
ten screws.


