background image

Koryuu Transcoder Quick Start Guide 


VideoGamePerfection.com

Koryuu Transcoder Back

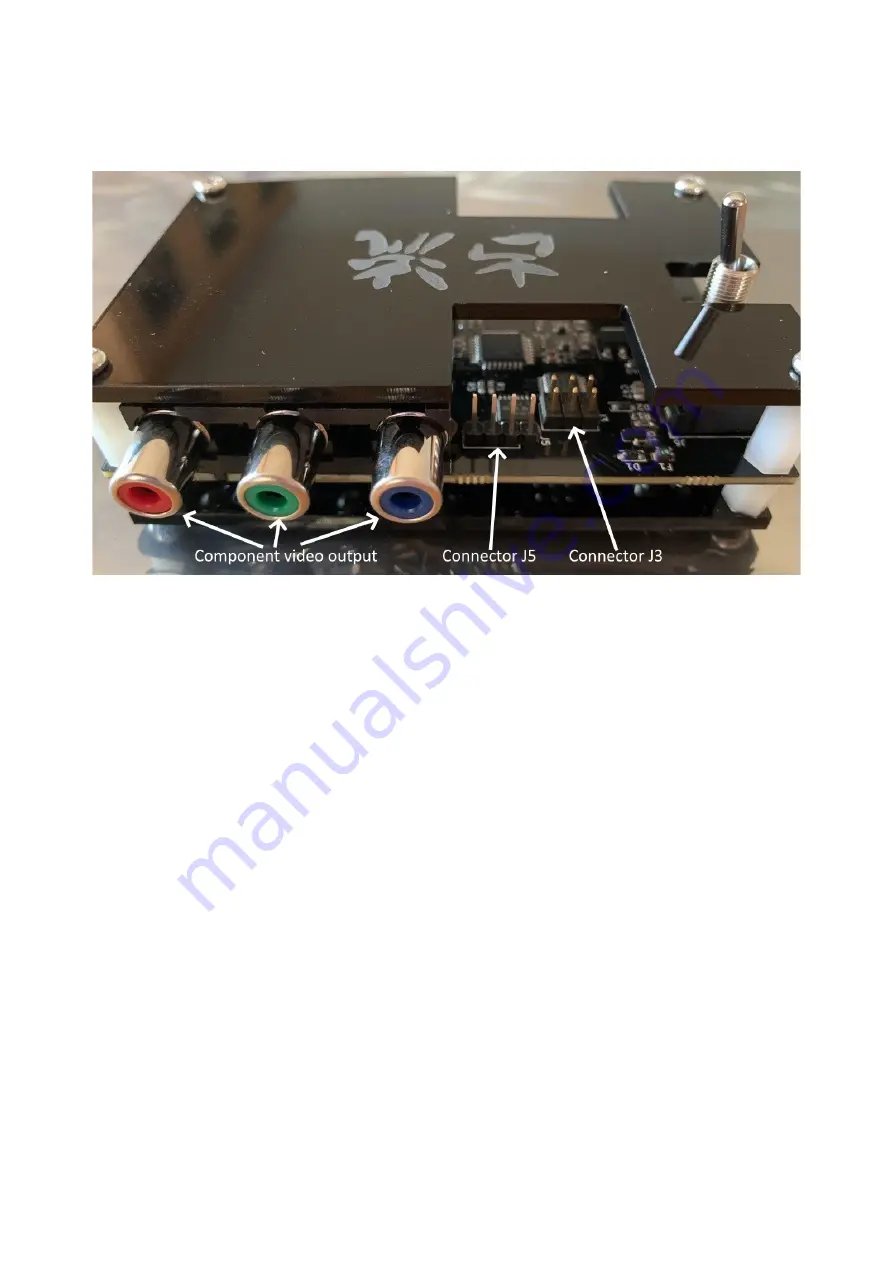
Component video output – 

Connect a component video cable from the output connectors to your 

OSSC, display, capture card or other video device. All three component video cables must be 
connected in the correct order to achieve the correct video output. Please match the colours of the 
plugs with the colours on your target display or video device and remember the order of the plugs 
may not be consistent across devices.

On the Koryuu the plugs are colour coded as follows:-

Pr – Red 

Y – Green 

Pb - Blue

Note that Koryuu cannot work in reverse, it cannot convert component video to composite or S-
video.

Connector J5

 – This connector is used for debugging and development and is not needed in normal

operation.

Connector J3

 – This connector is used for firmware updates. A USB Asp or similar programmer is 

required for this. As firmware updates are launched, a tutorial on how to update your Koryuu will 
be posted on our website.

Note that the Koryuu does not input or output audio signals. Connect any required audio input 
directly to your display or video processor.

Page 6

Содержание Koryuu Transcoder

Страница 1: ...anscoder Quick Start Guide This document is copyright VGP Media Ltd 2020 All rights reserved worldwide VideoGamePerfection com is a trading name of VGP Media Ltd Registered in Republic of Ireland numb...

Страница 2: ...k 6 Koryuu Transcoder Side 7 Koryuu Transcoder LEDs 8 Using the Koryuu Transcoder 9 Using the Koryuu Transcoder with the OSSC 9 Using the Koryuu Transcoder with other devices 9 Troubleshooting 10 More...

Страница 3: ...ted circuits always turn off the power before connecting to a display or a device Be careful when connecting and disconnecting cables Do not apply excessive force Some component video cables attach to...

Страница 4: ...re are currently four input modes 1 Composite video CVBS 2 Composite video pedestal 7 5 IRE mode 3 S Video YC 4 S Video pedestal 7 5 IRE mode When powered on the Koryuu defaults to input mode 1 Press...

Страница 5: ...ly and check for the correct orientation Inserting the cable at an angle or forcing it into place can damage the cable and or the Koryuu If your device has both composite video and S Video outputs you...

Страница 6: ...t be consistent across devices On the Koryuu the plugs are colour coded as follows Pr Red Y Green Pb Blue Note that Koryuu cannot work in reverse it cannot convert component video to composite or S vi...

Страница 7: ...5 volt barrel jack power supply unit PSU supplying at least 1 amp of current The tip must be 2 1 x 5 5mm and centre positive Please ensure your power supply meets these requirements Never connect a p...

Страница 8: ...Ds Power LED This LED will illuminate green whenever the Koryuu is powered on Option LED This LED will illuminate red whenever the Koryuu s option mode is enabled This is expected to be utilised in fu...

Страница 9: ...ections to your OSSC device Simply connect your Koryuu to the AV2 input on the OSSC select AV2 YPbPr input on your OSSC and then feed your source signal into the Koryuu using either of the two inputs...

Страница 10: ...sses check composite or S video cable connection and status of source device Blurry image Option button pressed Press option button again to disable this mode This button is reserved for future option...

Страница 11: ...one years warranty Please consider contacting us before disposing of your Koryuu Transcoder even if you no longer want it If you do need to dispose of the unit in most countries you can recycle the un...

Отзывы: