background image

22  

400202.01

vetus®

Installation manual VF4 VF5

4.1.2  Intake air requirement 

Engine compartments with natural draft ventilation must have vent openings of sufficient size and location to 
accomplish the tasks previously outlined.

IMPORTANT:  

The size of ventilation openings must be increased if any auxiliary equipment is 
located in the engine compartment.

The combustion air requirement (per engine) for the specified engines at wide open throttle are shown in the 
table below:

Combustion Air Requirements (single engine)

Model

Engine Air requirements at maximum speed

VF4

7 m

3

/min (250 cu.ft /min)

VF5

8.5 m

3

/min ( 300 cu.ft /min)

In order to guarantee the optimum engine temperature, 30 - 40°C (86 - 104°F), it is necessary to make sure that 
the engine compartment ventilation meets the following requirements:

•  Inlet (combustion air): the surface must not be lower than 230 cm

2

 (35 sq.in.) (per engine). We recommend 

that the air inlets are positioned in such a way as to favour a continuous air flow towards the engine’s air 
filter. 

•  Hot air outlet: the surface must not be less than 100 cm

(16 sq.in.) per engine and the air outlets must be 

positioned in the upper part of the engine compartment. Favourite the correct ventilation of turbocharger.

For all those applications that do not allow for these requirements to be fully met, it is required that the air inlets 
must be connected directly from the outside of the engine compartment with an appropriate water system and 
also we require that a ventilation system must be installed so that the hot air flow is forced from the engine com-
partment to the outside. All the components must meet the European Community standards and regulations.

  WARNING

If the temperature at the engine air inlet exceeds 40°C (104°F), the engine may be seriously damaged.

4.1.3  Compartment temperature indications.

Too high an inlet air temperature lowers the engine performance. Engine compartment temperature shall not 
exceed outside air temperature by more than 15 °C (59°F).
Since many factors influence engine compartment temperature, temperature measurements should always be 
carried out.
Observe the following:

•  The boat being tested shall be a standard production boat fitted as it would be for delivery to a dealer.

•  Temperature test meter used shall be of the type that can be read without opening the engine cover.

•  During the test, in Step 1., engine compartments are to remain closed. No outside air is to be forced into the 

engine compartment during the test and the bilge blower should not be running.

Содержание VF4.140E

Страница 1: ...Installation manual VF4 VF5 VF4 140E VF4 170E VF4 190E VF5 220E VF5 250E ...

Страница 2: ...vetus Installation manual VF4 VF5 400202 01 Copyright 2012 Vetus n v Schiedam Holland ...

Страница 3: ...9 4 Engine s requirements 21 4 1 Engine Compartment 21 4 1 1 Engine Compartment Ventilation 21 4 1 2 Intake air requirement 22 4 1 3 Compartment temperature indications 22 4 2 Fuel connection 23 4 2 1 Fuel Delivery System 23 4 2 2 Fuel connections 24 4 2 3 Shut off valve 24 4 2 4 Diesel fuel Pre filter and fuel additives 24 4 3 Sea water circuit 25 4 3 1 Sea cock 25 4 3 2 Seawater pickup hose 25 4...

Страница 4: ...6 5 3 1 Maximum specifications of the system 46 5 3 2 Command station Pilot instruction 47 5 3 3 Friction adjustment 47 5 3 4 Control keypad 47 5 3 5 Taking over control 49 5 3 6 Warming up the engine Warm up 49 5 3 7 Synchro mode operation 49 5 3 8 Mechanical installation 50 5 3 9 Connection of push pull cable 51 5 3 10 Installation of power supply 54 5 3 11 Power supply 54 5 3 12 Outgoing cables...

Страница 5: ...the problems are caused by faults or inaccuracies which occur during the installation It is most important therefore to follow during installation the recommendations mentioned in this manual 1 1 Engine ID Plates The ID labels are placed on the engine as shown in the pictures below The engine number is marked on the engine where indicated in the picture below ...

Страница 6: ...orrosion could damages the engines during their storage 1 3 First engine start 1 Read the owner s manual 2 Verify the fuel feed line for possible leaks Take care to avoid restrictions in the fuel line pipes 3 Verify and if required grease all the couplings the turbocharger operating mechanism 4 Check and verify the electrical connections Important Wrong connection of positive and negative could pr...

Страница 7: ...nt If you hear a strange noise or vibration of the engine is extreme or black smoke is coming out of the exhaust stop the engine immediately and ask for assistance When the temperature of the engine stabilizes at a temperature higher than normal it might be neces sary to bleed the coolant circuit Bleeding the coolant circuit Open the expansion tank cap to let the air escape Increase the RPM to 200...

Страница 8: ...n lights and breather pipe lights 7 Put a very visible paper on the engine where it is clearly stated that the engine is WITHOUT OIL 8 Disconnect the batteries and put them in a dry place always making sure that they are charged 9 Drain the cooling water in case it does not have anti freezing liquid or anti corrosion liquid 10 If the engine is connected with the propulsion system verify for the oi...

Страница 9: ...nical propulsion couplings 13 Start the engine and run at minimum speed for few minutes 14 If no anomalies bring the engine to its operating temperature 70 80 C 158 176 F Verify that there is no air in the coolant circuit bleed the air from coolant circuit if necessary 15 Turn off the engine and check again the engine oil level and coolant level 16 Verify for tightening ...

Страница 10: ...05 lbs 333 kg 734 lbs 333 kg 734 lbs Engine installation Max installation angle 10 degrees backwards Max athwartships angle 20 degrees continuously 30 degrees intermittend Maximum Output at the flywheel ISO 3046 1 103 kW 140 hp 125 kW 170 hp 140 kW 190 hp 162 kW 220 hp 184 kW 250 hp at the prop shaft ISO 3046 1 99 9 kW 135 8 hp 121 2 kW 164 9 hp 135 8 kW 184 3 hp 157 1 kW 213 4 hp 178 5 kW 242 5hp...

Страница 11: ...l min 26 4 US gal min Total head at max flow 1 5 bar 21 psi Inlet connection for hose 32 mm 1 1 4 I D Heater supply connection 32 mm 1 1 4 I D Heater return connection 32 mm 1 1 4 I D Exhaust system Exhaust diameter for gear box 90 mm for stern drive 76 mm 3 Exhaust back pressure at specified output max 300 mbar Electrical System Voltage 12 Volt Alternator 14 Volt 105 A 14 Volt 140 A Startmotor 14...

Страница 12: ...s and mating surfaces For connections where special torque denotations are not indicated the general tightening torque is applicable according to the table below The torque readings are guide values and connections do not need to be tightened with a torque wrench The screws and nuts divided into different class It is therefore important when a screw connection is dismantled to return the screw to ...

Страница 13: ... Vetus Warranty 2 6 Engine bed The engine bed should have sufficient stiffness and strength it must be bonded or connected over its total length to the bottom of the boat and in addition must have sufficient transverse reinforcement either by its own method of construction or alternatively by the use of straightening ribs An engine which is easily accessible will be inexpensive to work on is terms...

Страница 14: ... VF4 VF5 2 7 Overall dimensions 700 27 35 64 350 13 49 64 350 13 49 64 315 12 3 8 305 12 min 82 3 1 4 max 110 4 5 16 VF4 140E 700 27 35 64 350 13 49 64 350 13 49 64 315 12 3 8 305 12 min 82 3 1 4 max 110 4 5 16 290 11 7 16 VF4 170E VF4 190E ...

Страница 15: ...3 4 515 20 1 4 700 27 9 16 960 37 13 16 260 10 1 4 190 7 1 2 505 19 7 8 695 27 3 8 111 4 3 8 192 7 9 16 224 8 13 16 8 1 10 VF4 170E VF4 190E ZF45 120 4 3 4 515 20 1 4 700 27 9 16 1010 39 3 4 310 12 3 16 190 7 1 2 505 19 7 8 695 27 3 8 150 5 7 8 260 10 1 4 230 9 1 16 1 10 ...

Страница 16: ...27 61 64 350 13 49 64 360 14 11 64 305 12 305 12 290 11 7 16 min 82 3 1 4 max 110 4 5 16 VF5 220E VF5 250E 710 27 61 64 350 13 49 64 360 14 11 64 260 10 1 4 195 7 43 64 510 20 5 64 705 27 3 4 265 10 7 16 min 82 3 1 4 max 110 4 5 16 VF5 220EB1 VF5 250EB1 ...

Страница 17: ...manual VF4 VF5 VF5 220E ZF45 VF5 250E 120 4 3 4 600 23 5 8 720 28 3 8 1030 40 9 16 230 9 3 32 150 5 15 16 195 7 43 64 505 19 7 8 705 27 3 4 1 10 559 22 820 32 9 32 1695 66 47 64 776 30 35 64 VF5 220E VF5 250E BRAVO ONE 94 3 11 16 1 10 ...

Страница 18: ... fuel feed circuit 2 then the air compressed air from the turbo is cooled After cooler 3 then the internal coolant circuit is cooled 4 then the exhaust elbow is cooled 5 the the raw water is injected into the exhaust gasses and mixed with the exhaust gasses it goes overboard Sea water pump Gearbox Oil Cooler Exhaust Gas Sea water IN Fuel Cooler Engine Coolant Heat Exchanger Charge Air Heat Exchang...

Страница 19: ... When lift and during the transport of unpacked engine use means of appropriate load capacity When lift packed engine pay attention on load indication printed on box During the installation the installer had to follow the designer s indications Do not make changes to the engine components for any reason If appropriate before using the engine for the first time simulate a few trial manoeuvres to id...

Страница 20: ... fuel see the fuel indications Keep the equipment as much efficient as possible and carry out the scheduled maintenance operations established with the manufacturer Important This installation manual has been published by VETUS to aid the boat manufacturer involved in the application and installation of the products described herein It is assumed that these personnel are familiar with marine produ...

Страница 21: ...our boat after opening the engine packages always use the spacer rod as is show in the figure to lift the engine Assure that the spacer rod is in good condition and strong enough to withstand the weight For complete indications see the danger label on the engine cover carter WARNING The weight of the gearbox will shift the engine centre of gravity astern take care when lifting the engine ...

Страница 22: ...20 400202 01 vetus Installation manual VF4 VF5 ...

Страница 23: ...oes not cover the design of the ventilation system as it pertains to ventilation of fumes from the engine compartment The requirements for ventilation of fumes varies considerably from one boat design to the next as well as from country to country and therefore the boat manufacturer is responsible for ensuring their application is in compliance with the appropriate industry regulations and standar...

Страница 24: ...engine compartment Favourite the correct ventilation of turbocharger For all those applications that do not allow for these requirements to be fully met it is required that the air inlets must be connected directly from the outside of the engine compartment with an appropriate water system and also we require that a ventilation system must be installed so that the hot air flow is forced from the e...

Страница 25: ...ciple for all boats The fuel tank is an integrated component of the boat Refer to the special information on service and mainte nance from the tank manufacturer Only a few points related to function and safety are listed here All connections should be on the upper side of the tank The drain plug at the lowest point on the tank serves to permit the removal of water and sediment The filler tank pipe...

Страница 26: ...n fuel lines should be avoided 4 2 3 Shut off valve Make sure your fuel system has positive shut off valves know their locations and how they operate 4 2 4 Diesel fuel Pre filter and fuel additives There is the possibility that contamination of diesel fuel and algae growth in the diesel fuel could block the lift pump resulting in poor performance IMPORTANT The engine is provided with an element ty...

Страница 27: ...water fittings use only MARINE WATER HOSE steel reinforced and 2 5 bar 35 psi max pressure for suction or pressure use IMPORTANT Take care for the hose temperatures working range 4 3 3 Seawater strainer Seawater strainer used must be of sufficient size to ensure that an adequate supply of water will be maintained for cooling the engine Select a proper seawater strainer based on the following chart...

Страница 28: ...under all conceivable conditions of boat trim boat operation sea conditions and heel angle while not exceeding the manufacturer s back pressure recommendations Seawater intrusion is usually catastrophic to turbocharger and engine IMPORTANT The engine supplier is not in a position to judge what installation characteristics will prevent water intrusion in all conceivable circumstances That judgment ...

Страница 29: ...nimize F The water lift muffler should be sized to hold multiples of the volume of water that spills back from the exhaust highest point when the engine shuts off The actual amount of normal spill back at shut down is a function of length F the exhaust hose inside diameter E and the sea water pump flow rate about 100 litres min 22 Imp gal min 26 5 gal min at maximum speed The larger the water lift...

Страница 30: ...hon valve must be well above the worst case water level under all conceivable conditions of boat trim boat operation sea conditions and heel angle The anti siphon break and the exhaust hose point should be located as near to the boats centre line as possible especially on sailboats due to large and steady healing The siphon must be accessible for maintenance System with water injection point 15 cm...

Страница 31: ... chambers and severely damage the engine Damage caused by water in the engine will not be covered by Warranty unless this dam age is the result of defective part s Verify that the riser provides the required dimension c or a distance greater than c as indicated Model VF5 VF4 c Must be at least 580 mm 23 inches Engine With Standard Riser a From Waterline To Top Of Transom b From Highest Point On Ex...

Страница 32: ...RPM of the engine The reduction of the transmission The maximum hull speed of the boat The type of boat and its displacement The waterline length LWL High rpm caused by an excessive trim angle should not be used in determining correct propeller selection If full throttle operation is below the specified range the propeller must be changed to prevent loss of performance and possible engine damage O...

Страница 33: ... and water tanks about half full with all the usual equipment on board and on sailboats after the mainmast has been stepped and the final rigging has been installed Take sufficient time to make this alignment don t be satisfied with less than perfect results The alignment is correct when the propeller shaft can be easily slipped backward and forward into the counter bore and when a feeler gauge in...

Страница 34: ...d the installation drawings Engine bed must position engine so that a minimum of 6 mm 1 4 in up and down adjustment still exists on mounts after perform ing final engine alignment This is necessary to allow for realigning engine in the future IMPORTANT For the engine instal lation don t exceed the 15 degrees astern alignment angle ...

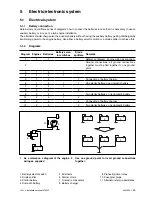
Страница 35: ...tters Remarks 1 1 1 Reference diagram Engine wiring as supplied 2 Ground connections all ground connections together must be tied together to one ground point 3 1 2 1 4 1 2 1 5 1 2 1 Connection of battery charger 6 1 2 1 1 One starter battery one domestic battery 7 2 2 1 8 2 2 2 9 2 3 2 Two starter batteries one domestic battery 10 2 2 1 2 11 2 2 1 2 Connection of battery charger 12 2 3 2 Two star...

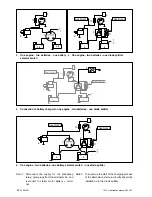
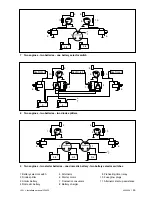
Страница 36: ... up the start of the charging process of the alternator a start up circuitry should be installed on to the diode splitter 2 3 4 5 6 7 9 10 11 See Note 1 See Note 2 8 6 1 7 3 4 2 5 9 10 11 See Note 1 See Note 2 3 One engine two batteries one battery selector switch 4 One engine two batteries one diode splitter 5 Connection of battery charger to one engine two batteries one diode splitter 6 One engi...

Страница 37: ...Preheating timer relay 10 Fuse glow plugs 11 Alternator start up assistance 5 6 9 10 1 7 3 4 3 4 5 6 9 10 7 Two engines two batteries one battery selector switch 8 Two engines two batteries two diode splitters 2 3 4 5 6 7 9 10 11 See Note 1 See Note 2 2 5 6 9 10 11 See Note 1 5 6 9 10 1 3 4 3 4 1 7 3 4 5 6 9 10 9 Two engines two starter batteries one domestic battery two battery selector switches ...

Страница 38: ...9 10 11 See Note 1 6 5 9 10 11 See Note 1 See Note 2 2 8 10 Two engines one starter battery one domestic battery one battery selector switch two splitters 11 Connection of battery charger to two engines one starter battery one domestic battery one battery selector switch two splitters Note 1 Disconnect the supply for the preheating relay glow plugs from the alternator B and reconnect to starter mo...

Страница 39: ...Heavy current through wiring that is too thin or resistance provoked by bad connec tion can generate excessive heat and could cause fire WARNING For Vetus splitter model 1252 1253 Maximum current the battery splitter can be used for a continuous current up to a maximum of 125 Amps Make sure that the maximum total current of alternator and battery charger not exceed the maximum specify current 12 T...

Страница 40: ...ctrical connection Ensure the positive battery cable is inserted through the protective rubber boot before attachment After battery cables are connected apply a thin coat of liquid neoprene to the terminals Be sure to slide rubber boot over positive terminal after making connection VF4 series VF5 series 1 Engine Starter 2 Positive battery cable connections 3 Negative battery cable connections IMPO...

Страница 41: ...Terminals must be soldered to cable ends to ensure good electrical contact Use electrical grade resin flux solder only Do not use acid flux solder as it may cause corrosion and a subsequent failure Battery Cable Length Minimum Cable Cross section Up to 0 9 m 3 ft 35 mm2 2 0 9 1 2 m 3 4 ft 50 mm2 1 1 2 1 5 m 4 5 ft 50 mm2 0 1 5 1 8 m 5 6 ft 70 mm2 00 1 8 2 4 m 6 8 ft 95 mm2 000 2 4 3 m 8 10 ft 120 ...

Страница 42: ...gative ground 1 Select an starter battery that meets all of the following specifications 12 Volt marine type Cold Cranking Amps CCA not lower than 850 A Tapered post connectors or side terminal connectors Do not use a battery with wing nut connectors Battery capacity rating of at least 110 Ah Good resistance to charge discharge cycles Deep cycle 2 Select a service battery that meets all of the fol...

Страница 43: ... F7 Transparent 25 DIRECT Fuel Pre heating resistor F9 Blue 15 OUT MAIN RELAYS Glow plug pre heating RELAY F10 Yellow 25 OUT MAIN RELAYS Pin 5 ECU PRE Heating RELAY F11 Brown 10 OUT MAIN RELAYS Pin 4 ECU FUEL Fuel pump RELAY Relay Code TYCO Characteristics Description J4 46520432 12V 30A Main Relay J5 12V 30A Fuel pump J6 12V 30A Fuel pre heating J8 12V 30A Battery alarm light J7 12V 70A Engine st...

Страница 44: ... that constitute the electric system of the engine are as following Waterproof box in steel featuring the ECU Engine harness Instrument panel Here below you will find a description of the parts Waterproof ECU box 1 Emergency RED Button 2 Connector for instrument panel 3 Anti vibration mounting set 4 Fuses Instrument panel cable 1 2 1 1 4 3 ...

Страница 45: ...400202 01 43 vetus Installation manual VF4 VF5 5 2 1 Engine installation wirings Trim Indic Transm oil level signal Trim sign Extension harness 12V Ground ECU BOX Engine Gearbox Instr Panel ...

Страница 46: ...TOR COOLANT TEMPERATURE SENDER 1 COOLANT TEMPERATURE SENDER 2 RPM SENDER INJECTOR 1 INJECTOR 2 INJECTOR 3 INJECTOR 4 OIL PRESSURE SENDER POTENTIO METER ALTERNATOR Signal Signal Warning light GROUND FUEL FILTER TEMPERATURE SENDER FUEL PRE HEATING FUEL PUMP TURBO PRESSURE SENDER RAIL PRESSURE SENDER FUEL PRESSURE REGULATOR OBD DIAGNOSE TIMING SENDER GLOW PLUGS Fuse 80 A Glowplugs WATER IN FUEL SENDI...

Страница 47: ...NT TEMPERATURE SENDER 1 COOLANT TEMPERATURE SENDER 2 RPM SENDER INJECTOR 1 INJECTOR 2 INJECTOR 3 INJECTOR 4 OIL PRESSURE SENDER POTENTIO METER ALTERNATOR Signal Signal Warning light GROUND FUEL FILTER TEMPERATURE SENDER FUEL PRE HEATING FUEL PUMP TURBO PRESSURE SENDER RAIL PRESSURE SENDER FUEL PRESSURE REGULATOR OBD DIAGNOSE TIMING SENDER GLOW PLUGS Fuse 80 A Glowplugs WATER IN FUEL SENDING UNIT S...

Страница 48: ...configuration of the system Actuators The maximum number of engines that the system can control is 2 Command stations The maximum number of operating levers in the installation is 3 Operating temperature From 10 to 85 C Storage temperature From 40 to 90 C Mechanical features Nominal load when control box is providing a pushing force 150 N 15 kgf with power consumption 1 5 A Max load when control b...

Страница 49: ...trol lever fixing screw It is possible to adjust the friction screwing and unscrewing the inner screw placed into the hole B When the regulation will be done mount the screw and the plastic cap IMPORTANT In case of command station for one engine the friction is placed under the right command lever 5 3 4 Control keypad On the command station is mounted an electronic keypad with 4 push buttons and 4...

Страница 50: ...LED is on the station has control over the installation Warm Sync If the LED flashes it is busy with the WARM UP i e the engine engines can run at increased speed because the gearbox is still in neutral If the LED is on the installation is functioning in synchronous mode Both engines are controlled by the right hand lever and the right hand trim appli ance controls both trims if present Warm Sync ...

Страница 51: ...ore the corresponding LEDs Engine flash it is possible to take over control by holding the Command key pressed in for three seconds IMPORTANT Once the takeover procedure has been carried out the station is ready for operating the engine IMPORTANT Before taking the command check that all the passengers are safely on board 5 3 6 Warming up the engine Warm up If both levers are in neutral by pressing...

Страница 52: ...6 114 4 1 2 174 6 7 8 155 6 1 8 155 6 1 8 130 5 1 8 32 1 1 4 35 1 3 8 300 11 13 16 350 13 3 4 280 11 332 13 1 16 210 8 1 4 25 1 ø 20 3 4 Flexible mounts Connections Install the control box at least 25 cm 10 in from the wall Do not install the control box with the plugs upwards Dimensions of the command station Dimensions of the control box Installation of the control box ...

Страница 53: ... trim connection for the standard cable for inboard engine 5 3 9 Connection of push pull cable The cable kit selected must be used for connecting the push pull cable A choice of 2 suitable kits is available depending on the type of push pull cable that is to be used for the gear box These kits are standard cable and the outgoing cable from Mercruiser outdrive Connection kit Standard cable kit Merc...

Страница 54: ... the stainless steel plate into the aluminium device locking the cable between them as shown in the picture 4 Insert the push pull cable into the bracket on the actuator and connect the eyelet to the pin and lock it using the segeer Use the emergency lever to help the operations 5 Lock the aluminium device with the corresponding screw the brass spacer and the washer at the distance indicated into ...

Страница 55: ...thread of the cable 2 Insert the plastic glass into the aluminium device placing the push pull cable between them as shown into the picture 3 Insert the push pull cable into the bracket on the actuator 4 Put the brass spacer on the pin and fix the plastic eyelet on the cable on it Lock the eyelet with the Seeger Use the emergency lever to help the operations 5 Lock the aluminium device with the sc...

Страница 56: ...tted with a 10 A decoupling diode In this way the control box is always powered by the battery which is high est charged The minimum cross section for the cable is 2 5 mm2 AWG 12 R1 is a relay that is acti vated by the key of the port engine while R2 is a relay that is activated by the key of the starboard engine 5 3 11 Power supply The system works on 12 V battery power supply The table gives the...

Страница 57: ...JP10 Engine DX 1 V_out CH1 Yellow Green 4 poles black outer jacket 2 V_out CH2 Grey 3 Black 4 GND Black Brown Brown The outgoing cables are 2 5 m 8 ft in length The throttle lever has an AMP SuperSeal plug with 6 poles for coupling to Vetus VF series engines Should the model of the engine be different take off the plug and follow the pin out as shown in the table above JP8 JP3 JP5 JP9 JP10 JP12 JP...

Страница 58: ...rt of this manual Note 1 In case of system for 1 engine the cables outgoing from Left engine section will be not present Note 2 In case of system without trim the cables outgoing from Trim sections will be not present 5 3 13 Trim cable In case of actuator for two engines will be present no 2 trim cables 12 V Fuse Throttle Trim Gearbox CANbus Starboard engine Portside engine Throttle Trim Gearbox Y...

Страница 59: ... VF5 Trim grey Trim Trailer blue Trim yellow Supply red Trim green Trim Trailer blue Supply red Fast on F Mercruiser pump Vetus Actuator Fast on F Fast on M Fast on M Female Plug Male plug Mercuiser side Vetus not supplied by Vetus blue violet ...

Страница 60: ...of the specific parameters follow this procedure 1 With the actuator turned on the display shows _ _ pressed both keys 1 and 2 and the first parameter will appear on the display 2 Pressing the key 3 the display will start to flash Now it is possible to tune the parameter using the keys 1 and 2 3 When the parameter has been set use the key 3 to store this parameter 4 To set the other parameters scr...

Страница 61: ... the keys 1 and 2 and when the parameter that you would like to change will be reached follow this procedure starting from the point 3 6 When the setting of all parameters is finished turn off the actuator Display mode The viewer automatically goes to mode DISPLAY _ _ if no key is pressed for two minutes The functioning of the installation is shown in mode DISPLAY Mode Display consists of a series...

Страница 62: ... be set for the push pull cable in accordance with the procedure in Chapter 10 2 1 Right hand engine Neutral 0F Right hand engine Forward 0H Left hand engine Reverse IL Left hand engine Neutral IF Left hand engine Forward IH Left hand engine Throttle lever minimum channel 1 L1 0 5 Vdc 0 9 9 Left hand engine Throttle lever maximum channel 1 H1 4 3 43 Begin point of acceleration channel 1 C1 00 00 L...

Страница 63: ... Stern drive and outboard engines if it is not possible to set the strokes when the engine is running so that this has to be done when the vessel is not in the water then simulate the rotation of the screws manually to make coupling the gearbox easier 3 If the strokes of the gearbox are known it is sufficient to physically measure the movement of the cursor on the control box in the various positi...

Страница 64: ...te the mechanical levers you have to rotate clock wise the taps A on the actuator s levers and then you can command the engine directly from the lever B In order to come back to normal mode you have to unscrew the tap A and then move the command station After the first using the lever B will engage automatically the position before the emergency operation IMPORTANT In a emergency situation with a ...

Страница 65: ...erature sensor adapter and new sensor 2 Dismount the oil pressure sensor Mount the adapter and new sensor 3 Connect the new harness double sta tion from ECU BOX to panels 4 Connect the engine cable to new sen sors 6 Optional 6 1 Fly bridge station installation For the installation of second command station follow the instruction below ...

Страница 66: ...laced with its highest point below the expansion tank to avoid air blocking of the circulation of the coolant WARNING Avoid a performance loss and or possible engine damage Engine coolant must flow continuously from the engine intake manifold to the engine water circulating pump NEVER close off or block the coolant flow to or from a heater All heater installations must be plumbed in series with th...

Страница 67: ...icture and insert the T pipe fitting clamp 2 Unscrew the plug from thermostat housing and replace it with the brass pipe use the copper ring 3 Follow the instruction below how to connect the fittings Fill the circuit and take care to drain air IMPORTANT Take care to avoid engine overheating Expansion tank Exhaust manifold T pipe fitting Valve WATER HEATER Min 200 mm 8 inch COOLANT LIQUID LEVEL The...

Страница 68: ...66 400202 01 vetus Installation manual VF4 VF5 ...

Страница 69: ...ons it could be necessary to use a different viscosity grade oil Please refer to VETUS assistance for other informations Please avoid mixing this oil with other oils because in that case the conditions related to the assistance inter vals are no longer guaranteed to be the right ones In case you are not able to find the VETUS oil make sure you use oil with the same characteristics and speci ficati...

Страница 70: ... oil back to at least level B The oil level must never exceed level A If the engine is to be used under severe conditions for instance being used for many operating hours 10 12 hours the oil level should be at least in the middle of the two signs min max Refill the oil through the oil refill gate as shown below if is required IMPORTANT Make sure that when you check the oil level that the engine is...

Страница 71: ...400202 01 69 vetus Installation manual VF4 VF5 ...

Страница 72: ...340401 01 12 07 Nederlands Printed in the Netherlands Vetus Diesel VF4 VF5 Nederlands ...

Отзывы: