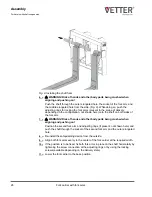
Fig. 8: Pushing the fork arm onto the fork carrier
6.
L
WARNING! Risk of hands and other body parts being crushed when
aligning and pushing on!
Grip the fork arm at the head and fork blade with someone else to assist you and
carefully slide it onto the fork carrier from the outside using appropriate force
(Fig. 8). Ensure that the upper and lower hooks of the fork arm encloses the pro-
file of the fork carrier.
7.
Repeat the procedure from step 3 for the second fork arm. Carry out assembly
from the other side of the fork carrier.
8.
Align both fork arms evenly to the center of the fork carrier at the required width.
9.
L
WARNING! Risk of crush injuries to hands when closing the locking
device!
Lock both fork arms by closing the lever inside the locking grooves (Fig. 7/2).
When doing so, ensure your fingers are not in the danger zone and flip the lever
again using appropriate force.
10.
Check that the fork arms are locked into the locking grooves. If this is not the
case, move the fork arms horizontally until the lock engages.
11.
Fit the locking screws on the fork carrier again.
12.
Lower the fork carrier to the base position.
Assembly
Fork arms with hook suspension
Fork carrier with fork arms
24
Содержание ManuTel
Страница 2: ...Fork carrier with fork arms 2 ...
Страница 52: ......


