21
■
Installation
③
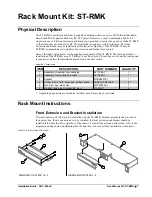
Mount the tool to the V-shaped part of the tool
holder.
- Make the side with the large rubber plate
attached face the V-shaped part.
- Insert the hose band as shown in the figure on
the right, and wrap around the tool.
- Place the hose band around the center of the
rubber plate.
- Adjust the position to make the tool vertical
and then tighten.
- Tighten gradually and test-operate the tool to
ensure it does not rotate by backlash.
*Caution: If the tool body is not in a straight cylindrical
shape, it cannot be mounted vertically.
*Caution: If tightened too strongly, the housing of the
tool may break, causing the tool to
malfunction.
④
Bundle the cables of the tool, and fix onto the
cable clips on the base, intermediate and tip
brackets. Fix the product with some surplus for
the cable, so that when the arm is extended, the
cable is not stretched fully.
4
) Setting the height
- The working height position is fixed using M6 cap screws
on the collars.
- Tighten the M6 hex socket head bolts on the collars firmly.
If not tightened firmly enough, the main body may fall
rapidly, causing great danger.
*Caution:
When loosening the collar on the base bracket
bottom side, support the arm with one hand while
working so that the arm does not fall rapidly.
*Caution:
The recommended tightening torque of the M6 hex
socket head bolt is 1.5 N m.
If it is tightened too tightly, the brass part on the tip
of the fix screw may deform, and may cause the pillar
to deform.
If the pillar is deformed, the height of the arm may
become unadjustable.
Set the projection of tool to
V-shaped part
Tighten the hose band
M6
Cap Screws