


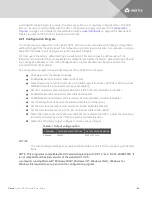


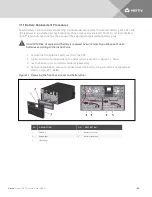
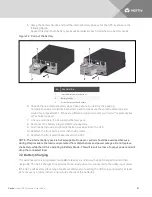


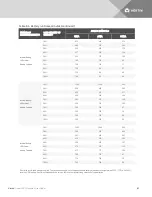


5. Grasp the battery handle, and pull the internal battery pack out of the UPS, as shown in the
following figure.
Repeat this step if both battery packs will be replaced. Each model has two battery packs.
Figure 7.2 Pull out the battery
NO.
DESCRIPTION
1
Internal battery pack (one of two)
2
Battery handles
3
Pull out battery pack with handle.
6. Unpack the new internal battery pack. Take care not to destroy the packing.
Compare the new and old internal battery pack to make sure they are the same type and
model. If so, proceed with 7. If they are different, stop and contact your Vertiv™ representative,
or Technical Support.
7. Line up and slide in the new internal battery pack.
8. Reconnect the battery plug and battery receptacle.
9. Push the battery wire and internal battery pack back into the UPS.
10. Reattach the front battery door with the 6 screws.
11. Reattach the front plastic bezel cover to the UPS.
NOTE: The internal battery pack is hot-swappable. However, caution should be exercised because
during this procedure the load is unprotected from disturbances and power outages. Do not replace
the battery while the UPS is operating in Battery Mode. This will result in a loss of output power and will
drop the connected load.
7.2 Battery Charging
The batteries are valve-regulated, nonspillable, lead acid and should be kept charged to attain their
design life. The GXT4 charges the batteries continuously when it is connected to the utility input power.
If the GXT4 will be stored for a long time, We recommend connecting the UPS to input power for at least
24 hours every 4 to 6 months to ensure full recharge of the batteries.
Vertiv
| Liebert GXT4 Installer/User Guide |
51
Содержание GXT4-10000RT230
Страница 1: ...Liebert GXT4 UPS 230 V 5000 VA 10 000 VA Installer User Guide...
Страница 6: ...Vertiv Liebert GXT4 Installer User Guide 6...
Страница 10: ...Vertiv Liebert GXT4 Installer User Guide 10 This page intentionally left blank...
Страница 20: ...Vertiv Liebert GXT4 Installer User Guide 20 This page intentionally left blank...
Страница 29: ...NO DESCRIPTION 1 Remove screws 2 IT power system connectors Vertiv Liebert GXT4 Installer User Guide 29...
Страница 30: ...Vertiv Liebert GXT4 Installer User Guide 30 This page intentionally left blank...
Страница 40: ...Vertiv Liebert GXT4 Installer User Guide 40 This page intentionally left blank...
Страница 48: ...Vertiv Liebert GXT4 Installer User Guide 48 This page intentionally left blank...
Страница 56: ...Vertiv Liebert GXT4 Installer User Guide 56 This page intentionally left blank...
Страница 64: ...Vertiv Liebert GXT4 Installer User Guide 64 This page intentionally left blank...
Страница 65: ......