background image

Wireless Access Point User Guide 

98 

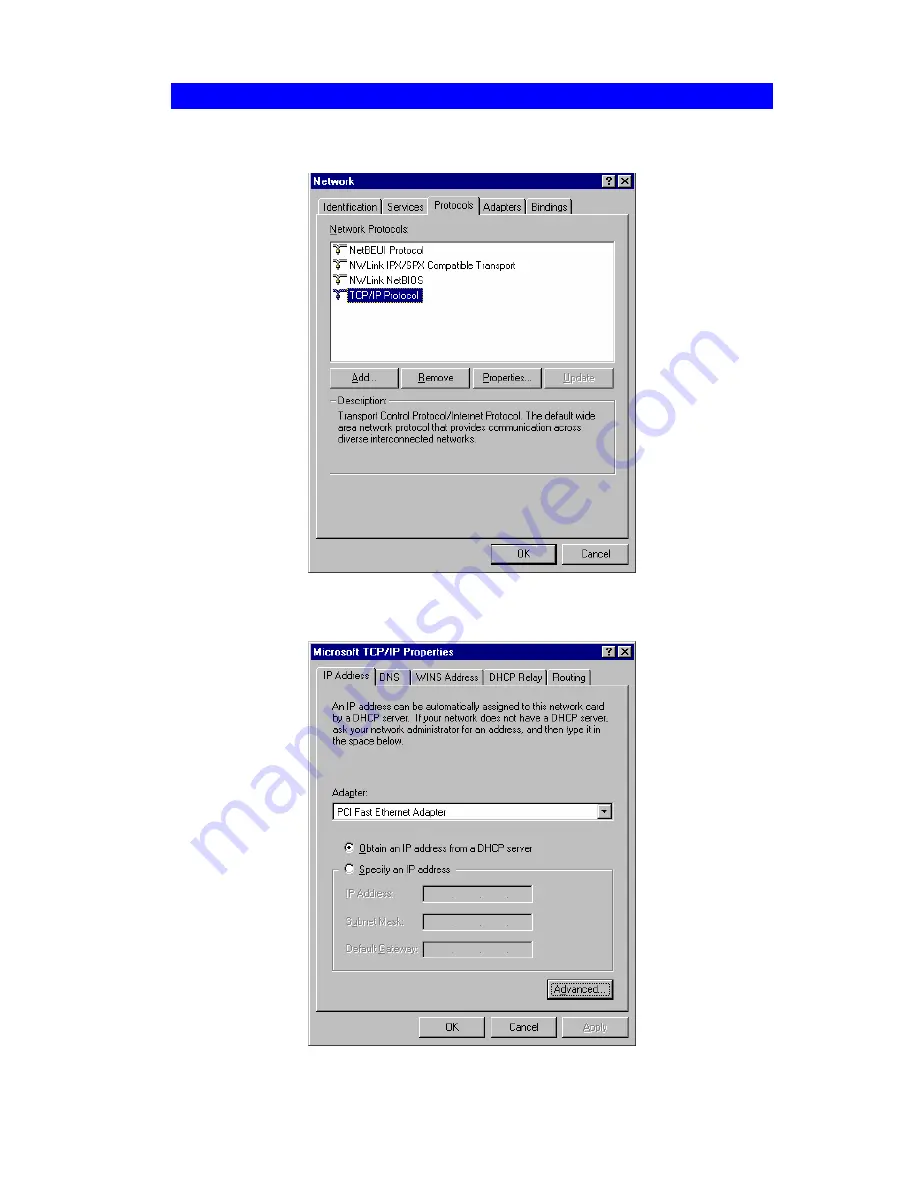
Checking TCP/IP Settings - Windows NT4.0 

1.


Select 

Control Panel - Network

, and, on the 

Protocols

 tab, select the TCP/IP protocol, as 

shown below. 


Figure 69: Windows NT4.0 - TCP/IP 

2.


Click the 

Properties

 button to see a screen like the one below. 


Figure 70: Windows NT4.0 - IP Address 

Содержание VX-AP1WPro

Страница 1: ...802 11g 802 11b WPA Wireless Access Point User Guide...

Страница 2: ......

Страница 3: ...Settings 31 QOS Management 33 Security Profiles 33 Security Profile Screen 35 CHAPTER 5 PC AND SERVER CONFIGURATION 55 Overview 55 Using WEP 55 Using WPA PSK 56 Using WPA with Radius 57 802 1x Server...

Страница 4: ...P Settings Windows NT4 0 98 Checking TCP IP Settings Windows 2000 100 Checking TCP IP Settings Windows XP 102 APPENDIX D ABOUT WIRELESS LANS 104 Overview 104 Wireless LAN Terminology 104 APPENDIX E CO...

Страница 5: ...ransmission up to 54Mbps for maximum throughput or automatic speed reduction to lower speeds when the environment does not permit maximum throughput Features of your Wireless Access Point The Wireless...

Страница 6: ...andard is supported allowing traffic from differ ent sources to be segmented Combined with the multiple SSID feature this provides a powerful tool to control access to your LAN STP Support The 802 1d...

Страница 7: ...Windows network Radius Accounting Support If you have a Radius Server you can use it to provide accounting data on Wireless clients Syslog Support If you have a Syslog Server the Wireless Access Poin...

Страница 8: ...pgraded Power On Normal operation Off No power LAN On The LAN Ethernet port is active Off No active connection on the LAN Ethernet port Flashing Data is being transmitted or received via the correspon...

Страница 9: ...lear ALL data and restore ALL settings to the factory default values To Clear All Data and restore the factory default values 1 Power Off the Access Point 2 Hold the Reset Button down while you Power...

Страница 10: ...o maximize reliability and performance follow these guidelines Use an elevated location such as wall mounted or on the top of a cubicle Place the Wireless Access Point near the center of your wireless...

Страница 11: ...s in Chapter 1 Using PoE Power over Ethernet The Wireless Access Point supports PoE Power over Ethernet To use PoE 1 Do not connect the supplied power adapter to the Wireless Access Point 2 Connect on...

Страница 12: ......

Страница 13: ...Windows utility or your Web Browser Setup using the Windows Utility A simple Windows setup utility is supplied on the CD ROM This utility can be used to assign a suitable IP address to the Wireless Ac...

Страница 14: ...n installed in the Wireless Access Point Description Any extra information for the Wireless Access Point entered by the administrator Note If the desired Wireless Access Point is not listed check that...

Страница 15: ...ronment Use the on line help if necessary The later sections in this Chapter also provide more details about each of these screens Access Control MAC level access control Security Profiles Wireless se...

Страница 16: ...ireless Access Point is configured establishing a Wireless connection to it may be not possible If your LAN contains a Router or Routers ensure the PC used for configuration is on the same LAN segment...

Страница 17: ...the Management menu 9 Use the Apply Restart button on the menu to apply your changes and restart the Wireless Access Point Setup is now complete Wireless stations must now be set to match the Wireles...

Страница 18: ...ration is automatic However you may need to perform the following operations on a regular basis If using the Access Control feature update the Trusted PC database as required See Access Control in Cha...

Страница 19: ...isplayed usually the value of BSSID is equal to the MAC address of wireless for AP Channel Frequency The Channel currently in use is displayed Wireless Mode The current mode e g 802 11g is displayed A...

Страница 20: ...efault name is used SSID This displays the SSID associated with the profile Broadcast SSID This displays whether or not the SSID is broadcast VLAN ID This displays the VLAN ID of each security profile...

Страница 21: ...n The number of Authentication packets received Authentication is the process of identification between the AP and the client De authentication The number of De authentication packets received De auth...

Страница 22: ...packets transmitted to or received from Wireless Stations at application level Data Number of valid Data packets transmitted to or received from Wireless Stations at driver level Multicast Packets Nu...

Страница 23: ...tus Screen Data Remote AP Status Screen Local Mode This displays the current mode of local AP Local Status This displays the current status of local AP active connected Remote Device s z MAC Address T...

Страница 24: ...ivity Log Data Current Time The system date and time is displayed Log The Log shows details of the connections to the Wireless Access Point Buttons Refresh Update the data on screen Save to file Save...

Страница 25: ...for the name MAC Address The MAC physical address of each Wireless Station is displayed Mode The mode of each Wireless Station Signal This indicates the signal strength of each Wireless Station SSID...

Страница 26: ...Wireless Access Point User Guide 22 System Screen Click System on the menu to view a screen like the following Figure 14 System Screen...

Страница 27: ...r an unused IP address from the address range on your LAN Subnet Mask The Network Mask associated with the IP Address above Enter the value used by other devices on your LAN Gateway The IP Address of...

Страница 28: ...rd If this is not checked the name and password fields are ignored on Save Name Enter the login name Password Enter the desired login password Repeat Password Re enter the desired login password STP E...

Страница 29: ...you have not added any stations this table will be empty For each Wireless station the following data is displayed MAC Address the MAC or physical address of each Wire less station Connected this indi...

Страница 30: ...ireless Station Use this when adding or editing a Trusted Station Address The MAC physical address of the Trusted Wireless Station Use this when adding or editing a Trusted Station Buttons Add a Trust...

Страница 31: ...the Edit button The address will be copied to the Address field and the Add button will change to Update 3 Edit the address MAC or physical address as required 4 Click Update to save your changes Add...

Страница 32: ...s Mode Select the desired option Disable 2 4GHz band select this if for some reason you do not this AP to transmit or receive at all 802 11b and 802 11g this is the default and will allow connec tions...

Страница 33: ...t to the speci fied AP Note If using Client Repeater mode Universal Client mode or Uni versal Repeater mode you cannot use Bridge Mode Remote AP MAC Address This is not required unless the AP Mode is...

Страница 34: ...Ps Enable this checkbox Click the button Set PTMP APs On the resulting sub screen enter the MAC addresses of the allowed APs Set PTMP APs Use this to open a sub window where you can specify the MAC ad...

Страница 35: ...options unless ALL of your wireless clients support this 802 11b clients will not be able to connect to the Access Point if either of these modes is selected Data Rate Select the desired option always...

Страница 36: ...nter the preferred setting between 20 and 1000 Normally this can be left at the default value RTS CTS Threshold Enter the preferred setting between 256 and 2346 Normally this can be left at the defaul...

Страница 37: ...t means QOS function is not be used If you select By SSID the threshold set by you will limit the traffic of each SSID and stations in each SSID If you select By Station the max value is fit for every...

Страница 38: ...The current security system e g WPA PSK is displayed Band The Wireless Band 2 4 GHz 5GHz for this profile is dis played Profiles may be assigned to either or both Wireless Bands Buttons Enable Enable...

Страница 39: ...d the SSID will then be broadcast to all Wireless Stations Stations which have no SSID or a null value can then adopt the correct SSID for connections to this Access Point Wireless Separation If Disab...

Страница 40: ...re automatically generated so no key input is required WPA2 with Radius This version of WPA2 requires a Radius Server on your LAN to provide the client authentication according to the 802 1x standard...

Страница 41: ...user must have a user login on the Radius Server Each user s wireless client must support 802 1x and provide the login data when required All data transmission is encrypted using the WEP standard You...

Страница 42: ...the Wireless Access Point has the correct address port number and shared key for login to your Radius Server These parameters are entered either on the Security page or the Radius based MAC authentica...

Страница 43: ...network Radius Port If this field is visible enter the port number used for connections to the Radius Server Client Login Name If this field is visible it displays the name used for the Client Login...

Страница 44: ...on the security method used 2 Add users on your RADIUS server as required and allow access by these users 3 Client PCs must have the correct Wireless settings in order to associate with the Wireles A...

Страница 45: ...nternet access is allowed Otherwise the user remains on the login page Clients which pass the authentication are listed as xx xx xx xx xx xx WEB au thentication in the log table and station status wou...

Страница 46: ...ice to complete the login procedure Login URL Enter the URL of the page on your local Web Server you wish users to see when they attempt to access the Internet but are not logged in Login Failure URL...

Страница 47: ...same method Key Input Select Hex or ASCII depending on your input method All keys are converted to Hex ASCII input is only for convenience Key Value Enter the key values you wish to use The default k...

Страница 48: ...TKIP Group Key Update This refers to the key used for broadcast transmissions Enable this if you want the keys to be updated regularly Key Lifetime This field determines how often the Group key is dyn...

Страница 49: ...less Stations must use the same key WPA Encryption The encryption method is AES Wireless Stations must also use AES Key Updates These settings determine how often keys are changed Group Key Update Thi...

Страница 50: ...from this key Other Wireless Stations must use the same key WPA Encryption The encryption method is TKIP for WPA PSK and AES for WPA2 PSK Key Updates These settings determine how often keys are change...

Страница 51: ...Radius Primary Radius Server Address Enter the name or IP address of the Primary Radius Server on your network Radius Port Enter the port number used for connections to the Radius Server Shared Key T...

Страница 52: ...arly and enter the desired time period Key Lifetime be tween key updates Group Key Update when any membership terminates if enabled the Group Key will be updated whenever any member leaves the group o...

Страница 53: ...IP address of the Primary Radius Server on your network Radius Port Enter the port number used for connections to the Radius Server Shared Key This is used for the Client Login on the Radius Server E...

Страница 54: ...updates Group Key Update when any membership terminates If enabled the Group Key will be updated whenever any member leaves the group or disassociates from the Ac cess Point RADIUS Accounting Enable...

Страница 55: ...us Screen WPA and WPA2 with Radius Primary Radius Server Address Enter the name or IP address of the Primary Radius Server on your network Radius Port Enter the port number used for connections to the...

Страница 56: ...nd enter the desired time period Key Lifetime be tween key updates Group Key Update when any membership terminates If enabled the Group Key will be updated whenever any member leaves the group or disa...

Страница 57: ...stronger than WEP encryption Figure 32 802 1x Wireless Security Data 802 1x Screen 802 1x Primary Radius Server Address Enter the name or IP address of the Primary Radius Server on your network Radius...

Страница 58: ...transmitted You must enter at least the default key For 156 Bit Encryption the key size is 16 chars ASCII or 32 chars in HEX 0 9 and A F Dynamic WEP key If checked the required WEP key is dynamically...

Страница 59: ...nly describes the setting method of WPA PSK below The setting of usingWPA2 with radius WPA and WPA2 with radius is similar to the setting of using WPA with radius so only describes the setting method...

Страница 60: ...set to Infrastructure SSID ESSID This must match the value used on the Wireless Access Point The default value is wireless Note The SSID is case sensitive Wireless Security On each client Wireless sec...

Страница 61: ...t must obtain a Certificate which is used for authentication for the Radius Server Encryption All data transmission is encrypted using the WPA2 standard Keys are automatically generated so no key inpu...

Страница 62: ...he default prompts ensure that DNS is installed and enabled during installa tion Services Installation 1 Select the Control Panel Add Remove Programs 2 Click Add Remove Windows Components from the lef...

Страница 63: ...ettings Features 59 Figure 33 Components Screen 4 Click Next 5 Select the Enterprise root CA and click Next Figure 34 Certification Screen 6 Enter the information for the Certificate Authority and cli...

Страница 64: ...must be stopped before continuing Click Ok then Finish DHCP server configuration 1 Click on the Start Programs Administrative Tools DHCP 2 Right click on the server entry as shown and select New Scop...

Страница 65: ...the router address for the current subnet The router address may be left blank if there is no router Click Next 10 For the Parent domain enter the domain you specified for the domain controller setup...

Страница 66: ...and select New Certificate to Issue Figure 39 Certificate Authority Screen 3 Select Authenticated Session and Smartcard Logon select more than one by holding down the Ctrl key Click OK Figure 40 Temp...

Страница 67: ...ct the Group Policy tab choose Default Domain Policy then click Edit Figure 42 Group Policy Tab 7 Select Computer Configuration Windows Settings Security Settings Public Key Policies right click Autom...

Страница 68: ...omputer and then click Next Figure 44 Certificate Template Screen 10 Ensure that your certificate authority is checked and then click Next 11 Review the policy change information and click Finish 12 C...

Страница 69: ...s Access Point and set the shared secret as entered on the Security Settings of the Wireless Access Point 5 Click Finish 6 Right click on Remote Access Policies select New Remote Access Policy 7 Assum...

Страница 70: ...ct the Authentication tab Enable Extensible Authentication Protocol and select Smart Card or other Certificate Deselect other authentication meth ods listed Click OK Figure 47 Authentication Screen 12...

Страница 71: ...cess Login for Users 1 Select Start Programs Administrative Tools Active Directory Users and Computers 2 Double click on the user who you want to enable 3 Select the Dial in tab and enable Allow acces...

Страница 72: ...at You are using Windows XP You are connecting to a Windows 2000 server for authentication You already have a login User name and password on the Windows 2000 server Client Certificate Setup 1 Connect...

Страница 73: ...Other Settings Features 69 Figure 50 Wireless CA Screen 5 Select User certificate request and select User Certificate the click Next Figure 51 Request Type Screen 6 Click Submit...

Страница 74: ...igure 52 Identifying Information Screen 7 A message will be displayed and then the certificate will be returned to you Click Install this certificate Figure 53 Certificate Issued Screen 8 You will rec...

Страница 75: ...k Connection and select Properties 3 Select the Authentication Tab and ensure that Enable network access control using IEEE 802 1X is selected and Smart Card or other Certificate is selected from the...

Страница 76: ...nable encryption for a wireless network follow this procedure 1 Click on the Wireless Networks tab Figure 56 Wireless Networks Screen 2 Select the wireless network from the Available Networks list and...

Страница 77: ...Other Settings Features 73 Figure 57 Properties Screen Setup for Windows XP and 802 1x client is now complete...

Страница 78: ...automatically Instead you must enter the WEP key manually ensuring it matches the WEP key used on the Access Point Figure 58 Properties Screen Note On some systems the 64 bit WEP key is shown as 40 bi...

Страница 79: ...eless Access Point s Man agement menu Admin Login Auto Config Update Config File Log Settings Rogue APs SNMP Upgrade Firmware Operation Mode Admin Login Screen The Admin Login screen allows you to ass...

Страница 80: ...the field below Either HTTP or HTTPS must be enabled HTTP Port Number Enter the port number to be used for HTTP connections to this device The default value is 80 Enable HTTPS Enable this to allow ad...

Страница 81: ...Connections Perform Auto Configu ration on this AP next restart If checked this AP will perform Auto Configuration the next time it restarts The wired LAN NOT the Wireless LAN will be searched for co...

Страница 82: ...k to see if a Firmware FW upgrade is available on the specified FTP Server If enabled Enter the desired time interval in days between checks Select the desired option for installation see next item Pr...

Страница 83: ...opy of cur rent settings Once you have the Access Point working properly you should back up the settings to a file on your computer You can later restore the Access Point s settings from this file if...

Страница 84: ...inal factory default settings click Set to Defaults button Note This will terminate the current connection The Access Point will be unavailable until it has restarted By default the Access Point will...

Страница 85: ...ed Broadcast Syslog data is broadcast Use this option if different PCs act as the Syslog server at different times Send to specified Syslog Server Select this if the same PC is always used as the Sysl...

Страница 86: ...ble Rogue AP Detection checkbox and select the desired wireless band and time interval Scan Select the desired Wireless band to scan to Rogue APs and enter the desired time interval between each scan...

Страница 87: ...blic or Private Read Write Com munity Enter the string for read write community in which the data can be read or set changed usually we use either Public or Private Managers Any Station The IP address...

Страница 88: ...Wireless Access Point User Guide 84 Trap version Select the desired option as supported by your SNMP Management program...

Страница 89: ...the following Figure 65 Firmware Upgrade Screen To perform the Firmware Upgrade 1 Click the Browse button and navigate to the location of the upgrade file 2 Select the upgrade file Its name will appe...

Страница 90: ...o change it Figure 66 Operation Mode Screen If you want to change Access Point mode to Home Gateway mode you should set SSID and Security System When the device worked as Home Gateway that it only pro...

Страница 91: ...e Open System or Shared Key All Wireless stations must then be set to use the same method Key Input Select Hex or ASCII depending on your input method All keys are converted to Hex ASCII input is only...

Страница 92: ...work Key Enter the key value Data is encrypted using a 256Bit key derived from this key Other Wireless Stations must use the same key WPA Encryption The encryption method is AES Wireless Stations must...

Страница 93: ...PSK and WPA2 PSK Network Key Enter the key value Data is encrypted using a 256Bit key derived from this key Other Wireless Stations must use the same key WPA Encryption The encryption method is TKIP f...

Страница 94: ...Operating Channels 802 11g 13 for North America 13 for Europe ETSI 14 for Japan 802 11b 11 for North America 14 for Japan 13 for Europe ETSI Operating temperature 0 55 Storage temperature 20 70 Power...

Страница 95: ...s Channels Support Automatic Wireless Channel Selection Tx Power Adjustment Country Selection Preamble Type long or short support RTS Threshold Adjustment Fragmentation Threshold Adjustment Beacon Int...

Страница 96: ...cess Control list file support Configuration file Backup Restore Statistics support Device discovery program Windows Utility Other Features DHCP client WINS client DHCP Server DHCP Relay Firmware Upgr...

Страница 97: ...ent and receiver Connect the equipment into an outlet on a circuit different from that to which the receiver is connected Consult the dealer or an experienced radio TV technician for help To assure co...

Страница 98: ...IP Address automatically DHCP client restart it You can use the following method to determine the IP address of the Wireless Access Point and then try to connect using the IP address in stead of the n...

Страница 99: ...on the Wire less Access Point On the PC the wireless mode is set to Infrastructure If using the Access Control feature the PC s name and address is in the Trusted Stations list If using 802 1x mode e...

Страница 100: ...o need to change the TCP IP of each PC Just configure the Wireless Access Point to match your existing LAN The following sections provide details about checking the TCP IP settings for various types o...

Страница 101: ...n IP Address automatically This is the default Windows settings To work correctly you need a DHCP server on your LAN Using Specify an IP Address If your PC is already configured for a fixed specified...

Страница 102: ...Settings Windows NT4 0 1 Select Control Panel Network and on the Protocols tab select the TCP IP protocol as shown below Figure 69 Windows NT4 0 TCP IP 2 Click the Properties button to see a screen li...

Страница 103: ...P address from a DHCP Server This is the default Windows setting This is the default Windows settings To work correctly you need a DHCP server on your LAN Using Specify an IP Address If your PC is alr...

Страница 104: ...tion 2 Right click the Local Area Connection icon and select Properties You should see a screen like the following Figure 71 Network Configuration Win 2000 3 Select the TCP IP protocol for your networ...

Страница 105: ...ndows setting This is the default Windows settings To work correctly you need a DHCP server on your LAN Using a fixed IP Address Use the following IP Address If your PC is already configured for a fix...

Страница 106: ...Right click the Local Area Connection and choose Properties You should see a screen like the following Figure 73 Network Configuration Windows XP 3 Select the TCP IP protocol for your network card 4 C...

Страница 107: ...s is the default Windows setting To work correctly you need a DHCP server on your LAN Using a fixed IP Address Use the following IP Address If your PC is already configured for a fixed specified IP ad...

Страница 108: ...ss Stations e g Notebook PCs with wireless cards to a wired Ethernet LAN The Wireless Stations can then access all LAN resources Access Points can only function in Infrastructure mode and can communic...

Страница 109: ...be used the one with the strongest signal is used This can only happen within an ESS If using Ad hoc mode no Access Point all Wireless stations should be set to use the same Channel However most Wirel...

Страница 110: ...you should use WPA 802 1x instead because WPA encryption is much stronger than WEP encryption If this option is used The Access Point must have a client login on the Radius Server Each user must have...

Страница 111: ...re admin for the User Name and password for the Password 3 Once connected you can use any of the commands listed in the following Command Reference Using the CLI Serial Port 1 Use a standard serial po...

Страница 112: ...ssword 6 You will then see the prompt and can then use any of the commands listed in the follow ing Command Reference Command Reference The following commands are available Display CLI Command List ad...

Страница 113: ...me Display Burst Time get calibration Display Noise And Offset Calibration Mode get cckTrigHigh Display Higher Trigger Threshold for CCK Phy Errors for ANI Control get cckTrigLow Display Lower Trigger...

Страница 114: ...cryption Keys get login Display Login User Name get minimumrate Display Minimum Rate get nameaddr Display IP address of name server get nf Display Noise Floor get noiseImmunityLvl Display ANI Paramete...

Страница 115: ...Display Station Status get SuperG Display SuperG Feature Status get systemname Display Access Point System Name get telnet Display Telnet Mode get timeout Display Telnet Timeout get tzone Display Tim...

Страница 116: ...Update Display Auto Update Enable Disable get autoUpgradeOnly Display Install later version only Enable Disable get autoUpdateInterval Display Auto Update Interval 1 31days get ftpServer Display FTP S...

Страница 117: ...Display Trap Receiver IP get wdsMacList Display WDS Mac Address List get enableWirelessClient Display Wireless Client Enable Disable get isolationType Display Isolation Type get winsEnable Display WI...

Страница 118: ...t Burst Time set calibration Set Calibration Period set cckTrigHigh Set Higher Trigger Threshold for CCK Phy Errors For ANI Control set cckTrigLow Set Lower Trigger Threshold for CCK Phy Errors For AN...

Страница 119: ...imumrate Set Minimum Rate set nameaddress Set Name Server IP address set noiseImmunityLvl Set ANI Parameter for Noise Immunity Level set ofdmTrigHigh Set Higher Trigger Threshold for OFDM Phy Errors f...

Страница 120: ...Address set softwareretry Set Software Retry set spurImmunityLvl Set ANI Parameter for Spur Immunity Level set ssid Set Service Set ID set ssidsuppress Set SSID Suppress Mode set SuperG Super G Featur...

Страница 121: ...quest Enable Disable set autoChangeName Set provide admin login name and password Enable Disable set autoSetResp Set Provide respond to Auto Config request Enable Disable set autoUpdate Set Auto Updat...

Страница 122: ...MP Station Address set trapMode Set Trap Mode set trapVersion Set Trap Version set trapSendMode Set Trap Send Mode set trapRecvIp Set Trap Receiver IP set description Set Access Point Description set...

Отзывы: