Attention:
Turn power switchto off ("O") before
inserting or removing the needle.
Change the needle regularly, especially if
it is showing signs of wear and causing
problems.
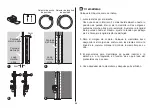
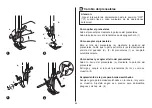
Insert the needle as illustrated as follows:
A. Loosen the needle clamp screw and
tighten again after inserting the new
needle. (1)
B. The flat side of the shaft should be
towards the back.
C/D.Insert the needle as far up as it will go.
Needles must be in perfect condition. (2)
Problems can occur with:
A. Bent needles
B. Damaged points
C. Blunt needles
Attenzione:
Girare l'interruttore su off ("O") prima di
inserire o togliere l'ago.
Sostituire regolarmente l'ago, in particolare
se si notano segni di usura che provocano
dei problemi.
Inserire l'ago come successivamente
illustrato:
A. Allentare la vite di blocco dell'ago e
riavvitarla dopo l'inserimento dell'ago. (1)
B. La parte piatta del perno va rivolta
verso la parte posteriore.
C/D.Inserire l'ago fino alla massima
possibilità di penetrazione.
Gli aghi devono essere in perfette
condizioni. (2)
Possono verificarsi dei problemi con:
A. Aghi piegati
B. Aghi danneggiati
C. Aghi spuntati
Atenção:
Desligue sempre a máquina ("O") antes
de meter ou tirar a agulha.
Mude a agulha de vez em quando,
sobretudo se apresentar sinais de
desgaste e começar a dar problemas.
Meta a agulha como se mostra:
A. Solte o parafuso do grampo e aperte-o
depois novamente para meter a nova
agulha. (1)
B. O lado plano da haste deve estar
virada para trás.
C/D. Meta a agulha o máximo que puder.
As agulhas devem estar em perfeitas
condições. (2)
Podem ocorrer os seguintes problemas:
A. Agulhas dobradas
B. Pontas estragadas
C. Agulhas rombas
PT
EN
IT
Inserting the needle
Meter a agulha
Inserimento dell'ago
71
Содержание Greta
Страница 1: ......
Страница 2: ......
Страница 3: ......
Страница 46: ...Presione la marca en la placa del patrón de puntadas para abrirla ES Placa del patrón de puntadas 40 ...
Страница 85: ......
Страница 86: ......
Страница 87: ......
Страница 88: ...021K3K0201 ES PT EN IT ...


