background image

T

ERMINAL

 S

ETUP

Examining Terminal Features

16

O

MNI

 5

XXX


AND

 V

X

5

XX

/V

X

610 I

NSTALLATION

 G

UIDE

smart card reader

, built into the front of the terminal. The icon 

shown at right indicates proper card position and insertion 
direction.

SAM (security access module) compartment

, built into the bottom of the 

terminal. The V

x

5xx/V

x

610 terminal contains MSAM cardholders to support 

multiple stored-value card programs or other merchant card requirements. 
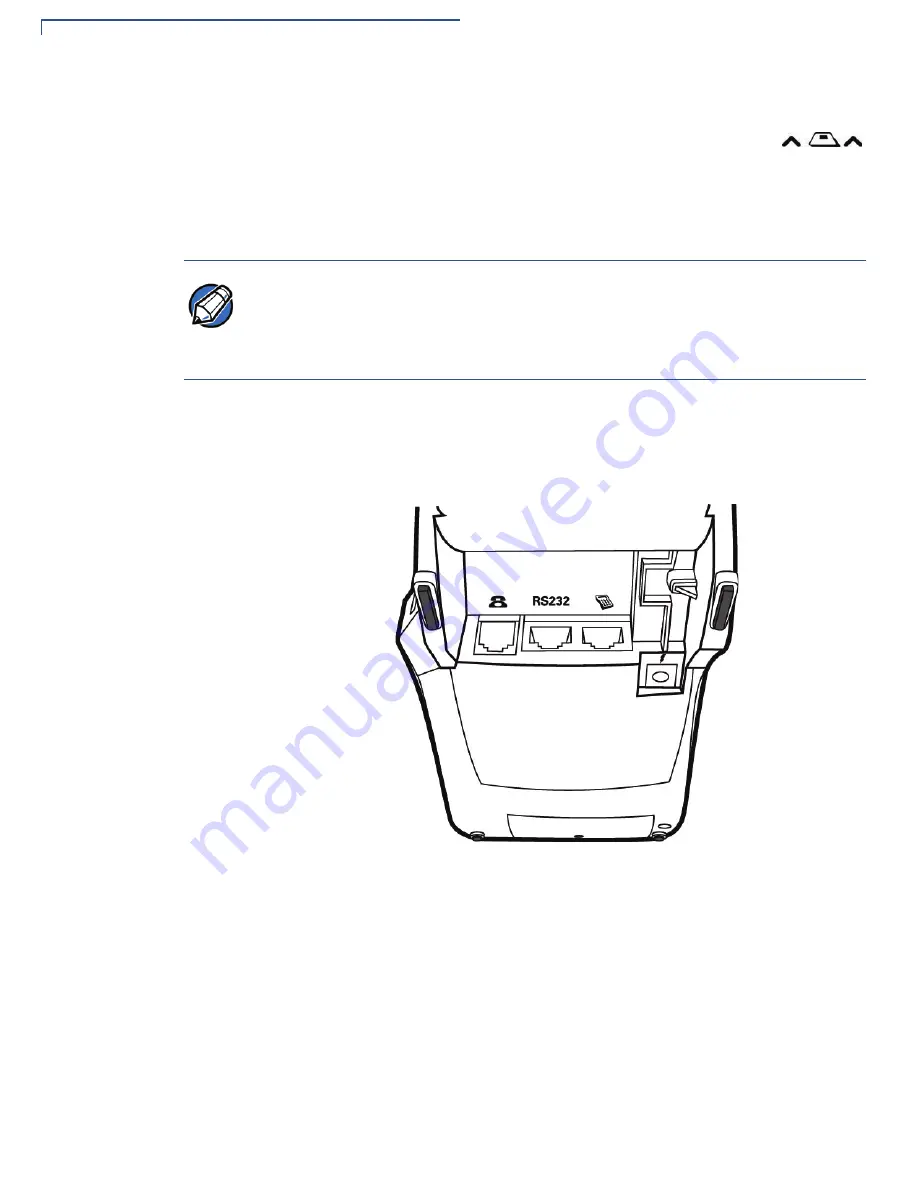
Connection Ports

Turn the terminal upside down to view the connection ports. Notice that the ports 
are recessed. Different ports are provided to connect the terminal to a 
communications line, optional peripheral devices, and the power supply.

Figure 2

 shows the connection ports for the V

x

510 terminal.

Figure 2

V

x

510 Connection Ports (Bottom View) 

NOTE

VeriFone ships variants of the V

x

5xx/V

x

610 terminal for different markets. Your 

terminal may have a different configuration. The following devices may or may not 
be present: a smart card reader, or zero or three MSAM cardholders. However, the 
basic processes described in this guide remain the same, regardless of terminal 
configuration.

Содержание Vx 610

Страница 1: ...VeriFone Part Number 23216 Revision C Omni 5xxx and Vx5xx Vx610 Installation Guide ...

Страница 2: ...the examples and software programs is supplied As Is VeriFone Inc 2099 Gateway Place Suite 600 San Jose CA 95110 USA www verifone com VeriFone Part Number 23216 Revision C Omni 5xxx and Vx5xx Vx610 Installation Guide 2006 VeriFone Inc VeriFone the VeriFone logo Omni VeriCentre Verix and ZonTalk are registered trademarks of VeriFone Other brand names or trademarks associated with VeriFone s product...

Страница 3: ...hipping Carton 14 Examining Terminal Features 15 Front Panel 15 Connection Ports 16 Establishing Telephone Line Connections 18 Installing the Paper Roll in the Printer 19 Installing Replacing MSAM Cards 22 Connecting Optional Device s 24 Vx510 and Vx570 Optional Device Connections 24 Vx610 Optional Device Connections 26 External Printers Supported 27 Connecting the Terminal Power Pack 28 Vx610 Bat...

Страница 4: ...inal Contacts 47 Smart Card Reader 47 CHAPTER 5 VeriFone Service and Support Return a Terminal or Smart Battery for Service 49 Accessories and Documentation 50 Power Pack 50 Thermal Printer Paper 50 VeriFone Cleaning Kit 51 Telephone Line Cord 51 Swivel Stand 51 Documentation 51 CHAPTER 6 Troubleshooting Guidelines Blank Display 53 Terminal Does Not Dial Out 53 Printer Paper Jam 54 Keypad Does Not...

Страница 5: ...n establish power and telephone line connections and how to configure optional peripheral devices Chapter 3 Specifications Discusses power requirements and dimensions of the Vx5xx Vx610 terminal Chapter 4 Maintenance Explains how to maintain your Vx5xx Vx610 terminal Chapter 5 VeriFone Service and Support Provides information on contacting your local VeriFone representative or service provider and...

Страница 6: ...tion Guide VPN 23043 Omni 5700 5750 and Vx570 Certifications and Regulations VPN 23646 Omni 57xx and Vx570 Quick Installation Guide VPN 23759 Omni 57xx and Vx570 Large Paper Door Quick Installation Guide VPN 24126 Omni 57xx and Vx570 Privacy Shield Quick Installation Guide VPN 24134 Omni 56xx and Vx610 Carrying Case Quick Installation Guide VPN 23640 Omni 56xx and Vx610 Attachable Strap Handstrap ...

Страница 7: ...e printer Courier The courier type face is used while specifying onscreen text such as text that you would enter at a command prompt or to provide an URL http www verifone com The pencil icon is used to highlight important information RS 232 type devices do not work with the PINpad port The caution symbol indicates possible hardware or software failure or loss of data The terminal is not waterproo...

Страница 8: ...dise Return Authorization MSAM Micromodule Size Security Access Module PED PIN Entry Devices PIN Personal Identification Number RJ45 Registered Jack 45 RS 232 Recommended Standard 232 SAM Security Access Module VPN VeriFone Part Number Wi Fi Wireless Fidelity Table 2 Acronym Definitions continued Acronym Definitions ...

Страница 9: ...n as Omni 5600 features the same sleek compact design of the Vx510 but in a portable battery powered form factor that uses wireless technologies including Wi Fi CDMA and GSM GPRS The Vx570 also known as Omni 5700 5750 is a high performance countertop terminals with modular communication options enhanced display expanded memory options and a USB peripheral port Vx510 and Vx610 terminals use a bold ...

Страница 10: ...lify training and reduce help desk calls The integrated high speed thermal printer simplifies paper loading and virtually eliminates paper jams The triple track high coercivity card reader handles most magnetic stripe cards NOTE VeriFone ships variants of the Vx5xx Vx610 terminals for different markets Your terminal may have a different configuration The following devices may or may not be present...

Страница 11: ...B of memory and the dynamic memory allocation of the Verix V OS support two or three typical sized applications on a single terminal The Vx570 offers 6 MB and 12 MB memory options The primary smart card reader and the MSAMs safeguard sensitive financial data and support multiple smart card schemes The Vx5xx Vx610 series of terminals and SoftPay EMV software have received EMV Level 1 and Level 2 Ty...

Страница 12: ...TERMINAL OVERVIEW Features and Benefits 12 OMNI 5XXX AND VX5XX VX610 INSTALLATION GUIDE ...

Страница 13: ...wer Cradle Installing Replacing the SIM Card GSM GPRS Models Connecting the Vx610 External Antenna Conducting Wireless Transactions Using the Smart Card Reader Using the Magnetic Card Reader Selecting Terminal Location Use the following guidelines when selecting a location for your Vx5xx Vx610 terminal Ease of Use Select a location convenient for both merchant and cardholder Select a flat support ...

Страница 14: ...10 terminal is a secure product and any tampering may cause the device to cease to function properly To unpack the Shipping Carton 1 Remove and inspect the following items Terminal Power pack Telephone line cord Power cord Battery pack for Vx610 only Antenna for Vx610 only if shipped loose Paper roll 2 Remove all plastic wrapping from the terminal and other components 3 Remove the clear protective...

Страница 15: ...unlabeled programmable function keys above the keypad d Three color coded function keys below the keypad icons at right from left to right CANCEL BACKSPACE CLEAR ENTER e An ALPHA key centered at the top of the keypad A magnetic card reader built into the right side The icon at right shows the proper swipe direction with the stripe down and facing inward toward the keypad A green indicator LED indi...

Страница 16: ...Turn the terminal upside down to view the connection ports Notice that the ports are recessed Different ports are provided to connect the terminal to a communications line optional peripheral devices and the power supply Figure 2 shows the connection ports for the Vx510 terminal Figure 2 Vx510 Connection Ports Bottom View NOTE VeriFone ships variants of the Vx5xx Vx610 terminal for different marke...

Страница 17: ...erminal Figure 3 Vx570 Connection Ports Back View Figure 4 shows the connection ports for the Vx610 terminal Figure 4 Vx610 Connection Ports Bottom and Side Views For information on how to attach peripheral devices see Connecting Optional Device s WARNING Do not connect the terminal to the power supply until all the peripherals are attached ...

Страница 18: ...e Line Connections Connect the telephone cord to the communication port on the terminal then route it directly to a telephone wall jack see Figure 5 Figure 6 and Figure 7 This is a direct connection and the line is dedicated to the terminal Figure 5 Vx510 Direct Telephone Connection Figure 6 Vx570 Direct Telephone Connection ...

Страница 19: ...he edge of the paper approximately 18 inches before the end of the roll After this line appears there is enough paper remaining on the roll to conclude at least one transaction WARNING To reduce the risk of fire use only No 26AWG or larger UL Listed or CSA Certified Telecommunication Line Cord NOTE Vx610 print speed varies depending on battery charge CAUTION Poor quality paper can jam the printer ...

Страница 20: ... then lift the cover up and back see Figure 8 Figure 8 Opening the Printer Cover 2 Remove any partial roll of paper in the printer tray by lifting up see Figure 9 3 Loosen the glued leading edge of the paper or remove the protective strip from the new roll of paper Unwind the paper roll past any glue residue Figure 9 Removing Partial Paper Roll 4 Hold the roll so the paper feeds from the bottom of...

Страница 21: ...sing directly on the cover until it clicks shut allowing a small amount of paper past the glue residue to extend outside the printer door see Figure 11 Figure 11 Closing Paper Roll Cover 8 Tear the paper off against the serrated metal strip in the printer For paper ordering information refer to Accessories and Documentation CAUTION To prevent the paper roll cover from damaging the print roller alw...

Страница 22: ...he Vx610 Smart Battery from the terminal 2 Place the terminal upside down on a soft clean surface to protect the lens from scratches 3 Remove the MSAM compartment door screw and rotate the door up and back to access the MSAM cardholders see Figure 12 Figure 12 Opening Vx510 MSAM Compartment Door Figure 13 Opening Vx570 MSAM Compartment Door CAUTION Observe standard precautions when handling electr...

Страница 23: ... 15 Figure 15 Installing an MSAM Card 6 Replace the MSAM compartment door and reinstall the screw NOTE Before inserting the MSAM card position it as shown in Figure 15 with the card s gold contacts facing the smart car reader end of the terminal The cardholder connector base has a set of contacts and a notch on one corner to ensure the MSAM card is positioned correctly The MSAM card has a notch on...

Страница 24: ...e port on the back of the peripheral device To install a PINpad 101 PINpad 201 or PINpad 1000 position and insert the grommet to secure the cable connection If a cable is not already connected to the smart card reader or PINpad insert the small modular plug on one end of the interface cable into the optional device s modular jack CAUTION Before connecting any peripheral device remove the power cor...

Страница 25: ...upports the CR 600 and CR 1000i check readers Contact your VeriFone representative or visit the online store a www store verifone com for information on these devices Figure 17 provides an example of a peripheral connection to the RS 232 port Figure 17 Vx510 Example Check Reader Connection CAUTION Check readers require a separate power source Before connecting a check reader or similar device remo...

Страница 26: ...osition and insert the grommet to secure the cable connection If a cable is not already connected to the smart card reader or PINpad insert the small modular plug on one end of the interface cable into the optional device s modular jack 2 Insert the larger RJ45 type connector on the other end of the PINpad cable into the PINpad serial port on the side of the terminal Figure 18 provides an example ...

Страница 27: ...riants have an internal thermal printer it may be convenient to print larger print runs for example daily or weekly reports to an external printer The Vx5xx Vx610 terminal supports the VeriFone P250 P350 P900 and P950 external printers Contact your VeriFone representative or visit the online store at www store verifone com for information on these devices External printers connect through the RS 2...

Страница 28: ...ntified by the icon at right Figure 20 Vx510 Power Pack Connection Figure 21 Vx570 Power Pack Connection CAUTION Using an incorrectly rated power supply may damage the terminal or cause it not to work as specified Before troubleshooting ensure that the power supply being used to power the terminal matches the requirements specified on the bottom of the terminal See Chapter 3 Specifications for det...

Страница 29: ... DOWNLOAD NEEDED appears on screen after the initial VeriFone copyright screen NOTE The bottom of the Vx510 and Vx570 terminals have an integrated cable retaining feature to secure the power cord to the terminal The battery based Vx610 does not need this feature WARNING Do not plug the power pack into an outdoor outlet or operate the terminal outdoors Disconnecting the power during a transaction m...

Страница 30: ...until the terminal displays the shutdown verification screen Keep holding the red key until the Vx610 terminal shuts down NOTE If you connect the Vx610 to a non battery power source the terminal shifts to corded power mode and starts up automatically regardless of the battery charge state VERIFONE OMNI QB0106A3 12 02 2005 VERIX DEFAULT CERTIFICATE COPYRIGHT 1997 2005 VERIFONE ALL RIGHTS RESERVED B...

Страница 31: ...tomers Vx510 Vx610 Privacy Shield To install the Vx510 Vx610 privacy shield 1 Align the privacy shield with the Vx510 Vx610 terminal and carefully insert the shield Make sure that the privacy shield window clears all keys Figure 24 Insert the Vx510 Vx610 privacy shield 2 Press firmly on all edges around the privacy shield to ensure it is correctly seated Figure 25 Make sure that the privacy shield...

Страница 32: ...cated on the right hand side of the telephone style keypad Figure 26 Remove the sticker 2 Align the privacy shield with the Vx570 terminal and carefully insert the shield Make sure that the privacy shield window clears all keys Figure 27 Insert the Vx570 privacy shield 3 Press firmly on all edges around the privacy shield to ensure it is correctly seated Figure 28 Make sure that the privacy shield...

Страница 33: ...rrupted discharge cycle and automatically shuts down when cell voltage is extremely low A safety circuit that prevents cell damage from overcharge over discharge or overheating activates when the battery is left in an unused terminal for extended periods Installation The Vx610 smart battery fits in a slot on the back of the Vx610 terminal as shown in Figure 29 The locking tab clicks when the batte...

Страница 34: ...harging If the battery is over discharged the safety circuit shuts down the battery The battery must then be recharged to restore operation Battery Life The Vx610 smart battery can be charged and discharged hundreds of times but will eventually wear out When operating times are noticeably shorter than usual it is time to buy a new battery see Accessories and Documentation for ordering information ...

Страница 35: ...to place Figure 31 Charging a single battery 2 Notice the LED indicator located on each side of the battery charger 3 Once the battery is fully charged remove the battery by sliding it upward or downward depending on which side of the charger is used Figure 32 Charging two batteries NOTE A red light indicates that the battery is charging while the LED changes to green to indicate that the charge h...

Страница 36: ... the cable through the cable retainer where provided to secure the power cord Figure 33 Vx610 Power Cradle Connection 2 Insert the AC power cord into the power pack and then plug the AC power cord into a wall outlet or power surge protector The LED lits up to indicate that it is ready for charging Figure 34 Vx610 Power Cradle Connection 3 Remove the protector identified by the icon at right Attach...

Страница 37: ... the Power Cradle Installing Replacing the SIM Card GSM GPRS Models The SIM Subscriber Identity Module card is a smart card inserted in the Vx610 GSM GPRS terminal that contains your GSM GPRS radio account information Use the following procedure to replace or install a SIM card 1 Loosen the screw from the GSM GPRS sled module at the back of the Vx610 terminal Figure 37 Loosen Retaining Screw ...

Страница 38: ...RS Sled Module 3 Insert the SIM into the cardholder at the back of the GSM GPRS sled module Figure 39 Insert SIM Card Into GSM GPRS Sled Module NOTE The SIM cardholder has a notch on one corner to ensure the SIM card is positioned correctly and for easy orientation in the cardholder Before inserting the SIM card position it as shown in Figure 39 with the card s gold contacts facing down ...

Страница 39: ...acing the SIM Card GSM GPRS Models OMNI 5XXX AND VX5XX VX610 INSTALLATION GUIDE 39 4 Replace the GSM GPRS sled module in the terminal Figure 40 Replace GSM GPRS Module 5 Tighten the retaining screw Figure 41 Tighten Retaining Screw ...

Страница 40: ...arrives from manufacture with the antenna unattached use the following procedure to install the antenna 1 Locate the antenna port on the back side of the Vx610 terminal 2 Align the connector on the end of the antenna with the connector on the end of the terminal 3 Push gently on the center of the base of the antenna until it slides into position Figure 42 Align Antenna with Antenna Port NOTE Some ...

Страница 41: ...n the antenna so that it points directly at the sky Replacing the Antenna If your Vx610 terminal has difficulties completing wireless transactions you may have to replace the antenna Use the following procedure to replace the antenna 1 Remove the existing antenna from the Vx610 terminal a Unscrew the barrel nut to loosen the antenna b Pull gently on the center of the base of the antenna until it s...

Страница 42: ...ts facing upward see Figure 44 2 Insert the smart card into the smart card reader slot in a smooth continuous motion until it seats firmly 3 Remove the card only when the application indicates the transaction is complete Figure 44 Inserting a Smart Card Using the Magnetic Card Reader The Vx5xx Vx610 terminal supports credit debit card transactions To Conduct a Credit Debit Card Transaction 1 Posit...

Страница 43: ...TERMINAL SETUP Using the Magnetic Card Reader OMNI 5XXX AND VX5XX VX610 INSTALLATION GUIDE 43 3 Swipe the card through the magnetic card reader Figure 45 Using the Magnetic Card Reader ...

Страница 44: ...TERMINAL SETUP Using the Magnetic Card Reader 44 OMNI 5XXX AND VX5XX VX610 INSTALLATION GUIDE ...

Страница 45: ...40V AC 50 60 Hz b Output rated 8 6 9 4V DC 4 0 A Barrel connector polarity Temperature Operating temperature 0 to 40 C 32 to 104 F Storage temperature 30 to 60 C 22 to 140 F Relative humidity 5 to 90 no condensation External Dimensions For Vx510 Terminals Length 209 mm 8 0 in Width 102 mm 4 0 in Depth 72 mm 2 8 in For Vx570 Terminals Length 209 mm 8 0 in Width 102 mm 4 0 in Depth 78 mm 3 07 in For...

Страница 46: ...SPECIFICATIONS SAR Compliance 46 OMNI 5XXX AND VX5XX VX610 INSTALLATION GUIDE For Vx610 Terminals with External Antenna Length 214 2 mm 8 4 in Width 102 mm 4 0 in Depth 72 mm 2 8 in ...

Страница 47: ...rt Card Reader Do not attempt to clean the smart card reader Doing so may void any warranty For smart card reader service contact your VeriFone distributor or service provider CAUTION Never use thinner trichloroethylene or ketone based solvents they may cause deterioration of plastic or rubber parts Do not spray cleaners or other solutions directly onto the keypad or terminal display CAUTION Avoid...

Страница 48: ...MAINTENANCE Smart Card Reader 48 OMNI 5XXX AND VX5XX VX610 INSTALLATION GUIDE ...

Страница 49: ...0 terminal smart battery or sled module to be returned Product ID including the model and part number For example OMNI 5100 and Pxxx xxx xx Mxxx xx xx xxx or 2xxxx xx Serial number S N xxx xxx xxx 2 Obtain the MRA number s by completing one of the following a Call VeriFone toll free within the United States at 1 800 VeriFone and follow the automated menu options Select the MRA option from the auto...

Страница 50: ...ocated on the VeriFone label on the bottom of the Vx5xx Vx610 terminal Accessories and Documentation VeriFone produces the following accessories and documentation for the Vx5xx Vx610 terminal When ordering please refer to the part number in the left column VeriFone online store at www store verifone com USA VeriFone Customer Development Center 800 VeriFone 837 4366 Monday Friday 7 A M 8 P M Easter...

Страница 51: ...ix V Tools Programmer s Manual For Vx510 Terminals 23218 Omni 5100 5150 and Vx510 Omni 3730 Certifications and Regulations 23219 Omni 5100 5150 and Vx5xx Quick Installation Guide For Vx570 Terminals 23646 Vx570 Certifications and Regulations 23759 Vx570 Quick Installation Guide 24134 Vx570 Privacy Shield Quick Installation Guide For Vx610 Terminals 23640 Omni 56xx and Vx610 Carrying Case Quick Ins...

Страница 52: ...VERIFONE SERVICE AND SUPPORT Accessories and Documentation 52 OMNI 5XXX AND VX5XX VX610 INSTALLATION GUIDE ...

Страница 53: ... your local VeriFone service provider Terminal Does Not Dial Out If the terminal does not dial out Check the telephone line connections Check that the telephone line is working by plugging it into a working telephone and listening for a dial tone NOTE The Vx5xx Vx610 terminal comes equipped with tamper evident labels The Vx5xx Vx610 contains no user serviceable parts Do not under any circumstance ...

Страница 54: ... the expected action refer to the user documentation for that application to ensure you are entering data correctly If the problem persists contact your local VeriFone representative Peripheral Device Does Not Work If any peripheral device PINpad or smart card reader does not work properly Check the power cord connection to the peripheral device Check that the device connected to the proper port h...

Страница 55: ...er If the manual transaction does not process proceed to Check the Telephone Line Check the Telephone Line Disconnect the telephone line from the terminal and connect it to a working telephone to check for a dial tone If there is no dial tone replace the telephone cable If the problem appears to be with the telephone line check with the party you are trying to call to see if their system is operat...

Страница 56: ...insufficient charge remaining in the battery to complete the print operation For Vx610 terminals only Check if the printer is out of paper and that the roll is properly installed Open the paper roll cover and install a new roll of printer paper or ensure that the roll is feeding from the bottom Verify that the printer roller and paper roll dust cover are properly installed If the problem persists ...

Страница 57: ... RS 232 port connection 27 external printers supported VeriFone external printers 27 I installation 9 connecting a check reader to Vx510 or Vx570 25 connecting a check reader to Vx610 27 connecting a PINpad to Vx510 or Vx570 24 connecting a PINpad to Vx610 26 connecting a smart card reader to Vx510 or Vx570 24 connecting a smart card reader to Vx610 26 connecting a smart card writer to Vx510 or Vx...

Страница 58: ...es 33 installation 33 recharging 34 removal 34 troubleshooting 56 specifications DC power pack 45 power 45 temperature 45 weight 46 T technical support contacting VeriFone 49 returning a battery for repair or replacement 49 returning a terminal for repair or replacement 49 telephone line connections 18 telephone line cords ordering 51 terminal features general 15 terminals accessories 50 benefits ...

Страница 59: ...6 V VeriCentre Appliance Management Suite simultaneous downloads 11 Vx5xx Vx610 multi application capability 11 Vx610 starting on battery power 30 troubleshooting 56 Vx610 startup battery mode 30 W wireless connection CDMA 11 GSM GPRS 11 Wi Fi 11 wireless transactions 42 ...

Страница 60: ...Omni 5xxx and Vx5xx Vx610 Installation Guide VeriFone Part Number 23216 Revision C VeriFone Inc 2099 Gateway Place Suite 600 San Jose CA 95110 USA Tel 800 VeriFone 837 4366 www verifone com ...

Отзывы: