


3.0 Installation
9
CE-1-11/00
3.1
Installing the Unit
26. The material provides resistance to heat
loss from the distribution ducting and a highly
effective vapour barrier when all joints are
sealed with metallised tape. It is light but robust,
not easily damaged in storage or during
construction and is rot proof, water and vapour
resistent, durable and can be expected to
remain an effective insulant for the normal life
span of a building.
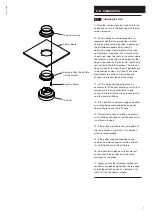
27. The insulation is supplied in 1.5m long
preformed sections for application to the ducting
at the time of installation. All joints should be
secured using the metalised tape (DTA30)
provided to ensure that a continuous vapour
seal is maintained.
28. The use of flexible ducting should be limited
to an absolute minimum. If used it should be
fully stretched in order to minimse pressure
loss.
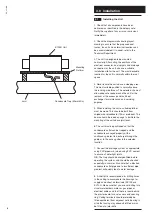
29. Offer the unit on to the mounting surface,
ensuring that it is not susceptible to movement
under operation. Use directional airflow
indicators on the top of the unit to ensure the
correct connection to external and internal
vents.
30. Mate up the ducting as appropriate,
ensuring that the airflow is in line with the
directional indicators.
31. Determine the most appropriate siting
position for the appropriate control. Normally,
this would either be a manual control switch
(NBSW), pull-cord switch (PCSW) humidity
switch (HS6) or speed control switch
(VCON100).
32. Determine the appropriate wiring
connections as outlined within section 4, and
wire in accordance with current IEE Wiring
Regulations, ensuring that the mains feed is
isolated before making any connections.
Содержание HR100R
Страница 2: ...CE 1 11 00 2...
Страница 14: ...8 0 Notes 14 CE 1 11 00...
Страница 15: ...CE 1 11 00 15...
Страница 16: ...CE 1 11 00 Vent Axia Ltd Fleming Way Crawley West sussex RH10 9YX www vent axia com Comp No 370666 Iss C 0310...