


2
2
A B C D E
1 2 3 4 5 6 7
8 9 10
A B C D E
1 2 3 4 5 6 7
8 9 10
ETHERNET
ETHERNET
RESET
RESET
USB
USB
A B C D E
1 2 3 4 5 6 7
8 9 10
A B C D E
1 2 3 4 5 6 7
8 9 10
ETHERNET
ETHERNET
RESET
RESET
USB
USB
1 sec
A B C D E
1 2 3 4
5 6 7 8 9 10
A B C D E
1 2 3 4
5 6 7 8 9 10
ETHERNET
ETHERNET
RESET
RESET
USB
USB
14 VELUX
®
VELUX
®
15
ENGLISH
ENGLISH
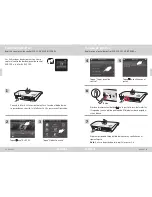
Function as interface
Registration with VELUX INTEGRA
®
control pad KLR 200
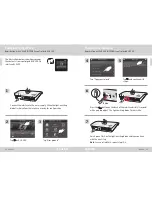
Tap on KLR 200.
Tap "Copy control pad".
Tap "New product".
Tap and continue with
step 6.
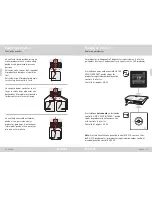
Connect the interface to the mains supply. When the light-emitting
diode flashes yellow, the interface is ready for configuration.
The illustrations below show how you copy
the contents from control pad KLR 200 to
interface KLF 200.
Function as interface
Registration with VELUX INTEGRA
®
control pad KLR 200
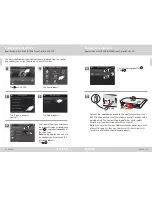
Await green flash on the light-emitting diode and then continue
with the next step.
Note:
In case of red flash, repeat steps 2-6.
Press the
button on the back of the interface briefly (1 second)
with a pointed object. The light-emitting diode flashes white.
2
3
1
4
5
6
7
A B C D E
1 2 3 4 5 6 7
8 9 10
A B C D E
1 2 3 4 5 6 7
8 9 10
ETHERNET
ETHERNET
RESET
RESET
USB
USB


