


80 VELUX
®
VELUX
®
81
日本語
日本語
重要な情報
重要な情報
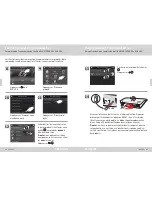
設置および操作の前に説明書をよくお読みください。今後参照するため、また新し
いユーザーに渡すため、説明書は保管しておいてください。
安全性
• インターフェース KLF 200 は、十分な経験と知識を有する者(8歳以上)であっ
て、その安全な使用法について説明を受け、付随する危険性について理解してい
る者が使用することができます。クリーニングおよびユーザー保守は児童が監
督者なしで行ってはいけません。
• 児童をインターフェースで遊ばせないこと。
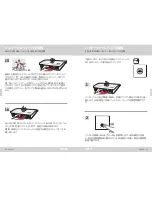
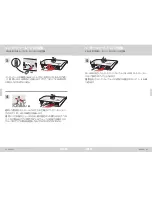
• インターフェースを何かで覆わないこと(最高周囲温度: 50°C/122°F)。
• 本機器はFCC規則Part 15および IC規則のRSS-210に適合しています。以下の2
つの条件に従って動作します。(1) 本機器は有害な干渉を引き起こしてはならな
い、(2) 本機器は、望ましくない動作を引き起こす干渉を含むどのような受信干
渉も受け取らざるをえない。
• 本機器は、試験の結果、FCC規則Part 15に従ったクラスBデジタル機器の制限に
適合していることが証明されています。これらの制限は、住居に設置された場合
の有害な干渉に対する妥当な保護を提供することを意図しています。本機器は
無線周波数エネルギーを発生・使用し、放射する可能性があり、説明書に従っ
て設置および使用されない場合、無線通信に有害な干渉を引き起こす可能性
があります。しかしながら、特定の設置のときには干渉が起こらないという保証
はありません。本機器がラジオまたはテレビ受信に対して有害な干渉を引き起
こす場合、それは本機器の電源をオン、オフすることで判断できますが、その場
合にはその干渉を改善するため、下記の方法の一つかそれ以上を試してみるこ
とをお勧めします。
- 受信アンテナの方向変更または受信アンテナの場所変更。
- 機器と受信機の距離を大きくする。
- 機器を、受信機が接続されている回路のコンセントとは異なる回路のコンセン
トに接続する。
- ディーラーまたは経験の豊富なラジオ/テレビ技術者に助力を求める適合に
対して責任がある関係者によって明示的に承認されていない変更または改造
を行った場合、その機器を操作するユーザーの権限が無効になる可能性があり
ます。
• FCC放射線曝露声明:本機器は、非管理環境用に定められた FCC放射線曝露限
度に適合しています。
• 機器の証明書番号の前にある「IC:」はIndustry Canada の技術仕様を満足する
ことを示しています。
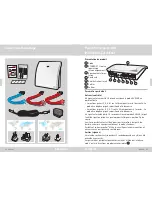
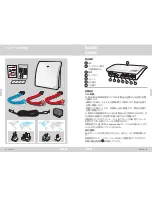
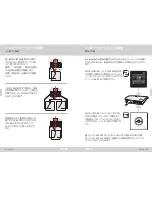
製品
• このインターフェースは双方向 RF(radio frequency) 通信に基づいており、↔ の
符号で表示されています。この符号はデータ・ラベル上に表示されています。こ
のインターフェースはそれぞれの市場地域で、 io-homecontrol
®
ロゴが付いた
製品に対応しています。
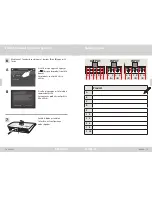
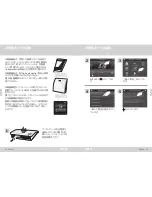
• このインターフェースは 5つのダブル入力端子を持っており、最大 5つのグルー
プ、 計200台までの製品をコントロールすることができます。
• このインターフェース入力端子からのケーブルは 100 m/110 ydを超えないこと。
• 無線周波数帯:2.4 GHz (io-homecontrol
®
), 2.4 GHz (WiFi 802.11 b/g/n).
• 無線周波数帯域: 障害物のない屋外で300 m/330 yd 。建物の構造により、室
内の帯域は約 30 m/100 ft。 ただし、強化コンクリート、金属天井およびスチー
ル部材入りのしっくい壁の構造の場合、これ以下となることもあります。
• 電気製品は家庭廃棄物ではなく、電気製品の廃棄に関する国の規制に従って廃
棄しなければなりません。
• 梱包材は通常の家庭廃棄物として廃棄できます。
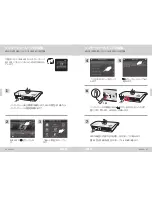
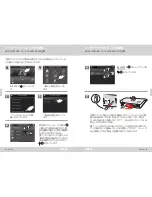
保守
• 修理または調整作業が必要になった場合は、必ずすべての電源供給を切断し、
間違って再接続されないようにすること。
• このインターフェースは最小限の保守しか必要としません。表面は柔らかい、湿
らせた布で拭いてください。
• アダプター・プラグやケーブルが損傷した場合、一つでも複数でも必ず交換して
ください。
• スペアパーツは 製品をお求めになったVELUX 販売元から入手できます。
• 技術的な点についてのご質問は日本ベルックス株式会社までご連絡ください。
電話番号リストまたは www.velux.com.をご覧ください。'
io-homecontrol
®
は設定が簡単で、高度で安全な無線技術を提供しています。
io-homecontrol
®
対応品は快適性、安全性、省エネルギー性を向上し、製品間の相互通信を可能にします。
www.io-homecontrol.com
重要なお知らせとご注意
重症・死亡事故などの危険を
減らすための注意点


