background image

18

INSTALLATION  

MANUAL

INSTALLATION

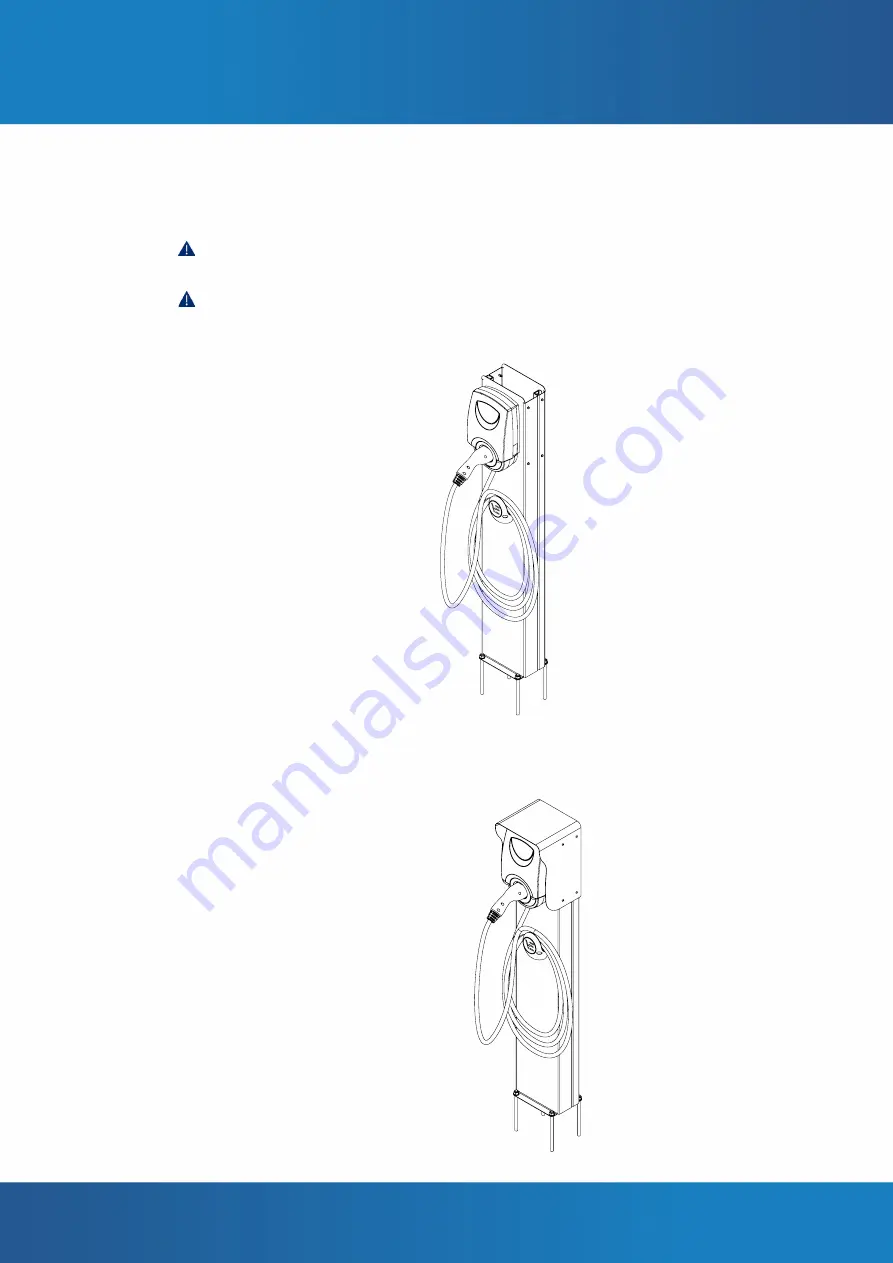
5.  Mount the charger onto the STAND element. Follow points 9 to 13 of the charger 

assembly instructions.

 The fasteners to be used in this case must be those provided with the STAND 

element, and not those supplied with the charger.

 Given that in this case the power supply does not come through the side of the 

charger, this access must be covered using the blind grommet provided with 

the charger.

6.  Replace the top part of the STAND element.

Содержание LITE Zero

Страница 1: ...INSTALLATION MANUAL V 1 02 ...

Страница 2: ...ACKAGING 6 REQUIRED TOOLS 7 INSTALLATION 8 INSTALLATION OF THE LITE ZERO UNO KUBO CHARGER 8 INSTALLATION 13 INSTALLATION OF THE STAND ELEMENT 16 INSTALLATION OF THE SIM CARD 19 INSTALLATION OF THE CURVE DEVICE 20 INSTALLATION OF THE THREE PHASE METER SET 22 CONNECTION OF THE CHARGER TO ANOTHER CHARGER OR TO A COMMUNICATIONS ELEMENT 25 TECHNICAL SPECIFICATIONS 26 CHARGERS 26 ACCESSORIES 29 ...

Страница 3: ...he original manual is written in Spanish Translation of the original manual into different languages has the sole purpose of clarifying its content In the event of discrepancy between the translated document and the original the original version takes precedence over the translation WARRANTY VELTIUM guarantees this product and its accessories against defects in their materials and manufacturing pr...

Страница 4: ...Do not use extension cables or adapters for the charging cable The charger must always be connected to the installation s ground connection Do not install the charger near inflammable explosive or combustible materials chemicals or solvents gas pipes steam vents radiators or batteries Do not install the charger in areas susceptible to flooding high humidity or running water Before installing the c...

Страница 5: ...5 INSTALLATION MANUAL BEFORE STARTING IDENTIFICATION OF THE CHARGER The charger model is visible on its cover LITE Zero Uno or Kubo The charger also comes with a label on the side indicating its model ...

Страница 6: ...or 6 mm2 cables 3 Zero Uno 5 Kubo Spare ACCESS CODE label 1 Template for installation 1 Charge cable support 1 OPTIONAL ACCESSORIES ELEMENT QUANTITY STAND STAND 1 M5x12 screw 1 single STAND 2 double STAND M5x70 screw 3 single STAND 6 double STAND CURVE CURVE 1 Flange 1 THREE PHASE METER SET Iskra IE38MD three phase energy meter 1 Iskra SG E1 smart gateway 1 ELEMENTS INCLUDED IN THE PACKAGING ...

Страница 7: ...ORE STARTING REQUIRED TOOLS LITE Zero Uno Kubo Drill 8 mm bit Phillips PH2 screwdriver Hammer Pencil or marker STAND Spanner 4 mm Allen or hex key CURVE 3 2 mm flathead screwdriver THREE PHASE METER SET Phillips PH2 screwdriver ...

Страница 8: ...re going to connect the charger to a three phase energy meter a communications device modem router switch or to another charger check that the Ethernet wiring from that device is also available For more information see INSTALLATION OF THE THREE PHASE METER SET and or CONNECTION OF THE CHARGER TO ANOTHER CHARGER OR TO A COMMUNICATIONS ELEMENT INSTALLATION INSTALLATION OF THE LITE ZERO UNO KUBO CHAR...

Страница 9: ...e the template in the desired position approximately 1 2 m from the horizontal reference to the ground We recommend that you use a spirit level to ensure that the template is perfectly level 5 PLACE THE TEMPLATE 1 2 m Ground Connector height ...

Страница 10: ...pply wiring at the indicated height 2 Cut and strip the cables to the recommended length 3 Fit the ferrules Always use an appropriate tool crimper to avoid poor connections likely to cause overheating in the connection terminals 20 mm hollow crimp ferrule 5 5 cm Connection tube 25 cm Lite Zero Uno 20 mm hollow crimp ferrule 5 5 cm Connection tube 25 cm Lite Kubo ...

Страница 11: ...e made 2 Drill the holes 3 Fit the wall plugs Insert the screw of the upper part and tighten it into the bushing as far as it will go In the case of the STAND use the screws supplied with it in the packaging 8 FIT THE UPPER SCREW 8 mm 1 2 3 Wall mounting 4 8x38 screw STAND assembly M5x12 screw ...

Страница 12: ...ro Uno LITE Kubo OPTIONAL If you are also going to install a CURVE device connect the wiring from that device For more information see INSTALLATION OF THE CURVE DEVICE OPTIONAL If you are going to connect the charger to a three phase energy meter a communications device modem router switch or to another charger check that the Ethernet wiring from that device is also available For more information ...

Страница 13: ...UBO In the event of having to install the THREE PHASE METER SET see INSTALLATION OF THE THREE PHASE METER SET 12 OPTIONAL CONNECTION OF THE CHARGER TO ANOTHER CHARGER OR TO A COMMUNICATIONS ELEMENT Intheeventofhavingtoconnectthechargertoanotherchargerortoacommunications element see CONNECTION OF THE CHARGER TO ANOTHER CHARGER OR TO A COMMUNICATIONS ELEMENT Hang the charger on the upper screw bushi...

Страница 14: ...r and tighten them firmly 2 Fit the caps to cover the three screws 14 FIX THE CHARGER TO THE WALL 15 INSTALL THE CHARGING CABLE SUPPORT 1 Mark the holes to be made in the wall 2 Drill the holes 3 Fit the wall plugs 8 mm 1 2 3 FRONTAL Wall mounting 4 8x90 screw STAND assembly M5x70 screw 1 2 ...

Страница 15: ...15 INSTALLATION MANUAL INSTALLATION 16 SUPPLY POWER TO THE CHARGER Close the element that cuts off the electrical circuit powering the charger 4 Fit the screws ...

Страница 16: ...N INSTALLATION OF THE STAND ELEMENT 1 Prepare the ground anchors for the STAND element according to the figure always using M12 components 20 5 cm 15 5 cm 2 Remove the top part of the STAND element in order to access the hollow interior ...

Страница 17: ...let on the ground and pass the power supply cables and the auxiliary wiring for connecting other devices through the hollow interior from the bottom until they can be pulled out through the corresponding grommet Auxiliary wiring Electrical wiring 4 Fix the STAND element to the ground ...

Страница 18: ...ons The fasteners to be used in this case must be those provided with the STAND element and not those supplied with the charger Given that in this case the power supply does not come through the side of the charger this access must be covered using the blind grommet provided with the charger 6 Replace the top part of the STAND element ...

Страница 19: ...s joining the front and rear parts of the casing using the torx head screwdriver size T20 Remove the front cover 2 Identify in the SIM card slot on the charger circuit board 3 Slip the SIM card into its slot as indicated in the following steps 4 Close the casing again with the 6 screws ...

Страница 20: ...ction of the active phase current passing through it 2 Install the CURVE device in the active phase of the circuit you wish to measure general or home Connection cables with charger Active phase 3 Attach the CURVE device to the cable using the mounting flange Mounting flange METER Contracted power Electric vehicle power CURVE Home power PANEL PANEL At the meter outlet In the home circuit Home powe...

Страница 21: ...between the CURVE device and the charger 5 Strip 8 mm from each wire of the cable and connect it to the terminals of the CURVE device 8 mm 6 Strip 8 mm from each wire of the cable and connect the CURVE device to the charger in the pins indicated LITE Zero LITE Uno ...

Страница 22: ...R 2 Install the three phase energy meter and the smart gateway next to one another maintaining contact between the elements of each device that enable them to communicate by means of infrared signals The three phase energy meter and the smart gateway are designed for installation on a DIN rail DIN EN 60715 3 Strip the power cables 10mm and the neutral cable 8 mm 4 Place the power and neutral cable...

Страница 23: ...ween the three phase energy meter and the smart gateway stripping 6 mm from the ends of the wires going into the latter place the power and neutral cable contacts in the smart gateway and tighten the screws Neutral Phase 1 Phase 1 Phase 2 Phase 2 Phase 3 Phase 3 ...

Страница 24: ...TION MANUAL INSTALLATION 6 Run an Ethernet cable with RJ45 connectors on both ends and connect it to both the smart gateway and the charger Connect it to either of the charger s two RJ45 sockets LITE Uno LITE Kubo ...

Страница 25: ...LATION OF THE THREE PHASE METER SET the following Connect the charger to a communications device modem router switch The communications device can be connected to either of the two sockets interchangeably Connect several chargers to one another forming a group All of the chargers in a group must be connected to the same LAN whether by directly connecting them to one another or by using connecting ...

Страница 26: ...up of chargers with THREE PHASE METER Single charger or group of chargers with THREE PHASE METER Charge programme Yes No of EV that can be charged simultaneously 1 Electrical Frequency 50 60 Hz Maximum current per phase 32 A Power supply Single phase P N T Three phase 3P N T Voltage AC 230 V AC 400 V Maximum output power 7 4 kW 22 kW No of connectors 1 Type of connector Type 2 socket with shutters...

Страница 27: ... unit with integrated cable Integrated to the unit Cable length on unit with integrated cable 5 metres 7 metres Power terminal block Accessible from the exterior no need to open the unit during installation Maximum power cable gauge 16 mm2 Colour White Black Blue Orange Environmental Suitable for outdoor use Yes Operating temperature 25 to 40 C Storage temperature 25 to 60 C Communications Bluetoo...

Страница 28: ...28 INSTALLATION MANUAL TECHNICAL SPECIFICATIONS DIMENSIONS 220 105 365 ...

Страница 29: ... 120 120 250 Functional Number of single STAND chargers 1 Number of double STAND chargers 2 Mechanical Material Lacquered steel Single STAND dimensions mm 1400 x 283 x 240 Double STAND dimensions mm 1400 x 310 x 350 Single STAND weight 25 kg Double STAND weight 26 5 kg TECHNICAL SPECIFICATIONS ACCESSORIES STAND ...

Страница 30: ...TIONS 27 48 57 22 TECHNICAL SPECIFICATIONS Electrical Maximum current to be measured 63 A Mechanical Dimensions mm 48 x 57 x 27 Material PC ABS V0 Maximum cable gauge to be measured 25 mm2 Communication cable with the charger 2 x 1 5 mm2 CURVE ...

Страница 31: ...g Iskra manuals TECHNICAL SPECIFICATIONS Three phase energy meter IE38MD Mechanical Dimensions mm 52 5 x 96 4 x 68 2 Assembly DIN rail Electrical Power supply Three phase 3F N Maximum current 80 A Voltage 3 x 400 V AC Frequency 50 and 60 Hz Power cable gauge 2 5 25 mm2 Neutral cable gauge 0 5 1 5 mm2 Certification MID ...

Страница 32: ...IONS Smart gateway SG E1 Mechanical Dimensions 17 5 x 95 4 x 68 2 Assembly DIN rail to the right of the IE38MD Electrical Power supply Single phase F N Voltage 85 265 V AC Cable gauge 0 5 3 mm2 Communications Connection with IE38MD meter Infrared Ethernet connector RJ45 ...

Страница 33: ...VELTIUM Smart Chargers S L Parque Tecnológico de Álava c Albert Einstein 30 01510 Vitoria Spain Tel 34 945 297 271 Email info veltium com www veltium com ...

Отзывы: