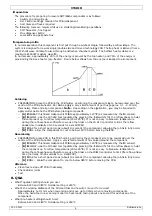
21
•
•
•
•
3.
Re
•
•
•
•
4.
Re
Ma
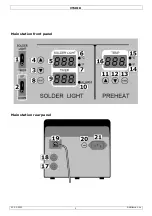
1.
2.
3.
4.
5.
6.
7.
8.
9.
10
Ma
11
12
13
14
15
16
Ma
17
18
19
20
21
5.
Th
op
Ho
sol
Me
No
Pro
.03.2011
The system
pre-heater,
for the equ
Death or s
equipment
Do not allo
result. Due
Keep this d
.
Genera
fer to the
Ve
Familiarise
All modifica
device is no
Only use th
Damage ca
dealer will n
.
Overvie
fer to the ill
ain station
SOLDERLI
Time coun
“
▼
” key:
“
▲
” key:
IR Tempe
Celsius (°
Fahrenhei
“RESET”:
“TIMER” d
.
“ALARM”:
ain station
.
“
▲
” key: T
.
“
▼
” key: T
.
“MODEL”:
.
Fahrenhei
.
Celsius (°
.
Preheat te
ain station
.
Solderligh
.
DC12V Co
.
Output to
.
Fuse Hold
.
AC power
.
Workin
e most com
erating temp
owever, to m
lders that re
elting point
ormal Operat
oduction Line
m can prod
to contact e
ipment to co
serious inju
from the ma
ow the spil
to the use o
evice away f
l Guideli
elleman® S
Indoor use
Keep this de
Protect this
yourself wit
ations of the
ot covered b
he device for
used by disr
not accept re
ew
ustrations o
– solderlig
IGHT/Timer
nting switch:
Time count
Time count
rature displa
C): IR Temp
it (°F): IR Te
Offset forwa
display: Time
alarm indica
– Preheat s
Temperature
Temperature
Actual tem
it (°F): Pre-h
C): Pre-heat
emperature
- rear pane
ht Foot switc
ooling fan so
PREHEATER
er
inlet (Mains
g Tempe
mon solderin
perature of t
meet RoHS re
equire a work
tion
e Operation
uce a lot of
exposed skin
ool before co
ury may res
ains before c
lage of any
of glass optic
from childre
nes
Service and
e only.
Keep
evice away f
device from
h the functio
device are f
y the warran
r its intended
regard of cer
esponsibility
n page
2
of
ht section
alternate sw
:
I
= time co
ing / Actual
ing / Actual
ay / IR hand
perature in d
emperature
ard counting
e counting d
ator
section
e pre-heater
e pre-heater
perature offs
heater temp
ter temperat
setting displ
el
h socket (4
ocket (3 pin)
R
s inlet)
erature
ng alloys use
this type of s
equirements
king tempera
f heat.
Do n
n as burning
ommencing m
sult from el
commencing
y liquid to fa
cal compone
n and unaut
d Quality W
p this device
from dust an
shocks and
ons of the de
forbidden fo
nty.
d purpose. U
rtain guidelin
y for any ens
this manual
witch:
I
= So
ounting up,
temperature
temperature
d tool power
degrees Cels
in degrees F
for “TIMER”
display / Proc
r up (increas
r down (decr
set pre-heat
erature indic
ture in degre
lay (3 segme
pin)
ed in the ele
solder is det
, these solde
ature which
lea
215
270-32
320-38
VTSDIR
4
not allow the
may occur.
maintenance
ectric shoc
repairs.
all on the q
ents, the IR
thorized use
Warranty
on
away form
nd extreme h
abuse. Avo
evice before
r safety reas
Using the dev
nes in this m
suing defects
.
olderlight tem
O
= time co
e decrease
e increase
ius indicator
Fahrenheit in
”
cess timer
se)
rease)
ter
cating light
ees Celsius i
ents)
ectronics ind
tailed below
ers are no lo
is ±30°C (5
aded solder
5°C (419°F)
0°C (518-60
0°C (608-71
e IR spot from
To eliminat
e.
ck.
It is there
quartz emit
hand tool sh
rs.
the last pag
rain, moistu
heat.
id brute forc
actually usi
sons. Damag
vice in an un
manual is not
s or problem
mperature c
ounting down
r
ndicator
indicator
ustry consis
and can var
onger allowe
54°F) higher
)
08°F)
16°F)
m the IR ha
e the possib
efore essent
tter (
pre-hea
hould be han
ges of this m
re, splashing
ce when ope
ng it.
ge caused by
nauthorised
t covered by
ms.
ontrolled,
O
n
t of 60% tin
ry from man
d and are re
.
300
360
nd tool or IR
bility of burn
tial to isolate
ater) as dam
ndled with re
manual.
g and drippi
rating the de
y user modif
way will void
y the warran
= time cou
and 40% le
ufacturer to
eplaced by le
lead-fre
220°C (428
0-360°C (572
0-410°C (680
©
Velleman
R from the P
s, allow time
e the
mage may
easonable ca
ng liquids.
evice.
fications to t
d the warran
ty and the
nting.
ead. The
manufactur
ead-free
e
8°F)
2-680°F)
0-770°F)
n nv
CB
e
re.
the
nty.
rer.
Содержание VTSDIR
Страница 1: ...V IN US VTSD NFRA RE SER MAN DIR ED SMD UAL BGA RE EWORK S 3 STATION N ...
Страница 2: ...VTSDIR 21 03 2011 Velleman nv 2 Main station front panel Main station rear panel Figure ...
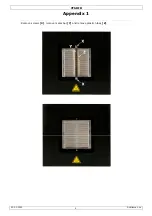
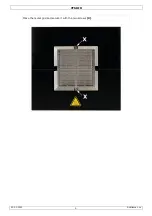
Страница 9: ...VTSDIR 21 03 2011 Velleman nv 9 Place the metal grid and secure it with the two screws X ...
Страница 10: ...VTSDIR 21 03 2011 Velleman nv 10 Appendix 2 ...
Страница 11: ...VTSDIR 21 03 2011 Velleman nv 11 ...


