background image

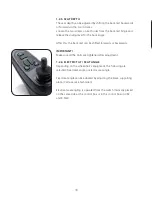
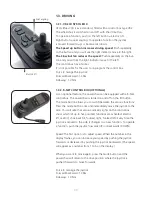
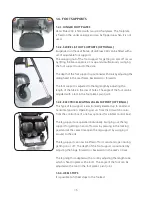
1.3.3. STEERING WITH THE JOYSTICK

Steering is done by moving the joystick in the direction you wish to 
drive. Acceleration and speed is checked by the fluctuation of the 
joystick: 

Large fluctuation =   powerful acceleration and high speed. 
Small fluctuation =   weak acceleration and low speed. 

It is not possible for the user to re-program the control box.

Warning! 

Abstain from putting vertical pressure on the joystick 

and the control box and abstain from pulling hard on the joystick 
as the parts of the box could be damaged.

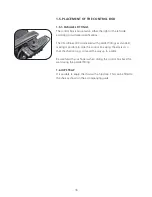
1.3.4. DESCRIPTION OF THE STEERING OF THE WHEELCHAIR

By moving the joystick directly forwards, both driving wheels are 
synchronously activated forwards. By moving the joystick directly 
backwards, both driving wheels are synchronously activated in 
the opposite direction. If the joystick is moved at a slant in the 
one direction, the speed of the two driving wheels are regulated 
asynchronously (and in certain cases in each their direction). This 
will make the chair move in one path in the desired direction. 

NB! 

By changing the driving direction, the chair’s flywheel must 

change position: they will swing around the front wheel fork axle 
until the wheels turn in the desired driving direction. 

When the wheelchair is stationary before such a change of direction, 
this requires great motor power from the driving wheels, a power 
that can release a “jolt” of the front end of the wheelchair (leg 
supports) or its back end (if front wheel-driven). The effect of this 
“jolt” is minimised by adjusting the power gradually and controlled 
(small movements with the joystick).
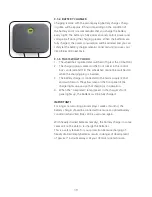
Warning!


Despite an approved EMC test, we make no guarantee that the 
powerchair is not affected by electromagnetic fields from e.g. 
mobile phones and radio transmitters, or that the powerchair does 
not transmit electromagnetic fields that can affect its surroundings, 
such as e.g. shop security systems.

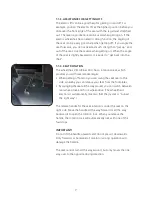
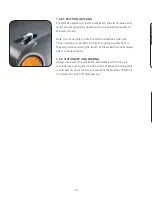
1.3.5. DRIVING OVER OBSTACLES

VELA Blues 300 can manage different levels of up to 4 cm, which 
makes passage over, among other things, doorsteps and many 
types of approaches possible. Always drive as perpendicular as 
 possible on such obstacles. With sudden obstacles, a certain run-up 
is required and a certain speed to get over the obstacles. 

IMPORTANT!

The electric lift must always be lowered to the bottom position 
before tackling obstacles as the raised seat impairs the stability of 
the wheelchair and can lead to risk of tipping over.

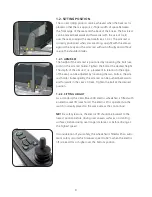
1.3.6. DRIVING ON SLANTING SURFACES

The wheelchair has sufficient pulling power to drive up normal 
existing ramps in connection with the residence (max. climbing ability 
is 12° with a 75 kg load). 

Descent is always carried out perpendicular to the slanting surface 
and at a calm pace. 

IMPORTANT! 

•  

The electric lift must always be lowered to the bottom position 

before driving on slanting surfaces, since a raised electric lift can 
impair the wheelchair’s stability with danger of tipping over.

•  

The wheelchair must not be driven at an angle or sideways on a 

slanting surface as tilting to the side can cause overturning.

1.3.7. BRAKING

Driving is interrupted by moving the joystick to the centre position 
or by letting it go.

1.3.8. ELECTO-BRAKE

VELA Blues 300 is fitted with an electro-brake, which automatically 
activates the second after the driving motor is stopped. This brake 
ensures that the chair is fully blocked when getting on and off, when 
parking on ramps or similar.

13

12

Содержание Blues 300

Страница 1: ...U K U S E R M A N U A L VELA Blues 300 UK June 2013 ...

Страница 2: ...6 0 VE con Co For S W Fo El El 6 0 IM Th sea wh TH The Th ...

Страница 3: ...1 1 3 2 R Net control box optional 11 1 3 3 Steering with the Joystick 12 1 3 4 Description of the wheelchair s steering 12 1 3 5 Driving over obstacles 13 1 3 6 Driving on slanting surface 13 1 3 7 Braking 13 1 3 8 Electro brake 13 1 3 8 1 Friction coupling 14 1 3 9 Stationary and parking 14 1 4 FOOT SUPPORTS 1 4 1 Hinged footplates 15 1 4 2 Swivel E foot supports optional 15 1 4 3 Electric eleva...

Страница 4: ...ING 4 0 1 Cleaning 20 4 0 2 Troubleshooting 20 5 0 GUARANTEE AND SERVICE 22 6 0 TRANSPORTATION 22 6 0 1 Lashing braces 22 6 0 2 Passenger seat optional 22 6 0 3 Positioning the 3 point seat belt on the user 22 7 0 TECHNICAL DATA 7 0 1 Series number 23 7 0 2 Power Source 23 7 0 3 Batteries 23 7 0 4 Electronics 23 7 0 5 Charger 23 7 0 6 Dimensions 23 7 0 7 Operating characteristics 23 ...

Страница 5: ...ratulations on your VELA Blues 300 IMPORTANT THE POWERCHAIR MUST CHARGE 12 HOURS BEFORE USE The user guidelines concern useful information about positioning operation maintenance technical data etc Please read this user manual thoroughly and store it for later use It must always be available to the user This user manual must always accompany the wheelchair It can also be found on VELA s website ww...

Страница 6: ...est position Electric tilt seat angle is in a neutral position Both motors are engaged pivoting arm is positioned lengthwise of the wheelchair The wheelchair is switched on by pressing the I 0 button 1 1 1 GETTING ON AND OFF Always switch off the wheelchair before getting on and off the I 0 button 1 1 2 THE FOOT PLATE Swing the seat to the side so that you can move your feet off the footplate and ...

Страница 7: ...rotational seat which provides you with several advantages When getting off and on you can swing the seat over to the side whereby you can release your feet from the footplates By swinging the seat all the way around you can switch between rear wheel drive and front wheel drive The wheelchair s electronics automatically resets so that the joystick is turned the right way The release handle for the...

Страница 8: ...arm rest i e placement in relation to the edge of the seat can be adjusted by loosening the two bolts in the arm rest holder Subsequently the arm rest can be pushed backwards and forwards in the seat s C track Tighten the bolt at the desired position 1 2 2 SITTING HEIGHT As a standard the VELA Blues 300 electric wheelchair is fitted with an electric seat lift seat hoist The electric lift is operat...

Страница 9: ...e Fixed back angle can be adapted by using tools by adjusting the angle brace on the back of the back rest The brace is removed from the circular fixture at the one end and is extended or shortened by turning the ends in the thread in the middle section Manual back angle is adjusted by operating the handle of the gas spring push downwards whilst the back rest is pushed into the desired position Re...

Страница 10: ...ed forwards or backwards IMPORTANT Make sure all the bolts are tightened after adjustment 1 2 6 ELECTRIC TILT SEAT ANGLE Depending on the wheelchair s equipment the following are selected Fixed seat angle or electric seat angle Fixed seat angle can be adapted by adjusting the brace supporting plate Call a service technician Electrical seat angling is operated from the switch normally placed on the...

Страница 11: ...uipped with a R Net control box The powerchair is turned on and off on the I 0 button The mode button allows you to switch between the various functions Press the mode button once and immediately move the joystick to the side You will note that various indicator lights on the control box show which of up to five possible functions are activated electric lift seat tilt chair back tilt footrest righ...

Страница 12: ...irection the speed of the two driving wheels are regulated asynchronously and in certain cases in each their direction This will make the chair move in one path in the desired direction NB By changing the driving direction the chair s flywheel must change position they will swing around the front wheel fork axle until the wheels turn in the desired driving direction When the wheelchair is stationa...

Страница 13: ... connection with the residence max climbing ability is 12 with a 75 kg load Descent is always carried out perpendicular to the slanting surface and at a calm pace IMPORTANT The electric lift must always be lowered to the bottom position before driving on slanting surfaces since a raised electric lift can impair the wheelchair s stability with danger of tipping over The wheelchair must not be drive...

Страница 14: ...chair when the friction coupling is operated Turn both coupling handles back so they are positioned along the length of the wheelchair immediately after concluded towing 1 3 9 STATIONARY AND PARKING Always disconnect the wheelchair immediately when driving is concluded by pushing the I 0 button NOTE When the wheelchair is switched on it will consume power from the batteries Therefore it is advised...

Страница 15: ...ed with a tool in the foot plate s pivot joint 1 4 3 ELECTRIC ELEVATING W LEG SUPPORT OPTIONAL This type of leg support is electronically elevated up to an almost horizontal position Operating occurs from the tilt switch or also from the control box if one has optioned for a R Net control box The leg support are operated individually Swinging out the leg support for getting on and off occurs by pr...

Страница 16: ...ered with parallel fittings as standard making it possible to slide the control box along the armrest so that the chair can e g come all the way up to a table Be careful with your fingers when sliding the control box back for ward using the parallel fitting 1 6 HIP STRAP It is possible to equip the chair with a hip strap This can be fitted to the chair as shown in the accompanying guide ...

Страница 17: ...on before accelerating over difference in levels and before driving at high speed Always lower the electric lift to the lowest position before driving on slanting surfaces Never drive sideways on slanting surfaces as the inclination could cause the chair to overturn The wheelchair may not be exposed to rain or heavy moisture as water will damage the electronics Never cover the battery charger duri...

Страница 18: ...ed to request a service technician to change the batteries IMPORTANT The greatest care must be taken connecting correctly when installing the batteries Red wire to plus pole Incorrect pole connection can result in defect of the electronics in the wheelchair 3 1 CHARGING 3 1 1 BATTERY INDICATOR The control box has a built in battery indicator With fully charged batteries three groups of coloured LE...

Страница 19: ... underside NOTE The wheelchair cannot be switched on when the charging plug is inserted 3 The battery charger is connected to the mains supply 230V and switched on The yellow lamp on the front panel of the charger lights up as a sign that charging is in operation 4 When the completed lamp green in the charger s front panel lights up the batteries will be fully charged IMPORTANT For longer non work...

Страница 20: ... of your VELA Blues 300 occur please first check the following THE WHEELCHAIR CANNOT START Both friction coupling handles are in operating position i e point lengthwise of the wheelchair The battery indicator shows that power is on The overload cutout is disengaged Push the safety feature home The seat is in driving position I e either positioned forwards or positioned backwards THE WHEELCHAIR DRI...

Страница 21: ...hat the rubber seal has not been damaged If this is not the case contact VELA Once a week TESTING CONTROL BOX FUNCTIONS User 1 Check the on off switch 2 Check the horn 3 Check the speed try accelerating and decelerating 4 Check the seat lift raise and lower the seat to its full extent 5 Check the seat tilt tilt the seat all the way backwards and all the way forwards If any of the functions do not ...

Страница 22: ...The height of the powerchair can be reduced to approx 85 cm by folding the chair back across the seat Loosen the pin on the chair back and remove it Then fold the chair back across the seat 6 0 1 LASHING RINGS The chair can be fitted with a lashing ring which is used if the chair is to be transported by car bus or train The lashing rings can only be mounted if the chair is configured with a C prof...

Страница 23: ...rest Folding or fixed armrest Electric or manual chair back Electrically operated leg support or E leg support swivel footrest 6 0 3 POSITIONING THE 3 POINT SEAT BELT ON THE USER IMPORTANT The 3 point seat belt must not be tightened across sharp edges The drawing illustrates the incorrect positioning of a 3 point seat belt The seatbelts must not be held away from the body by parts of the wheelchai...

Страница 24: ... lift VELA MBL actuator 180 24 VDC Tilt actuator Linak RA40 24 VDC Electric back actuator Linak LA28 100 Motor control VELA ET3 2 24VDC PG Drives combined wheelchair electronics VR2 7 0 5 CHARGER Automatic Power Charger 8Ah 230V AC 24V DC 7 0 6 DIMENSIONS Seating height 48 68 cm Seat height from edge empty 52 cm Overall height without seat 40 cm Carriage width 61 cm Carriage length with 1 footplat...

Отзывы: