1
2
3
4
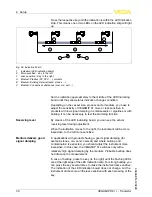
F
ig
.
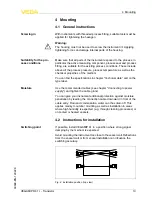
8
:
VEGAMIP
61
-
threaded version
G
1
½
A
1
P
olarisation marking
2
I
nstrument hexagon
3
L
ocknut
4
P
rocess seal
1
I
nsert the supplied process seal
(
1
)
before screwing it in
2
T
o screw
VEGAMIP
61
in
,
use the instrument hexagon
(
3
)
below
the housing
.
S
crew the instrument in and hand
-
screw it a
fl
at wrench
3
T
urn the sensor back
(
max
.
180
°
)
to reach the required orientation
of the polarisation marking
(
4
)
4
H
old the instrument in this position and tighten with the counter nut
(
2
)
C
aution
:
T
he housing must not be used to screw the instrument in
!
A
pplying
tightening force can damage internal parts of the housing
.
N
ote
:
I
n the case of
VEGAMIP
61
with
NPT
thread
,
the instrument seals in
the thread itself
.
H
ence
,
no counter nut is necessary for these
versions
.
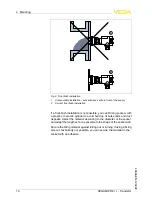
A
void long sockets in which the medium can remain and if possible
,
mount
VEGAMIP
61
front
-
fl
ush
.
T
his applies mainly if buildup and dust
are expected
.
B
uildup
VEGAMIP R
61
• -
T
ransistor
17
4
M
ounting
40694
-
EN
-
120228
Содержание VEGAMIP 61
Страница 1: ...Operating Instructions VEGAMIP R61 Receiving unit Transistor Document ID 40694 Radar ...
Страница 45: ...VEGAMIP R61 Transistor 45 Index 40694 EN 120228 ...
Страница 46: ...46 VEGAMIP R61 Transistor Index 40694 EN 120228 ...
Страница 47: ...VEGAMIP R61 Transistor 47 Index 40694 EN 120228 ...


