29
GETTING TO KNOW YOUR ECS-9200/9100
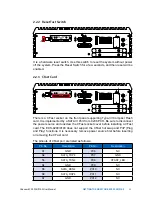
2.3.2 Remote Power On/ Off Switch & Ignition
COM 1
COM 2
COM 3
COM 4
V+ V-
On | Off
DC-IN
IGN
LAN6
PoE
LAN5
PoE
LAN4
PoE
LAN3
PoE
Isolated
DIO 2
D I
PIN 1 ~ 8
DO
PIN 11 ~ 18
20
11
10
1
Isolated
DIO 1
D I
PIN 1 ~ 8
DO
PIN 11 ~ 18
20
11
10
1
It is a 3-pin power-on or power-off switch through Phoenix Contact terminal
block. You could turn on or off the system power by using this contact. This
terminal block supports dual function of soft power-on/ power-off (instant off or
delay 4 second), and suspend mode.
Pin No.
Definition
Pin No.
Definition
1
Ignition
2
External Power Button V+
3
External Power Button V-
BIOS Setting
Function
COM 1
COM 2
COM 3
COM 4
RS-232
RS-422 (5-wire)
RS-422 (9-wire)
RS-485
RS-485 w/z auto-flow control
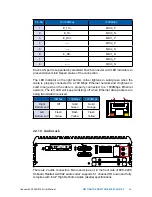
2.3.3 COM Ports
Serial port 1 to 4 (COM 1 to 4) can be configured for RS-232, RS-422, or RS-
485 with auto flow control communication. The default definition of COM 1 and
COM 2 is RS-232. If you want to change to RS-422 or RS-485, you can find the
setting in BIOS.
COM 1
COM 2
COM 3
COM 4
V+ V-
On | Off
DC-IN
IGN
LAN6
PoE
LAN5
PoE
LAN4
PoE
LAN3
PoE
Isolated
DIO 2
D I
PIN 1 ~ 8
DO
PIN 11 ~ 18
20
11
10
1
Isolated
DIO 1
D I
PIN 1 ~ 8
DO
PIN 11 ~ 18
20
11
10
1
Содержание ECS-9210
Страница 64: ...57 HARDWARE INSTALLATION Step 3 Finish Step1 and 2 Step 4 Remove one cover Step 5 Open the module...
Страница 68: ...61 HARDWARE INSTALLATION Step 4 Open CPU slot Be careful CPU pins Step 3 CPU slot...
Страница 74: ...67 HARDWARE INSTALLATION 3 7 Installing PCI PCIe Card Step 2 Remove the bracket Step 1 Remove the M3 screw...
Страница 75: ...68 HARDWARE INSTALLATION Vecow ECS 9200 9100 User Manual Step 4 Fasten M3 screw Step 3 Install PCI PCIe card...
Страница 77: ...70 HARDWARE INSTALLATION Vecow ECS 9200 9100 User Manual Step 3 Finish Step 4 Install SSD HDD...
Страница 78: ...71 HARDWARE INSTALLATION 3 9 Installing M 2 Step 2 Fasten one M3 screws Step 1 M 2 slot...
Страница 80: ...73 HARDWARE INSTALLATION Step 4 Lock two M2 screws with slot Step 3 Install M2DOM module with slot...
Страница 82: ...75 HARDWARE INSTALLATION Step 2 Fasten 4pcs KHS 6 32 screws then finish...


