background image

External devices

125

When connected to the USB port, the

devices mentioned above can be

operated via the controls and menus

of the Infotainment system.

Note

Not all MP3 player, USB drive, iPod

models or Smartphones are

supported by the Infotainment

system.

Connecting/disconnecting a device

Connect the USB device or iPod to

the USB port. For the iPod, use the

appropriate connection cable. The

music function starts automatically.

Note

If a non-readable USB device or

iPod is connected, a corresponding

error message will appear and the

Infotainment system will

automatically switch to the previous

function.

To disconnect the USB device or

iPod, select another function and then

remove the USB storage device.

Caution

Avoid disconnecting the device

during playback. This may

damage the device or the

Infotainment system.

USB audio function

The Infotainment system can play

music files contained in USB storage

devices or iPod/iPhone products.

SD card

An SD card may be inserted in the SD

card slot.
When inserted, the SD card can be

operated via the controls and menus

of the Infotainment system.

Note

Not all SD card types are supported

by the Infotainment system.

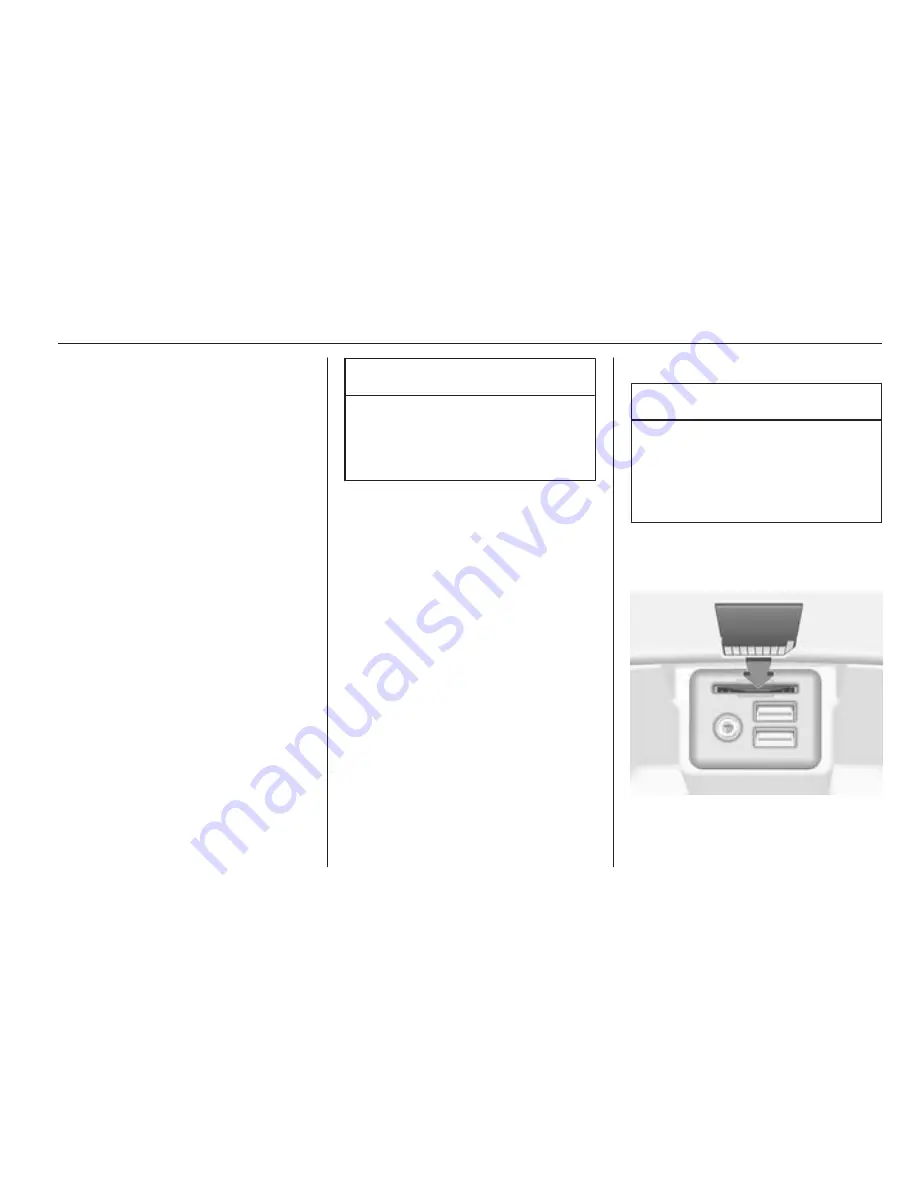
Inserting/removing an SD card

Caution

Never attempt to use an SD card

that has been cracked, deformed

or repaired using adhesive tape.

Doing so may damage the

equipment.

Insert the SD card in the SD card slot

as shown below. The music function

starts automatically.

Содержание KTA-2677/11-VX-en

Страница 1: ...0 1 Infotainment Manual Model Year 2014 5 Edition January 2014 KTA 2677 11 VX en VAUXHALL Insignia Infotainment Manual Model Year 2014 5 Edition January 2014 KTA 2677 11 VX en...

Страница 2: ...Touch R700 Navi 900 3 R300 Color R400 Color 101 Contents...

Страница 3: ......

Страница 4: ...Introduction 4 Basic operation 12 Radio 45 CD Player 50 External devices 53 Navigation 60 Speech recognition 78 Phone 84 Frequently asked questions 93 Index 96 Touch R700 Navi 900...

Страница 5: ...route planning will reliably guide you to your destination and if desired automatically avoid traffic jams or other traffic problems In addition the Infotainment system is equipped with a Phone portal...

Страница 6: ...Warning In some areas one way streets and other roads and entrances e g pedestrian zones that you are not allowed to turn into are not marked on the map In such areas the Infotainment system may issu...

Страница 7: ...6 Introduction Control elements overview Centre display with controls...

Страница 8: ...display Home screen 6 BACK button 13 Press return to previous screen menu 7 v button Radio short press skip to next station long press seek up 45 CD player External devices short press skip to next tr...

Страница 9: ...r recognition 22 3 BACK button 19 Press return to previous screen menu Long press return to Home screen Left hand steering wheel control 1 s button Press take phone call 88 or activate speech recognit...

Страница 10: ...ton confirm selection 2 button 10 Press upwards increase volume Press downwards decrease volume 3 k l buttons Radio press to select next previous favourite 26 Media press to select next previous track...

Страница 11: ...ystem is switched on using the X button while the ignition is switched off it switches off again automatically after 1 hour Setting the volume Turn the X knob The current setting is shown on the displ...

Страница 12: ...around the current location Find a detailed description of the navigation functions 3 60 Phone Press the button to display the Home screen Select the PHONE icon If a connection to a paired mobile pho...

Страница 13: ...shown on two separate displays Centre display The centre display is located in the middle of the instrument panel It serves as the main information and control centre of the Infotainment system Inputs...

Страница 14: ...lection of important Infotainment functions Inputs are made via the five way controller on the right hand side of the steering wheel Find detailed descriptions in Control elements overview 3 6 and Con...

Страница 15: ...Press the button on the instrument panel to access the Home screen BACK button When operating the menus press the BACK button to return to the next higher menu level Touch screen The centre display ha...

Страница 16: ...xit edit mode Note In subsequent chapters the operating steps for moving a screen element via the touch screen will be described as drag the icon to or drag the menu item to Scrolling lists If there a...

Страница 17: ...oll to the next page Note Constant pressure must be applied and the finger must be moved at constant speed If available tap on the q or p screen buttons at the left and right side of the screen Note I...

Страница 18: ...lement to the next When the desired element is highlighted stop moving Press down on the pad to select the respective element Note In subsequent chapters the operating steps for selecting and activati...

Страница 19: ...urites pages To scroll from one favourites page to another Place three fingers on the pad and simultaneously move them left to scroll to the next pages or right to scroll to the previous pages Note In...

Страница 20: ...is activated Note If you are requested to confirm a function or message in the Driver Information Centre by pressing SEL Select press the 9 button Speech recognition system Find a detailed description...

Страница 21: ...ly displayed Personalising the Home screen Entering edit mode Tap and hold an application icon for a few seconds The screen changes as you enter edit mode Frame marks are displayed around all applicat...

Страница 22: ...ion into the application tray The Home screen icon changes to a small application tray icon Release the icon to drop it in the respective location If there are five icons in the application tray alrea...

Страница 23: ...ctor bar When interacting with the screen buttons in the main menu the interaction selector bar is often minimised To display the interaction selector bar select the n screen button at the bottom of t...

Страница 24: ...led by the autocomplete function As soon as one character letter or digit is entered the autocomplete function becomes active Every additional character entered is considered in the matching process r...

Страница 25: ...r PIN code have to be entered a keypad is displayed Depending on the application or function currently active the keypad menu is displayed differently For a detailed description of how to enter charac...

Страница 26: ...red in the edit field If the best guess of the system was right drawing a new character also serves as confirmation To close the character recognition menu press two fingers on the pad Character modif...

Страница 27: ...bel text of the respective favourite If a favourite location is empty the position number of the favourite location 1 to 60 is indicated Displaying favourites The favourites list is accessible from al...

Страница 28: ...st is wrapped Note At the bottom of the screen indication marks designate how many favourites pages may be accessed and which page is currently displayed The number of indication marks adapts to the v...

Страница 29: ...and then select the NAV icon Select DESTINATION in the interaction selector bar and then select the RECENT tab 3 68 To store one of the addresses in the recent destinations list as a favourite reveal...

Страница 30: ...creen button A keyboard opens up with the current favourite label text displayed in the entry field as well as in the label preview area Enter the new label text and select the Label screen button You...

Страница 31: ...tivated by increasing the number of viewable favourites Contacts Two different types of contacts lists may be accessed from the Infotainment system Contacts lists downloaded from Bluetooth devices or...

Страница 32: ...e is no first name available the last name is taken instead If there is no first or last name one of the first characters entered is used as sorting criteria The sorting order may be changed if first...

Страница 33: ...the respective contact in the contacts list The outgoing call menu is displayed 3 84 Adding new contacts To add information from the application menus to the vehicle contacts list open the respective...

Страница 34: ...screen The editing view is displayed Modifying information Select the field you wish to modify Depending on the field selected the keyboard or keypad is displayed Enter your changes 3 22 Select the Sa...

Страница 35: ...34 Basic operation Confirm the message The entry is deleted...

Страница 36: ...on the touch pad Scrolling lists 1 finger move up or down 2 fingers move up or down 1 finger move slider on scroll bar 1 finger repeatedly tap or tap and hold the n or o buttons at the top or bottom...

Страница 37: ...to Driver Information Centre 1 finger move in the direction of the Driver Information Centre Seeking for radio stations 2 fingers move left or right to seek up or down Changing waveband 2 fingers move...

Страница 38: ...er move in the direction of the Driver Information Centre Changing track 2 fingers move left or right to skip to previous or next track Changing media source 2 fingers move up or down to skip to previ...

Страница 39: ...on the map you wish it to centre around Zoom in on the map w screen button 2 fingers move apart spread Zoom out on the map screen button 2 fingers move together pinch Phone menu Sending current audio...

Страница 40: ...nhance or attenuate the deep frequencies of the audio sources Adjust the settings using the or w screen buttons Balance and fader In the illustration at the right side of the menu define the point wit...

Страница 41: ...e available options Off no enhancement of volume with increasing vehicle speed High maximum enhancement of volume with increasing vehicle speed Bose AudioPilot This feature automatically adjusts the v...

Страница 42: ...the 12 24 Hr screen button on the right side of the screen to select a time mode If 12 hour mode is selected a third column for AM and PM setting is displayed Select the desired option Set date Selec...

Страница 43: ...alet Mode menu item A keypad is displayed Enter a four digit code and select the Enter screen button The keypad is redisplayed To confirm the first input reenter the four digit code and select the Loc...

Страница 44: ...To turn the display back on touch the touch screen or press a button on the instrument panel Return to Factory Settings Press the button and then select the SETTINGS icon Scroll through the list and...

Страница 45: ...t of version numbers of all items loaded to the system is displayed System update To update your system software contact your Vauxhall Authorised Repairer TouchPad In this menu you may define the scro...

Страница 46: ...omatic station search Press the t or v buttons to play the previous or next station Manual station search Press and hold the t or v buttons Release the respective button when the desired frequency has...

Страница 47: ...spective waveband To display all frequencies available for the waveband currently active select the View screen button in the upper right corner of the screen To tune to the desired frequency scroll t...

Страница 48: ...rogramme name of the station appears instead of its frequency During a station search the Infotainment system tunes in to RDS stations only The Infotainment system always tunes into the best receivabl...

Страница 49: ...dio programmes services can be broadcasted on a single frequency ensemble Besides high quality digital audio services DAB is also able to transmit programme associated data and a multitude of other da...

Страница 50: ...if the DAB waveband is activated DAB to DAB Linking If this function is activated the device switches over to the same service programme on another DAB ensemble frequency if available when the DAB sig...

Страница 51: ...P3 and WMA files written in any format other than listed above may not play correctly and their file names and folder names may not be displayed correctly Audio CDs with copy protection which are not...

Страница 52: ...operation for MP3 and WMA files is identical When a CD with WMA files is loaded MP3 related menus are displayed Usage Starting CD playback Push an audio or MP3 CD with the labelled side facing upwards...

Страница 53: ...highlighted Scroll through the list and select the desired list item Note Find a detailed description of browsing MP3 CDs 3 55 CD Menu To display the CD Menu select the MENU screen button in the inte...

Страница 54: ...X input the audio signal of the auxiliary device is transmitted via the speakers of the Infotainment system The volume and the tone settings can be adjusted via the Infotainment system All other contr...

Страница 55: ...emove the USB storage device Caution Avoid disconnecting the device during playback This may damage the device or the Infotainment system USB audio function The Infotainment system can play music file...

Страница 56: ...Connecting a device Find a detailed description on the Bluetooth connection 3 85 Bluetooth audio function The Infotainment system can play music files contained in Bluetooth devices like iPod or Smar...

Страница 57: ...or next tracks Fast forwarding or rewinding Tap and hold the t or v buttons to rewind or fast forward Browse function Note The browse function is not available for AUX and Bluetooth media sources To...

Страница 58: ...ic Programme TP To constantly receive traffic news set Traffic Programme TP On Find a detailed description 3 47 Playing movies Starting video playback Connect the device 3 53 Repeatedly press the MEDI...

Страница 59: ...een You are led through various setup screens First a list of all phones paired to the system is displayed Select the phone with which you want to establish an Internet connection to the app store The...

Страница 60: ...ton at the bottom of the screen The app is installed When the installation process is finished the Install screen button changes to Launch Note Apps installed on the Infotainment system are displayed...

Страница 61: ...n system does not release the driver from the responsibility for a correct vigilant attitude in road traffic The relevant traffic regulations must always be followed If a navigation instruction contra...

Страница 62: ...an City street house number postal code city country France house number street postal code city country Germany street house number postal code city country or city street house number country Gibral...

Страница 63: ...contact your Vauxhall Authorised Repairer Usage Information on the map display To display the navigation map press the button and then select the NAV icon Route guidance not active The current locatio...

Страница 64: ...by an arrow symbol The distance to the next turning manoeuvre is displayed Map manipulation Scrolling To scroll the map you may optionally Place your finger anywhere on the screen and move it up down...

Страница 65: ...lect the OVERVIEW screen button The screen button changes to RESET To return to the normal view select the RESET screen button Changing the map view To toggle between the different map views 3D View H...

Страница 66: ...activated audio control screen buttons are displayed in the interaction selector bar of the map view Select the MENU screen button in the interaction selector bar and then select the Map View list it...

Страница 67: ...e the entire recent destinations list Deleting individual destinations Select Delete Individual Destinations to display the recent destinations list To delete a destination select the icon next to the...

Страница 68: ...POIs already stored in the Infotainment system you can create user defined POIs that meet your personal requirements After creation such user defined POIs can be downloaded to the Infotainment system...

Страница 69: ...nfotainment system A message is displayed that prompts you to confirm the download After confirmation the POI data will be downloaded to the Infotainment system The downloaded POIs are then selectable...

Страница 70: ...ector bar and then select the RECENT tab A list of all recently entered destinations is displayed Select one of the entries The destination details view is displayed To start route guidance select the...

Страница 71: ...select the POIS tab A list of POI main categories is displayed Setting a search location Note The search location is specified by the map section chosen If you scroll the map zoom in or out or start...

Страница 72: ...nce select the Go screen button Creating a waypoint trip A waypoint is an intermediate destination that is considered in the calculation of a route to its final destination To create a waypoint trip y...

Страница 73: ...only available if a phone number is stored for the respective location Storing destinations Contacts entry After entering a destination and before starting route guidance the destination details view...

Страница 74: ...tton in the interaction selector bar and then select the Cancel Route menu item Alternatively tap on the arrow symbol indicating your next turning manoeuvre on the right side of the screen to display...

Страница 75: ...w Nearby Traffic Incidents menu item Depending on which incidents you wish to be displayed select the Along Route or the All screen button at the bottom of the screen To display details on a traffic i...

Страница 76: ...ferently Normal route one destination Waypoint trip several destinations Changing the route After route guidance has been started tap on the arrow button to display the route guidance menu Adding a wa...

Страница 77: ...a red 9 Note The Avoided Areas section also comprises roads automatically avoided by the system due to traffic incidents To reinclude the avoided street or motorway in the route unselect the respecti...

Страница 78: ...n edited several times you may want to rearrange the waypoints in the most efficient order Select the OPTIMISE tab Wait until the waypoints list has been updated Select the Save screen button at the t...

Страница 79: ...t ways to speak commands for performing the desired actions Most of them except destination entry and voice keypad can be completed in a single command If the action takes more than one command to be...

Страница 80: ...lay language to French German or Italian For changing the display language see Language in chapter System settings 3 41 Input order for destination addresses The order in which the parts of an address...

Страница 81: ...ponds to natural speech Note When starting to use the speech recognition it may be advantageous to use the Long setting As you get more experienced it may be advantageous to use the Short setting Voic...

Страница 82: ...dy for voice input a beep is heard The speech recognition symbol on the right side of the help menu changes from black to red You can now say a voice command see description above Adjusting the volume...

Страница 83: ...e radio frequency and the waveband Navigation destinations however are too complex for a single command First state a command that explains the type of destination needed such as Directions to an Addr...

Страница 84: ...ated the help prompt is either displayed in the Driver Information Centre or on the centre display To interrupt the help prompt press the w button A beep is heard You may say a command Voice pass thru...

Страница 85: ...d network provider You will find further information on this in the operating instructions for your mobile phone or you can enquire about them with your network provider Important information for oper...

Страница 86: ...e SETTINGS icon Select Bluetooth to display the respective submenu Pairing a device Important information Up to five devices can be paired to the system Only one paired device can be connected to the...

Страница 87: ...the phone memory of the mobile phone If this function is not supported by the Bluetooth device a corresponding message is displayed on the Infotainment system Pairing via the Phone application 1 Press...

Страница 88: ...rks it may be necessary for a valid SIM card to be properly inserted in the mobile phone 9 Warning Bear in mind that you can make and receive calls with the mobile phone if it is in a service area wit...

Страница 89: ...inment system via Bluetooth Find a detailed description 3 85 Initiating a phone call Keypad Press the button and then select the PHONE icon to display the respective menu If necessary select the KEYPA...

Страница 90: ...calls are highlighted in red in the recent calls list and indicated by a 9 symbol next to the phone icon in the application tray Select one of the phone numbers stored in the recent calls list The nu...

Страница 91: ...tivating the microphone Select the Mute screen button to temporarily deactivate the microphone The screen button changes to Unmute To reactivate the microphone select the Unmute screen button Deactiva...

Страница 92: ...e B screen button to merge the two calls Both calls become active The B screen button changes to C To unmerge the calls select the C screen button Phones Select the PHONES tab to display the device li...

Страница 93: ...mobile telephone standards GSM 900 1800 1900 and UMTS is only permitted if the maximum transmission power of the mobile telephone is 2 watts for GSM 900 or 1 watt for the other types For reasons of s...

Страница 94: ...ne book and recent calls list is allowed on the phone Depending on the phone loading the phone book and recent calls list might take a few minutes Detailed description 3 88 Touch pad How can I select...

Страница 95: ...en Manage Favourites in order to rename delete or move the favourites Detailed description 3 26 Where are the favourites stored and how can I recall them The favourites are stored in the favourites li...

Страница 96: ...can I download them New apps can be downloaded to the system from the AppShop Press the button and then select the Apps icon on the Home screen to display the Apps main menu Make sure Bluetooth and Te...

Страница 97: ...utomatic volume adjustment Auto volume 40 Bose AudioPilot 40 Auto Set 41 Auto volume 40 AUX 53 B BACK button 13 Balance 39 Basic operation Application tray 19 Character recognition pane 22 Contacts 30...

Страница 98: ...53 Movie files 53 Five way controller 13 Forgotten PIN 41 Frequency list 45 Frequently asked questions 93 G General information 50 53 60 78 84 AUX 53 Bluetooth music 53 CD 50 Infotainment system 4 Na...

Страница 99: ...88 Radio 45 SD card 55 USB 55 57 OVERVIEW screen button 62 P Pairing 85 Phone Bluetooth 84 Bluetooth connection 85 Contacts 30 Emergency calls 87 Favourites 26 Handsfree mode 88 Phone book 30 88 Rece...

Страница 100: ...39 Touch operation overview 35 Touch pad 13 41 Scrolling 41 Touch screen 13 Touch screen calibration 41 TP 47 Traffic incidents 72 Traffic Programme 47 Treble 39 Turn list 72 U Usage 10 45 51 62 80 AU...

Страница 101: ...100...

Страница 102: ...Introduction 102 Basic operation 109 Radio 115 CD Player 121 External devices 124 Phone 128 Index 138 R300 Color R400 Color...

Страница 103: ...nment system is equipped with a Phone portal that allows comfortable and safe use of your mobile phone in the vehicle Optionally the Infotainment system can be operated using the control panel or the...

Страница 104: ...e into Radio reception Radio reception may be disrupted by static noise distortion or loss of reception due to changes in distance from the transmitter multi path reception due to reflection shadowing...

Страница 105: ...104 Introduction Control elements overview Control panel...

Страница 106: ...ton Press display Home screen 109 8 BACK button Menu one level back 109 Input delete last character or entire entry 109 9 v button Radio short press skip to next station press and hold seek up 115 Ext...

Страница 107: ...109 Press buttons operate menus on the Driver Information Centre see images below i button display menu for application selection return to next higher menu level j button display application specific...

Страница 108: ...ce becomes active Press and hold the X knob again to turn the system off Automatic switch off If the Infotainment system is switched on using the X button while the ignition is switched off it switche...

Страница 109: ...cting and operating external devices 3 124 Phone Press the button to display the Home screen Select the PHONE screen button to establish a Bluetooth connection between the Infotainment system and a mo...

Страница 110: ...ed item is highlighted Press To activate a selected screen button or menu item To confirm a changed settings value To switch to a different settings option To display the application specific submenu...

Страница 111: ...on Centre the i button serves as back button Press the i button to return to the next higher menu level Selecting an application To display the menu for application selection press the i button Repeat...

Страница 112: ...Balance Turn the MENU knob to adjust the setting as desired Press the MENU knob to confirm the setting Selecting a tone style Scroll through the list and press the MENU knob to activate EQ Equaliser...

Страница 113: ...elect the AUTO SET screen button at the bottom of the screen Activate either On RDS or Off Manual If Off Manual is selected adjust hours and minutes Repeatedly select the 12 24 HR screen button at the...

Страница 114: ...ll Authorised Repairer Display Press the button and then select the SETTINGS icon Scroll through the list and select the Display menu item Select the Turn Display Off menu item to turn off the display...

Страница 115: ...gs e g tone settings A warning message is displayed Select the Restore screen button The settings are reset Software Information Press the button and select the SETTINGS icon Scroll through the list a...

Страница 116: ...nds Station search Automatic station search Press the t or v buttons to play the previous or next station Manual station search Press and hold the t or v buttons Release the respective button when the...

Страница 117: ...m is only available for the FM and the DAB wavebands Press the MENU knob to display the respective waveband menu and select the Categories list item A list of programme type categories currently avail...

Страница 118: ...e Select the desired favourite screen button The respective radio station is played Note The active favourite is highlighted Using the right hand steering wheel control Repeatedly press the k or l but...

Страница 119: ...nfotainment system tunes in to RDS stations only The Infotainment system always tunes into the best receivable broadcasting frequency of the set station by means of AF alternative frequency Depending...

Страница 120: ...ncy ensemble Besides high quality digital audio services DAB is also able to transmit programme associated data and a multitude of other data services including travel and traffic information As long...

Страница 121: ...if the DAB waveband is activated DAB to DAB Linking If this function is activated the device switches over to the same service programme on another DAB ensemble frequency if available when the DAB sig...

Страница 122: ...MP3 and WMA files written in any format other than listed above may not play correctly and their file names and folder names may not be displayed correctly Audio CDs with copy protection which are not...

Страница 123: ...age Starting CD playback Push an audio or MP3 CD with the labelled side upwards into the CD slot until it is pulled in Repeatedly press the MEDIA button to activate the CD function Removing a CD Press...

Страница 124: ...ay the CD menu and then select the Browse CD Media list item The track list is displayed Note The track currently playing is highlighted Scroll through the list and select the desired list item Note F...

Страница 125: ...io signal of the auxiliary device is transmitted via the speakers of the Infotainment system The volume and the tone settings can be adjusted via the Infotainment system All other control functions ne...

Страница 126: ...sconnect the USB device or iPod select another function and then remove the USB storage device Caution Avoid disconnecting the device during playback This may damage the device or the Infotainment sys...

Страница 127: ...em Connecting a device Find a detailed description on the Bluetooth connection 3 129 Bluetooth audio function The Infotainment system can play music files contained in Bluetooth devices like iPod or S...

Страница 128: ...song playback e g album artist genre To deactivate the shuffle function select the 9 screen button again Note If the shuffle function is activated 9 is highlighted in red Browse function Note The brow...

Страница 129: ...and network provider You will find further information on this in the operating instructions for your mobile phone or you can enquire about them with your network provider Important information for o...

Страница 130: ...then select the SETTINGS icon Select Bluetooth to display the respective submenu Pairing a device Important information Up to five devices can be paired to the system Only one paired device can be co...

Страница 131: ...g via the Phone application 1 Press the button and then select the PHONE icon The phone main menu is displayed 2 Select the Manage Phones list item to display the device list 3 Select the PAIR screen...

Страница 132: ...eld of the device list Deleting a device 1 Press the button and then select the SETTINGS icon Select Bluetooth to display the respective submenu 2 Select Device Management to display the device list 3...

Страница 133: ...as a connection via Bluetooth has been set up between your mobile phone and the Infotainment system you can operate many functions of your mobile phone via the Infotainment system Note Not every mobi...

Страница 134: ...list and select the desired contact entry The contact details view is displayed Select one of the phone numbers stored under that contact The number is dialled Calls lists Press the button and then se...

Страница 135: ...ct the END screen button to end the call Deactivating the microphone Select the MUTE screen button to temporarily deactivate the microphone The screen button changes to UNMUTE To reactivate the microp...

Страница 136: ...ation instructions and the operating guidelines of the mobile phone and handsfree manufacturer must be observed when installing and operating a mobile telephone Failure to do so could invalidate the v...

Страница 137: ...pment and mobile telephones which fail to meet above mentioned mobile telephone standards is only permitted using an antenna located outside of the vehicle Caution Mobile telephones and radio equipmen...

Страница 138: ...Phone 137...

Страница 139: ...r 109 Instrument panel 109 Bass 110 Bluetooth connection 129 Bluetooth music 124 C Category list 115 CD player 121 Clock display 112 Control elements Infotainment system 104 Steering wheel 104 Control...

Страница 140: ...information 128 Handsfree mode 132 Phone book 132 Recent calls 132 Ringtone 132 Phone book 132 Phone call Initiating 132 Rejecting 132 Taking 132 Playing audio 126 R Radio Category list 115 DAB 119 DA...

Страница 141: ...s 110 TP 118 Traffic Programme 118 Treble 110 U Usage 107 115 122 AUX 126 Bluetooth music 126 CD 122 Infotainment system 107 Menu 109 Phone 132 SD card 126 USB 126 USB 124 V Valet mode Locking 112 Unl...

Отзывы: