background image

Navigation

83

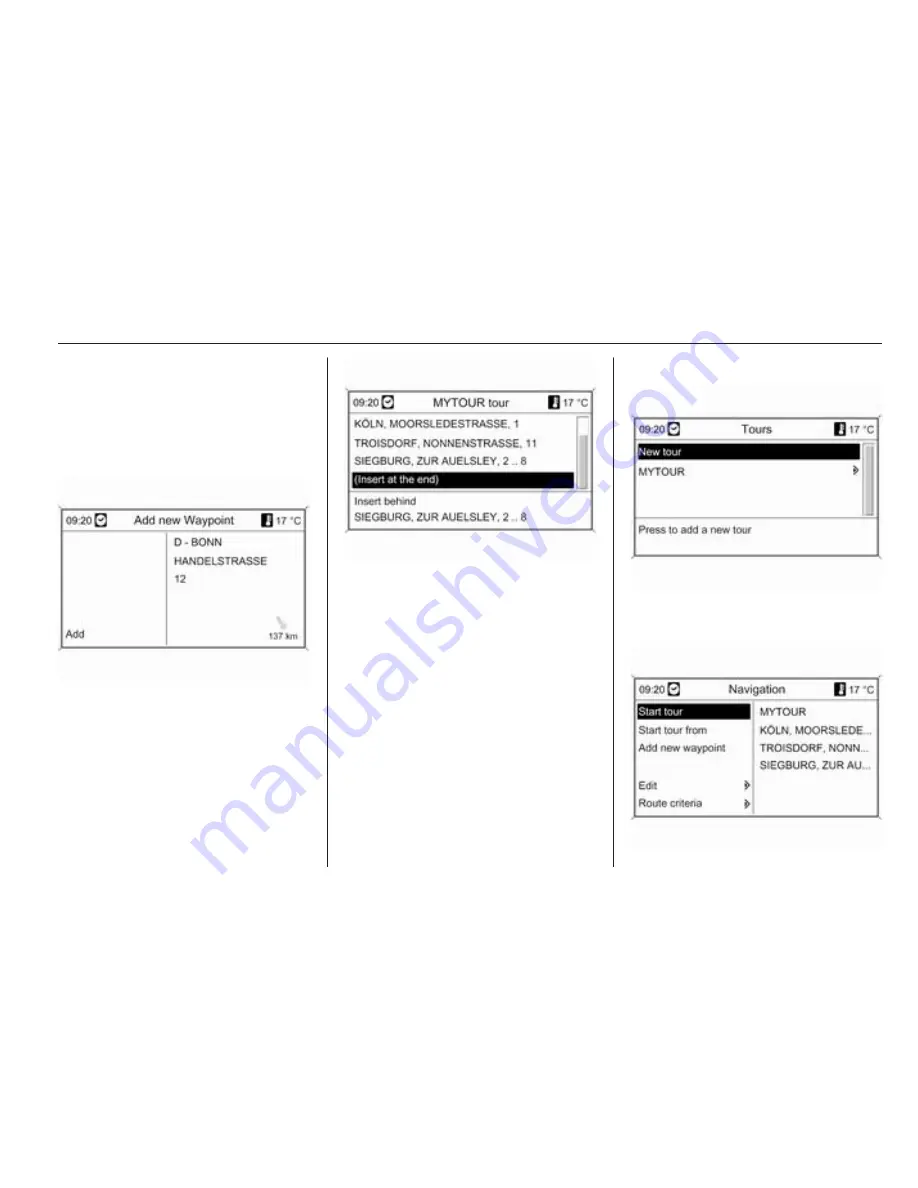
Select an option for destination input

and then select/enter the desired

intermediate destination 

3

 67.

A menu is displayed that shows the

address data of the selected/entered

intermediate destination.

After selecting Add a list with all

previously added intermediate

destinations is displayed.

By default new waypoints are added

at the end of the list. If another

position is desired turn the

multifunction knob to select another

insertion point.
Repeat the described procedure to

add further intermediate destinations.

Starting a tour

Select a tour in the Tours menu. The

Navigation menu is displayed.

Содержание Astra GTC

Страница 1: ...0 1 VAUXHALL Astra GTC VAUXHALL Astra GTC Infotainment Manual Model Year 2012 Edition October 2011 TS 1709 B 12...

Страница 2: ...Introduction 2 Radio 24 CD Player 40 AUX input 46 USB port 48 Digital picture frame 52 Navigation 55 Speech recognition 100 Phone 115 Index 136 Contents...

Страница 3: ...es The digital sound processor provides you with several preset equalizer modes for sound optimisation The navigation system only Navi 600 Navi 900 with dynamic route planning will reliably guide you...

Страница 4: ...ones that you are not allowed to turn into are not marked on the map In such areas the Infotainment system may issue a warning that must be accepted Here you must pay particular attention to one way s...

Страница 5: ...4 Introduction Control elements overview Instrument panel Navi 600 Navi 900...

Страница 6: ...utomatically 25 8 FAV 1 2 3 26 Lists of favourites preset radio stations 26 9 TP 33 Activate or deactivate radio traffic service 33 10 CD ejection 42 11 CONFIG 21 System settings 21 12 TONE 18 Tone se...

Страница 7: ...6 Introduction 18 RPT 93 Repeat last navigation message 93 19 DEST 56 Navigation destination entry 56 20 PHONE 115 Open telephone menu 128 Activate deactivate mute 11 21 NAVI 56 Display map 56...

Страница 8: ...Introduction 7 Instrument panel CD 400...

Страница 9: ...stations automatically 25 8 FAV 1 2 3 26 Lists of favourites preset radio stations 26 9 TP 33 Activate or deactivate radio traffic service 33 If Infotainment system switched off display time and date...

Страница 10: ...Introduction 9 Instrument panel CD 300...

Страница 11: ...FAV 1 2 3 26 Lists of favourites preset radio stations 26 9 TP 33 Activate or deactivate radio traffic service 33 If Infotainment system switched off display time and date 33 10 CD ejection 42 11 CON...

Страница 12: ...ch between calls 128 3 Increase volume 11 4 Reduce volume 11 5 Short press end decline call 128 or close call list 128 or activate deactivate mute 11 or deactivate speech recognition if available 100...

Страница 13: ...t high temperatures only CD 300 CD 400 At very high temperatures inside the vehicle the Infotainment system limits the maximum adjustable volume If necessary the volume is decreased automatically Mode...

Страница 14: ...value to switch a system function on off BACK button Press the BACK button briefly to exit a menu return from a submenu to the next higher menu level delete the last character in a character sequence...

Страница 15: ...ched on or off Press the multifunction knob to switch between the settings On and Off Entering a character sequence To enter character sequences e g telephone numbers or road names Turn the multifunct...

Страница 16: ...rrow on the right hand edge of the menu indicates that after selection of the option a submenu with further options will be opened Activating a setting Turn the multifunction knob to mark the desired...

Страница 17: ...r Press the multifunction knob to confirm the selected character Using the BACK button the last character in the character sequence can be deleted CD 300 Menu elements and symbols The up and down arro...

Страница 18: ...tion knob to display the desired setting Press the multifunction knob to activate the setting Setting a value Press the multifunction knob to open the corresponding settings menu Turn the multifunctio...

Страница 19: ...o confirm the character displayed Using the BACK button the last character in the character sequence can be deleted Tone settings Navi 600 Navi 900 In the tone settings menu the tone characteristic ca...

Страница 20: ...and hold the multifunction knob for a few seconds Setting all settings to 0 or Off Press and hold the TONE button for a few seconds Optimising the tone for the style of music Select EQ Equalizer The d...

Страница 21: ...ing the volume distribution between front rear Select Fader Set the desired value Setting the volume distribution between right left Select Balance Set the desired value Setting an individual setting...

Страница 22: ...i 900 Maximum startup volume Press the CONFIG button to open the system settings menu Select Radio settings and then Maximum startup volume Set the desired value Speed dependent volume Press the CONFI...

Страница 23: ...lume Press the CONFIG button to open the system settings menu Select Radio settings and then Maximum startup volume CD 300 select Audio settings and then Start up Volume Set the desired value Speed co...

Страница 24: ...ly saved for the key being used last volume settings one volume level for all non phone audio sources radio CD player AUX USB and one for phone audio if phone portal available all radio station preset...

Страница 25: ...e RADIO button once or several times to select the desired waveband The station last played in that waveband will be received Station search Automatic station search Briefly press the button s or u to...

Страница 26: ...ion knob and set the optimal reception frequency on the popup frequency display AM waveband Turn the multifunction knob and set the optimal reception frequency on the popup frequency display DAB waveb...

Страница 27: ...S button to open an autostore list or to switch to another autostore list Briefly press one of the station buttons 1 6 to open the station at the corresponding list position Favourite lists Stations o...

Страница 28: ...he currently received station is marked by i Storing a station Set the station to be stored Briefly press the FAV button to open a favourite list or to switch to another favourite list To store the st...

Страница 29: ...open the relevant waveband menu Note The following FM specific displays are shown as examples Navi 600 Navi 900 Favourites list Select Favourites list All stations saved in the favourites lists are di...

Страница 30: ...on lists The dual tuner in the Infotainment system continuously updates the station lists in the background This ensures that e g the station lists always contain the stations that can be received in...

Страница 31: ...station is marked by i DAB announcements Besides their music programmes numerous DAB stations 3 37 broadcast various announcement categories The currently received DAB service programme is interrupte...

Страница 32: ...r FM stations list All receivable AM FM stations in the current reception area are displayed DAB waveband not available for CD 300 Turn the multifunction knob All receivable DAB stations 3 37 in the c...

Страница 33: ...d e g news Some stations also change the PTY code depending on the content currently being transmitted The Infotainment system stores these stations sorted by programme type in the corresponding categ...

Страница 34: ...es the finding of the desired station and its fault free reception Advantages of RDS On the display the programme name of the set station appears instead of its frequency On station search the Infotai...

Страница 35: ...t is currently receivable and about the music track being played at the moment are displayed below the programme name To show or hide the information Set Radio text to On or Off TA volume The volume o...

Страница 36: ...tworks With EON you can listen to radio traffic announcements even if the station you have set does not broadcast its own radio traffic service If such a station is set it is displayed in black as for...

Страница 37: ...ations are RDS stations that broadcast traffic news Switching the radio traffic service on and off To switch the traffic announcement standby facility of the Infotainment system on and off Press the T...

Страница 38: ...l radio programmes services can be broadcast on a single frequency ensemble Besides high quality digital audio services DAB is also able to transmit programme associated data and a multitude of other...

Страница 39: ...ngs and then DAB settings The following options are available in the configuration menu Auto ensemble linking with this function activated the device switches over to the same service programme on ano...

Страница 40: ...e switches over to a corresponding FM station of the active DAB service if available when the DAB signal is too weak to be picked up by the receiver Dynamic audio adaption with this function activated...

Страница 41: ...not play correctly or not at all Self recorded CD Rs and CD RWs are more vulnerable to mishandling than prerecorded CDs Correct handling especially in the case of self recorded CD Rs and CD RWs must b...

Страница 42: ...lacement of the device will then be necessary The following CD formats can be used CD ROM Mode 1 and Mode 2 CD ROM XA Mode 2 Form 1 and Form 2 The following file formats can be used ISO9660 Level 1 Le...

Страница 43: ...is pulled in CD replay starts automatically and the Audio CD or Audio MP3 menu is displayed If there is already a CD in the unit but the Audio CD or Audio MP3 menu is not active Press CD AUX button T...

Страница 44: ...ks in random order set Shuffle songs RDM to On To select a track from a folder or playlist if available select Folders or Playlists Select a folder or playlist and then select the desired track Select...

Страница 45: ...unction knob and then select Default CD page view or Default MP3 page view Select the desired option Changing the folder level only CD 300 MP3 replay Press the button g or e to change to a higher or l...

Страница 46: ...th audio and MP3 data the audio data can be selected from Playlists Folders To open a menu with additional options for track search and selection select Search What options are available depends on th...

Страница 47: ...sole there is an AUX socket for the connection of external audio sources It is possible for example to connect a portable CD player with a 3 5 mm jack plug to the AUX input Note The socket must always...

Страница 48: ...AUX input 47 CD 300 CD 400 An audio source that is connected to the AUX input can be operated only via the control elements of the audio source...

Страница 49: ...Important information MP3 player and USB drives The MP3 players and USB drives connected must comply with the USB Mass Storage Class specification USB MSC Only MP3 players and USB drives with a cluste...

Страница 50: ...rt are operated via the controls and menus of the Infotainment system Note The socket must always be kept clean and dry Important information The following devices can be connected to the USB port iPo...

Страница 51: ...nd playing of tracks Press the multifunction knob and then select Search to display the options available The search process on the device may take several seconds CD 300 CD 400 Press the AUX button o...

Страница 52: ...Play all To display a menu with various additional options for track search and selection select Search The search process on the USB device may take several minutes During this time the station last...

Страница 53: ...tures you want to download need to be stored in the root directory e g F of the USB drive Only the first 100 pictures sequentially sorted as stored in the root directory of the USB drive will be offer...

Страница 54: ...at old pictures are listed first on the menu and indicated by MEM see image below If you want to have removed old pictures you need to deselect them before downloading new pictures Select max 10 pictu...

Страница 55: ...Select the picture you want to be shown on the display Press the INFO button several times until the currently selected picture is shown on the display To display a default Infotainment menu again pr...

Страница 56: ...notice and hazards or problems that arise suddenly e g road works Caution The usage of the navigation system does not release the driver from the responsibility for a correct vigilant attitude in road...

Страница 57: ...r as detailed text on the TMC messages menu To be able to use TMC traffic information the system has to receive TMC stations in the relevant region Dynamic route guidance only works if traffic informa...

Страница 58: ...lay Route guidance not active If route guidance is not active the following information is displayed In the top line time street name of current position exterior temperature Address and geographic co...

Страница 59: ...w symbol the name of the current street to follow Above the arrow symbol the name of the street to follow after the next intersection While driving on highways Driving direction and distance to the ne...

Страница 60: ...knob On the map the following information is shown The route as a blue line The current position as a red triangle The final destination as a chequered flag Various symbols see section Symbols overvie...

Страница 61: ...idance is inactive Decide whether the Infotainment system should announce warning messages even if no route guidance is active Delete lists Select whether all entries in the Address book or in the Las...

Страница 62: ...sage on the display and a beep when the vehicle approaches a point of interest stored in the myPOIs memory see myPOIs announcer below Exporting and importing POI data Introductory explanations Types o...

Страница 63: ...trip in separate submenus See Organizing the POI data in several subfolders below Exporting and importing individual POIs and address book entries Brief description 1 Connect a USB drive to the USB po...

Страница 64: ...ct Import individual POIs and then select Continue All POI data stored on the USB drive is imported to the myPOIs memory of the Infotainment system After the import is finished the imported POIs are s...

Страница 65: ...mple POI data The POI data need to be entered into the text files in the following format Longitude coordinate Latitude coordinate Name of POI Any additional information Phone number optional Example...

Страница 66: ...o the Infotainment system Connect the USB drive with your individual POI data to the USB port of the Infotainment system see chapter USB port 3 48 To start the import press the CONFIG button select Na...

Страница 67: ...p the myPOIs announcer Press the CONFIG button select Navigation settings and then select myPOIs announcement A menu is displayed that shows the POI categories currently stored in the myPOIs memory Yo...

Страница 68: ...m the current position to the home address and then starts route guidance Enter address direct entry of a destination address with country city street and house number See Entering an address directly...

Страница 69: ...is displayed To start a search for petrol stations close to the vehicle s current position select Petrol stations After the search is finished a list of all found petrol stations is displayed Below t...

Страница 70: ...country Entering an address using the speller function Mark the City input field and then press the multifunction knob to activate the speller function Using the multifunction knob successively mark...

Страница 71: ...ation to start route guidance to the displayed address Description on route guidance see section Guidance 3 85 Storing the address Select Store if you want to store the displayed address in the addres...

Страница 72: ...s in the address book or myPOIs memory below Selecting an address stored in the myPOIs memory Press the DEST button and then select myPOIs to open the menu shown below Note The option Imported POIs is...

Страница 73: ...of interest Select the desired point of interest The Navigation menu is displayed Select Start navigation to start route guidance to the displayed address Description on route guidance see section Gu...

Страница 74: ...etrol station the address the distance and the available fuel types in addition to petrol and Diesel Abbreviations used for fuel types CNG Compressed natural gas LPG Liquefied petroleum gas Setting fi...

Страница 75: ...est e g petrol stations or service areas along the route Only available when you are currently driving on a motorway Selecting a point of interest see example above for Vicinity current position Aroun...

Страница 76: ...3 85 Storing the address Select Store if you want to store the displayed address in the address book or myPOIs memory The Store menu is displayed see Storing an address in the address book or myPOIs m...

Страница 77: ...witch on the multifunction knob 3 4 position the crosswire on a destination on the map Press the multifunction knob to confirm the selection The Navigation menu is displayed Starting route guidance Se...

Страница 78: ...displayed address Description on route guidance see section Guidance 3 85 Storing the address Select Store if you want to store the displayed address in the address book or myPOIs memory The Store men...

Страница 79: ...all available address categories Note If you select another category than Private or Business the destination address will be stored in the myPOIs memory not in the address book Select Business The me...

Страница 80: ...n menu is displayed again If you want to edit also the name or change the category you need to select the regarding address in the address book again see above Name Number after selecting this option...

Страница 81: ...individual imported points of interest from the myPOIs memory If you want to remove individual imported POIs Import updated POI data to the Infotainment system that do not contain the address data of...

Страница 82: ...l point of interest Then you can set the address data of the regarding address book entry or myPOIs entry selectable via Individual POIs as home address Travel guide only Navi 900 Note If data from th...

Страница 83: ...our After selecting New tour enter a name for the tour using the speller function 3 67 Accept the entered name using OK The name is displayed on the Tours menu Adding intermediate destinations to the...

Страница 84: ...tination After selecting Add a list with all previously added intermediate destinations is displayed By default new waypoints are added at the end of the list If another position is desired turn the m...

Страница 85: ...destinations on the selected tour Move waypoints Displays a list with all intermediate destinations on the selected tour Mark the intermediate destination to be moved Press the multifunction knob to c...

Страница 86: ...e displayed address on the map Call if the address data includes a telephone number and a phone portal is available the telephone number will be dialled Store store the displayed address in the addres...

Страница 87: ...e to determine the type of the upcoming trip For each trip the following data will automatically be recorded A unique serial number for the trip for unambiguous labelling of trips Start and destinatio...

Страница 88: ...ive text max 80 characters that will be added to the logbook data of a trip see Sample logbook data below The description will be added to the logbook data of each upcoming trip as long as the descrip...

Страница 89: ...s criteria Select one of the following criteria Fastest Shortest Economical an energy optimized route is calculated taking into account the vehicle specific parameters that are currently set in the Ve...

Страница 90: ...ply settings to activate the displayed settings and to leave the menu If desired select one or several of the following options in the Route criteria menu Avoid freeways Avoid toll roads Avoid tunnels...

Страница 91: ...u Select between map orientation north up and head up on the map display Select Map options and then Show POIs on map to open a submenu with various options to define whether and which points of inter...

Страница 92: ...uidance is deactivated and the menu options for route guidance inactive are displayed see Functions with route guidance inactive above TMC messages Information on TMC see section Dynamic guidance 3 55...

Страница 93: ...on Description see Functions with route guidance inactive above Destination information Description see Functions with route guidance inactive above Overview current route The following information on...

Страница 94: ...ains active until a new route calculation is performed Remove all route blockages After selecting this option all areas route sections previously selected as to be excluded from the route guidance wil...

Страница 95: ...that calculated Maps All map data required for use of the navigation system is stored on an SD card provided with the Infotainment system Map SD card The SD card reader of the Infotainment system can...

Страница 96: ...SD card in its storage case when not in use Replacing a map SD card The SD card slot is located in the centre console Removing the SD card Press on the inserted SD card to unlock it and then carefull...

Страница 97: ...96 Navigation Symbols overview...

Страница 98: ...No Explanation 12 Caution warning 13 Closed road 14 Dense traffic 15 Traffic jam 16 Narrow lanes 17 Open list 18 Closed list 19 Shopping centre 20 Toll road 21 Tourist information No Explanation 22 Si...

Страница 99: ...98 Navigation...

Страница 100: ...er 42 Tunnel 43 Kiosk 44 Grocery 45 Hotel motel 46 Motorway exit 47 Car park 48 Park ride 49 Multi storey car park No Explanation 50 Petrol station 51 Service area 52 Restaurant 53 WC 54 Historical mo...

Страница 101: ...ction In the event of incorrect operation or commands the speech recognition gives you visual and or acoustic feedback and requests you to re enter the desired command Apart from this the speech recog...

Страница 102: ...f the navigation system only Navi 900 inclusive audio system features only works if a map SD card with speech recognition data is inserted 3 94 Navigation related voice commands are not available unti...

Страница 103: ...iencing difficulty with the system recognizing a command confirm that the command is correct Try saying the command clearly or wait for a brief moment after the beep Background noise such as a climate...

Страница 104: ...ptional Example when using the command Frequency 87 5 108 0 MHz you can leave out MHz You can simply try out if there are shortened variants available for certain commands For each command shown on th...

Страница 105: ...e g a preset radio station or a city name from a list Example Autostore lists To select an item from such a list you only need to say the number in front of the desired list item e g 5 In most cases t...

Страница 106: ...examples below Examples on radio control Situation the radio mode is currently active Changing to another waveband Action the user wants to change from the AM to the FM waveband User activates speech...

Страница 107: ...Play BBC 2 System plays the regarding station Examples on CD player control Situation an audio or MP3 CD is already inserted the CD player mode is currently active Selecting an album on an MP3 CD User...

Страница 108: ...oints of interest System shows a list with search options User Nearby System shows a list with points of interest categories User 2 System shows the navigation menu for petrol station search User manu...

Страница 109: ...er says the number of the line that contains the desired street name e g 4 System displays the selected street name on the menu for address input User Number System Which street number do you want to...

Страница 110: ...he Edit menu item System displays the Edit menu User manually selects the Add name menu item System Please say the destination name User can say an arbitrary name The regarding destination address can...

Страница 111: ...gue Press the button x on the steering wheel Say Cancel Do not enter say any commands for some time After the third unrecognised command Operation With the aid of the speech recognition the mobile pho...

Страница 112: ...tar An asterisk is entered Hash A hash is entered Help Cancel The maximum length of the telephone number entered is 25 digits To be able to make a call abroad you can say the word Plus at the beginnin...

Страница 113: ...peated once The pitch and pronunciation must be as identical as possible for both name inputs otherwise the speech recognition will reject the inputs A maximum of 50 voice tags can be stored in the te...

Страница 114: ...ds available Add Delete Help Cancel Example of a dialogue User Pair Voice output Do you want to add or delete a device User Add Voice output Using the pair function in the external device enter 1234 t...

Страница 115: ...oice feedback Each voice input is answered or commented on by the Infotainment system by way of a voice output that is adapted to the situation To switch the voice output on or off enter Voice feedbac...

Страница 116: ...optionally via the speech recognition system The mobile phone can be operated using an external vehicle antenna by inserting it into an adapter that is specific to the phone Not all Phone portal func...

Страница 117: ...at http www bluetooth com Additionally the Phone portal supports SIM Access Profile SAP EU R TTE Compliance Hereby we declare that the Bluetooth System Transceiver is in compliance with the essential...

Страница 118: ...phone please refer to the operating instructions for the mobile phone Telephone specific adapters If you are using a telephone specific adapter the mobile phone is operated via the external antenna T...

Страница 119: ...f the phone first Mobile phones with connection interface on the lateral edge Installing the adapter Fasten the adapter to the base plate Make sure that the contacts are correctly connected First lowe...

Страница 120: ...unlocking button on the adapter and lift the mobile phone Bluetooth connection Bluetooth is a radio standard for the wireless connection of for example a telephone with other devices Information such...

Страница 121: ...de When the mobile phone is added as a handsfree device the user can make or receive calls and use other functions via the Phone portal The range of functions available depends on the mobile phone Whi...

Страница 122: ...erated via the Phone portal Changing the Bluetooth code only relevant for handsfree mode The first time a Bluetooth connection to the Phone portal is set up a default code is displayed This default co...

Страница 123: ...will have to enter the PIN code of the SIM card in the mobile phone Enter the PIN code of the mobile phone SIM The mobile phone is paired with the Phone portal Services of the mobile network provider...

Страница 124: ...Select Change PIN Enter the current PIN code Enter the new PIN code Repeat the new PIN code and confirm The PIN has been changed Configuring network services Select Phone settings and then Network ser...

Страница 125: ...ode When the mobile phone is added as a handsfree device the user can make or receive calls and use other functions via the Phone portal The range of functions available depends on the mobile phone Wh...

Страница 126: ...ated via the Phone portal Changing the Bluetooth code only relevant for handsfree mode The first time a Bluetooth connection to the Phone portal is set up a default code is displayed This default code...

Страница 127: ...will have to enter the PIN code of the SIM card in the mobile phone Enter the PIN code of the mobile phone SIM The mobile phone is paired with the Phone portal Services of the mobile network provider...

Страница 128: ...Change PIN Enter the current PIN code Enter the new PIN code Repeat the new PIN code and confirm The PIN has been changed Configuring network services Select Phone settings and then Network services T...

Страница 129: ...You can enquire about this with the local network operators The emergency call number can differ depending on the region and country Please enquire beforehand about the correct emergency call number...

Страница 130: ...instructions for the telephone specific adapter Navi 600 Navi 900 Setting the volume for hands free facility Turn the m knob of the Infotainment system or press the buttons on the steering wheel Diall...

Страница 131: ...ntries that you want to have displayed Note Telephone book entries are carried over as they are transferred from the mobile phone The presentation and order of the telephone book entries may be differ...

Страница 132: ...ly making a telephone call press the multifunction knob to open a submenu Various options are available depending on the situation and range of functions of the mobile phone Hang up disconnect the tel...

Страница 133: ...ing process You can switch to the telephone book menu by selecting PB Telephone book After setting up the connection the telephone book is compared with the telephone book in the temporary memory prov...

Страница 134: ...ialling process Call lists Via the menu Call lists the user can view incoming outgoing and missed calls and dial the relevant numbers To start a dialling process select the desired call list an entry...

Страница 135: ...s The vehicle specific installation instructions and the operating guidelines of the mobile phone and handsfree manufacturer must be observed when installing and operating a mobile telephone Failure t...

Страница 136: ...ed mobile telephone standards is only permitted using an antenna located outside of the vehicle Caution Mobile telephones and radio equipment may lead to malfunctions in the vehicle electronics when o...

Страница 137: ...Configuring DAB 37 Configuring RDS 33 Connection 117 Control elements overview 4 D DAB 37 Destination input 67 Digital audio broadcasting 37 Dynamic guidance 93 E Emergency call 128 Enhanced Other Ne...

Страница 138: ...oute list 85 start navigation 85 symbols overview 96 TMC messages 85 usage 56 using the speller function 67 Navigation control 101 Navigation display 56 Navigation volume 56 O Operation 128 P Personal...

Страница 139: ...Speller function 67 Starting CD replay 42 Station search 24 Storing stations 25 26 Switching the Infotainment system on or off 11 Switching the radio on 24 Symbols overview 96 T Telephone specific ad...

Отзывы: