background image

1101

Illustrations may differ from actual product 

Subject to printing/proofreading errors

1 2

Startup

Before  starting the burner for the first time, check that: 

• it has been installed according to the instructions. 
• the feed auger's inclination is 40 ±5°. 
• there is a draught damper and it is adjusted to -5 Pa. 
• all control units are correctly set. 
• the burner has sufficient combustion air. 
• there are pellets up to the burner. 
• the grate is in the correct position and the lip is in place.

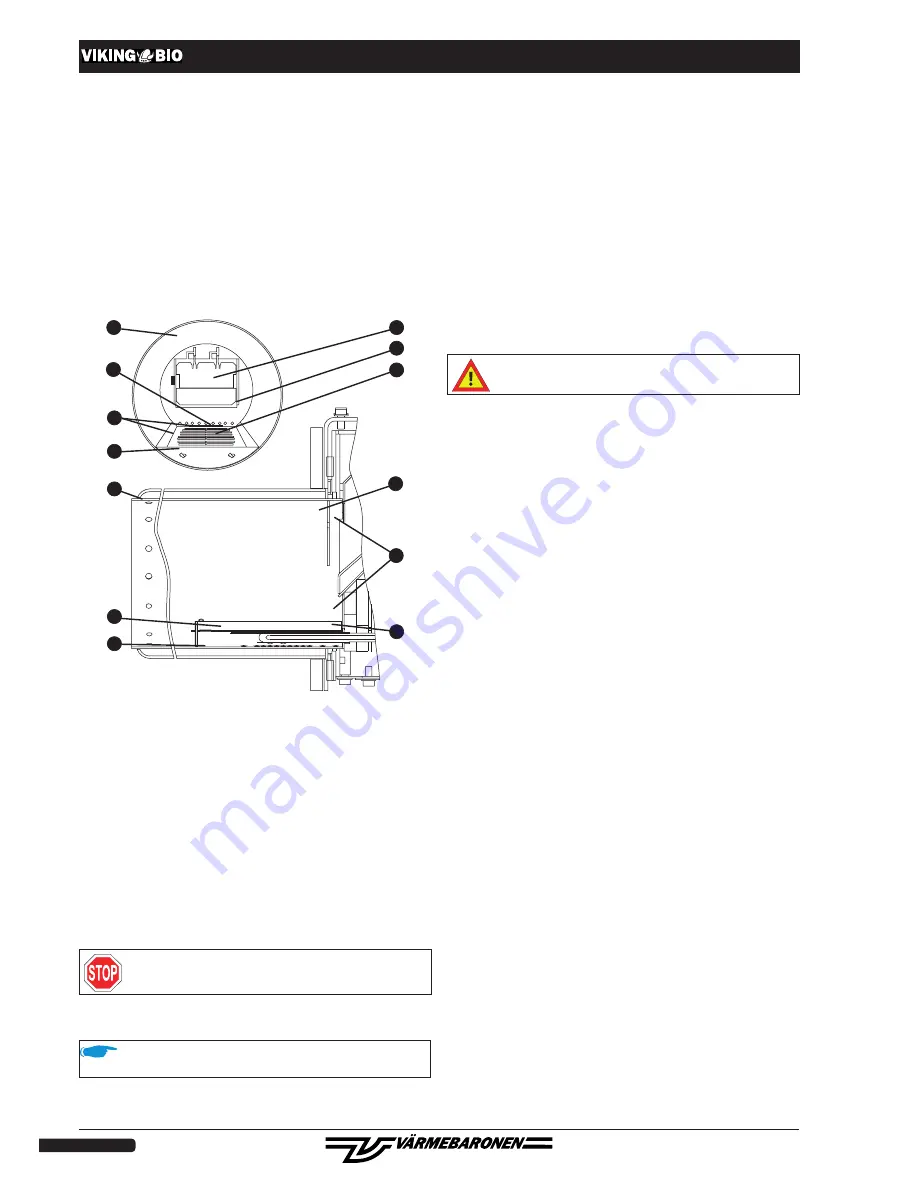
Position of grate

The grate must be positioned as shown in the figures below. If the grate is 
in the wrong position, the ignition time is extended or ignition may fail. The 
ignition element may also be damaged.


a

b

c

d

c

d

e

e

f

f

g

g

h

a.  Cross-section, inner burner 

pipe at front edge of grate.

b.  Cross-section, burner 

pipes in their longitudinal 
direction.

c. End wall.
d. Grate.

e.  Lip. Prevents pellets from bouncing out 

into the combustion chamber/reduces 
heat radiation.

f.  The grate must be in contact with the 

end wall. There must be a small gap at 
its rear edge.

g.  The grate must be in contact with the 

burner pipe.

h. Gap.

Feed auger

The feed auger must be filled before the burner is started. This is done by 
connecting the feed auger to an earthed wall outlet. Place a collection re-
ceptacle below the hose and operate the feed auger so that 25-30 litres of 
pellets pass through.

Risk of crushing! 

Do not insert hands or objects in the feed auger.

Draught requirements

  The chimney must be fitted with a draught damper that is ap-

propriate for the chimney.

For good operating economy and reliable ignition, the chimney draught 
should be 

5 Pa. Under certain circumstances, the draught may be difficult 

to adjust. The chimney draught affects the time it takes for the burner to 
establish a flame. Switch SW2/2 is used to set the draught.

Flue gas temperature

Condensation damage can be avoided if the flue gas temperature is mini-
mum 70 °C one metre below the top of the chimney. A low flue gas tem-
perature results in higher efficiency but this must be weighed up against 
the risk of condensation. The temperature is measured when the boiler is 
at its normal operating temperature no earlier than five minutes after the 
burner was started and with the draught damper closed. 
Measures to increase the flue gas temperature: 

• remove any turbulators or baffle plates in the boiler.


• insulate the boiler's flue pipe and the chimney in cold rooms.


• increase the capacity of the burner


• install flue lining tubes

To avoid damage to the chimney, the flue gas temperature 

must be checked.

Turbulators

Certain boiler types have or can be fitted with flue gas turbulators. Their 
task is to make the flue gases turbulate to extract more heat and thus in-
crease efficiency. 
At low burner power, the flue gas temperature is low and there is a risk of 
condensation forming in the chimney. Try to shorten the turbulators until a 
suitable flue gas temperature is obtained.

Smoke in boiler room

If the system's hatches and dampers are not airtight, there is a risk of 
smoke entering the boiler room, in particular if excess pressure is formed 
in the combustion chamber. A smoke detector is a good way of discovering 
whether flue gases are leaking out into the boiler room. 
The boiler hatches must be closed when the burner is in operation.

Combustion values

Correct adjustment is important for good heating economy, high efficiency, 
low emissions of environmentally hazardous substances and the service 
life of the parts of the burner in contact with the flame. Optimum adjust-
ment is possible only using flue gas analysis instruments. The boiler room 
door must be closed during measurement. 
The values indicate how combustion should be. Please note that the values 
vary somewhat during the firing phase:

Flue gas temperature:

  160 °C (depending on chimney type)

Efficiency:

 >90%

CO content:


<300 ppm

CO2 content, average:

  12.5% ( ±2.5%)

Boiler temperature:


60-80 °C

Soot number:

 1-3.

Содержание Viking Bio 20

Страница 1: ...Installation operation and maintenance 18 01 2011 Ver konv012 Replaces Pellet burner...

Страница 2: ...uirements Flue gas temperature Turbulators Smoke in boiler room Combustion values Adjustment 13 Adjustment Choice of operating mode Boiler temperature control via the burner Start delay Pellet firing...

Страница 3: ...d in boiler make type Installer Tel Other Combustion values 1 2 3 4 Date Date Date Date Draught Pa Draught Pa Draught Pa Draught Pa Soot no Soot no Soot no Soot no O2 O2 O2 O2 CO ppm CO ppm CO ppm CO...

Страница 4: ...ings are important for good heating economy and the service life of the parts in contact with flames Optimum adjustment is possible only using flue gas analysis instruments The burner s parts in conta...

Страница 5: ...burner By flashing in different ways they provide information about operating phases and alarms Pel lets are fed to the burner automatically from the fuel store via a feed auger controlled by the burn...

Страница 6: ...ase of the combustion chamber should be high enough for there to be space for the quantity of ash formed during a weeks firing in winter The highest quantity of ash is to be found at the rear of the c...

Страница 7: ...hten the locking screw well so that the motor does not slip on the feed auger shaft The feed auger must be well anchored as it will work its way into the store Anchor the feed auger with a chain on th...

Страница 8: ...h can be opened The jumper T1 T2 in the power cable s contact part must be removed when a hatch switch is connected Boiler temperature control via the burner The boiler temperature sensor accessory is...

Страница 9: ...n boiler temperature Pellmax VX Boiler thermostat controls boiler temperature Boiler temperature control via the burner N N CP N N N S3 L B4 N F 2 1 VX L1 L2 L3 N 230V BLUE BLACK BROWN GREY YELLOW GRE...

Страница 10: ...CABLE SIDE TEMP START DOSE 1 2 3 4 5 6 7 8 9 10 11 12 13 14 1 Connector for supply thermostat etc See electrical installation 230V in all conductors L1 supply to burner via overheating protection B4 c...

Страница 11: ...shes high ambient temperature One long four short flashes fan not working One long four short flashes synchronously with FLAME low fan RPM in operating phase Flashing low element current 22 TEMP tempe...

Страница 12: ...voided if the flue gas temperature is mini mum 70 C one metre below the top of the chimney A low flue gas tem perature results in higher efficiency but this must be weighed up against the risk of cond...

Страница 13: ...t for good heating economy high efficiency low emissions of environmentally hazardous substances and the service life of the parts of the burner in contact with the flame On account of irregular suppl...

Страница 14: ...sh short flame depending on whether there is too much air or too little fuel low efficiency high flue gas temperature Flue gas temperature A high flue gas temperature may be because the boiler has not...

Страница 15: ...to produce hot water pellet firing is usually unsuitable During this period the burner operates for short periods of time which means high stoppage losses and lower efficiency When heating requirement...

Страница 16: ...reate a flame as described above it will stop and produce the Failed start alarm The most probable causes of this are excessive draught the grate is in the incorrect position or the burner is not rece...

Страница 17: ...the grate must not be pressed together The opening must be approximately 1 mm Each time cleaning takes place check the condition of the parts in contact with the flame the grate the inner burner pipe...

Страница 18: ...ews c on the flange against the burner housing Pull out all parts from the burner housing as shown in the above figure C Separate as shown in the figure Notice how gaskets f and g are fitted The inner...

Страница 19: ...have power Is the operation indicator lit up Are all control units thermostats etc set correctly Are all safety devices overheating protection hatch switches etc in normal operating mode Is the burner...

Страница 20: ...emperature possibly because the com bustion chamber hatch is poorly insulated Check the ambient temperature Should be max 30 C Take action Faulty temperature sensor on circuit board Change circuit boa...

Страница 21: ...ouble pole 1 700204 Silicone gasket 1 440060 Chain 1500 mm 1 13 440158 Electrical intake triple pole 1 37 710050 Lip 1 440061 Snap hook 1 1 440163 Electrical intake septuple pole 1 38 710065 End wall...

Страница 22: ...x Combimax CU and older Combimax UB 3322 Installation bag pellets measuring instruments etc 3315 Spacer extends Viking Bio 105 mm from hatch 3323 621 05 60 Draught damper 150 x 130 mm for flue pipe 90...

Страница 23: ...1101 23 Illustrationsmaydifferfromactualproduct Subjecttoprinting proofreadingerrors...

Страница 24: ...6 849 098 www varmebaronen org info varmebaronen org V rmebaronen AB reserves the right to change the specification of components in accordance with its policy of continuous improvement and developmen...

Отзывы: