3
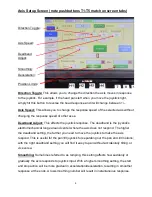
Head Selection:
Axis Setup:
Axis Enable:
Axis State:
Master Speed:
Head Selection
pushbuttons:
Head Selection:
The light bubble above each touchscreen button 1-4 will be green if a
head is synced, red if not synced. You can also use the mechanical pushbuttons H1-H4
to change heads. Touch the onscreen buttons 1-4 to switch heads.
Axis Setup:
Quickly access the setup screen for each individual axis to change speed,
smoothing and other parameters for only the selected axis. Touch the onscreen button.
Axis Enable:
Green checkbox means the axis is enabled, while red checkbox means
the axis is disabled. On startup, the connected devices will be enabled by default
(green checkbox). Touch the onscreen button to enable/disable.
Axis State:
The default state is “Ready,” and this is the desired state for live control of
the heads. The other available states are “Record” and “Playback” –
you will not be
able to control the axis if it’s in “Playback” mode.
For now, leave all axes in the
“Ready” state. Touch the onscreen button to change mode.
Master Speed:
This is the global speed setting for all axes. You can change the
individ
ual axis speeds under “Axis Setup,” but the Master Speed control will scale the
speeds of all axes up or down proportionally. Touch the onscreen button to adjust.


