


Installation
Varec, Inc.
33
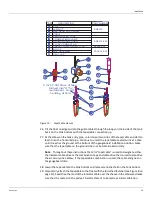
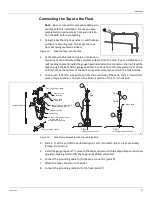
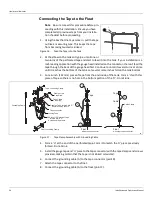
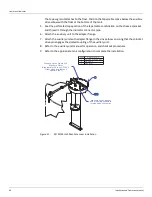
routed through the float guide holes and rotate the guide cable retainers to lock the guide
cable in place. Tighten the nuts and set the float on the tank bottom or bottom anchor.
16. Perform steps 27 - 32 under Cone Roof Tank Installation.
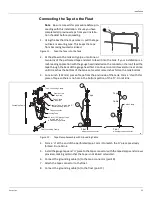
17. Tape the gaugeboard indicator to the gaugeboard at a level indication of 2.00 inches [50.8
mm] plus the height of the bottom anchor. Adjust the cable tension until the float barely
lifts from its resting place. Crimp the cable connector and remove the tape.
Note
As the float is four inches [101.6 mm] high and its waterline is at its equator, it can
-
not register the last two inches [50.8 mm] plus any bottom anchor height of liquid in the
tank.
18. Complete the installation by performing steps 34 - 36 under Cone Roof Tank Installation.
Содержание 6700
Страница 2: ......
Страница 24: ...Liquid Level Indicator 16 Installation and Operations Manual Figure 7 Cone Roof Tank Installation 12 50 318...
Страница 25: ...Installation Varec Inc 17 Figure 8 Half Travel Cone Roof Tank Installation 16 50 419...
Страница 31: ...Installation Varec Inc 23 Initial Lubrication Apply a light oil to the elbow and indicator sheaves...
Страница 37: ...Installation Varec Inc 29 Initial Lubrication Apply a light oil to the elbow and indicator sheaves...
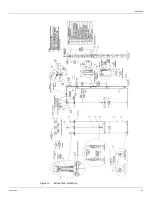
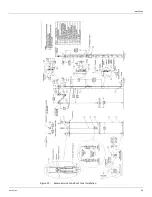
Страница 39: ...Installation Varec Inc 31 Figure 15 Bolted Tank Installation 16 50 419...
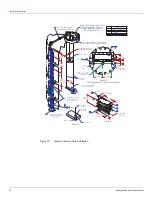
Страница 51: ...Installation Varec Inc 43 Figure 20 Severe Service Cone Roof Tank Installation 12 50 318...
Страница 70: ...Liquid Level Indicator 62 Installation and Operations Manual...
Страница 73: ......