background image

OPERATION

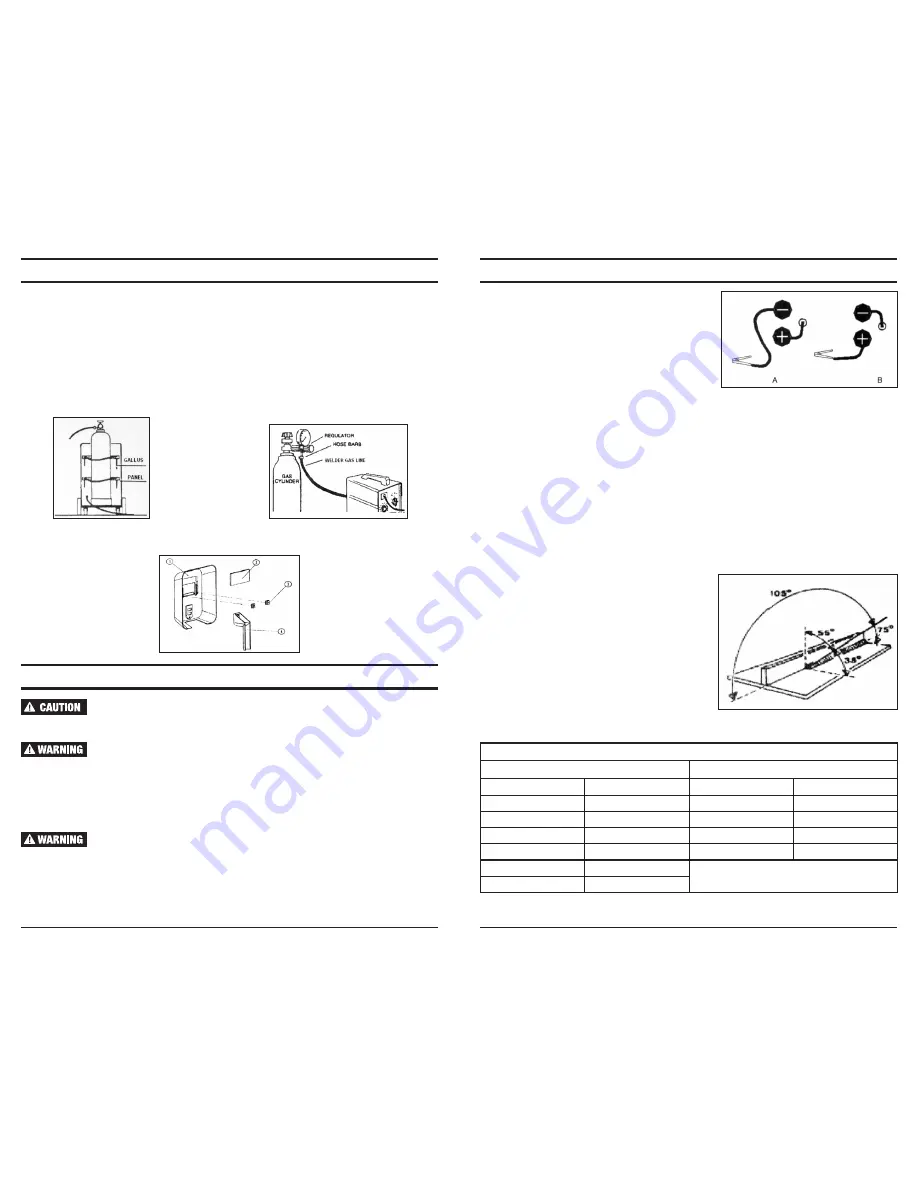
For welding with solid wire, use the gas setup described 

on previous page, and connect ground wire and clamp 

according to diagram "A" at right.

For welding with flux-core wire, gas is not necessary. 

Connect ground wire and clamp according to diagram 

"B" at right.

1. Attach ground clamp to work piece. Make sure teeth on clamp make a good, solid electrical 

connection through paint, rust, etc.

2. Set MIN/MAX and 1/2 Switches according to metal specification.

3. Make sure power switch is "OFF" then plug power cord into electrical outlet.

4. Remove nozzle cover and contact tip from welding torch and pull the hose.

5. Ensure that the welding tongs holding the rod are not contacting any grounded objects, then turn 

the conversion switch to voltage position (the same as input voltage). The green power lamp will 

light.

6. Turn power switch to "ON". Press and hold trigger until 30mm of wire comes out. Release trigger.

7. Shut off power and replace nozzle and contact tip, ensuring that wire extends through contact tip.

8. Turn power back on, press trigger intermittently to adjust wire feed speed using wire speed knob. 

9. Orient yourself on the area to be welded, and the place the face shield over your face.

10. While holding trigger, stroke the wire against the area to be welded to ignite the arc.

11. Once arc is ignited, tilt the electrode wire forward at an angle of approximately 35˚. See diagram.

12. When the weld is complete, lift the electrode away from any grounded object, remove face shield, 

and turn power switch to "OFF".

ASSEMBLY AND SET UP (CONTINUED)

Gas Cylinder Installation

The welder has a platform on the rear to accommodate a small gas cylinder. (If you plan to use a 

large cylinder, chain it to a wall or bench, or obtain a cart designed specifically for the cylinder).

1. Secure the small cylinder to the cart using the straps on the cart.

2. Clean the threads on the gas outlet valve, and open valve briefly to blow any debris away from the 

inside of the valve fitting.

3. Attach regulator to the gas valve on top of the cylinder.

4. Attach welder gas line to hose barb output on regulator and secure in place with hose clamp.

5. Check all fitting for leaks by opening gas cylinder valve and regulator valve.

6. Close all valves when not in use.

Assemble the face shield according to the diagram below: 

OPERATION AND MAINTENANCE

If the welder begins operating improperly, stop working at once and 

determine the source of the problem. Any necessary repairs must be 

performed by a qualified service technician.

Before performing any maintenance or repairs, turn power to OFF and 

unplug unit from power source.

Keep welder unit clean. Open side door and using low-pressure, clean, dry compressed air, remove 

dust and dirt from internal parts, electrical contacts, inside of housing and all ventilation ports. 

After cleaning, check to make sure there are no loose parts or fittings. If any loose parts are found, 

tighten as necessary. 

Be sure all cables and electrical contacts are connected firmly. Loose 

connections can cause arcing which can hurt your eyes or start a fire. 

Arcing while in contact with your body can cause severe injury or death.

12

13

13

Current output chart
MIG-175

MIG-135

Switch Position

Output Amperage

Switch Position

Output Amperage

1

30A

MIN-1

30A

2

50A

MAX-1

50A

3

75A

MIN-2

70A

4

95A

MAX-2

90A

5

110A

6

135A

Содержание 41186

Страница 1: ...Welders Instruction Manual 41186 135 Amp Gas Gasless MIG Welder 41187 135 Amp Gas Gasless MIG Welder Kit 41188 175 Amp Gas Gasless MIG Welder ...

Страница 2: ...ner and or operator are responsible for maintenance maintaining all decals or warning labels and while in use maintaining the unit in good working order If the owner and or operator are not fluent in English the product warnings and instructions shall be read and discussed with the operator s native language by the purchaser owner or his designee Make sure that the operator comprehends its content...

Страница 3: ...0 8 8 6 6 4 10 12A 16 14 10 8 8 6 6 4 4 12 14A 16 12 10 8 6 6 6 4 2 14 16A 16 12 10 8 6 6 4 4 2 16 18A 14 12 8 8 6 4 4 2 2 18 20A 14 12 8 6 6 4 4 2 2 PERSONAL SAFETY 1 Stay alert watch what you are doing and use common sense when operating a power tool Do not use tool while tired or under the influence of drugs alcohol or medication A moment of inattention while operating power tools may result in...

Страница 4: ...air or replace damaged parts at once Maintain unit according to manual Always keep all panels and covers securely in place when operating the welder Clamp work cable with good metal to metal contact to workpiece or worktable as near the weld as practical Insulate work clamp when not connected to workpiece to prevent contact with any metal object 6 7 SAFETY RULES FOR WELDERS CONTINUED FUMES AND GAS...

Страница 5: ...ore starting to weld again Do not block or filter airflow to unit MOVING PARTS can cause injury Keep away from moving parts Keep away from wire feed drive rollers Keep all doors panels covers and guards closed and secured in place WELDING WIRE can cause injury Do not point gun toward any part of the body other people or any metal when threading welding wire Do not press gun trigger unnecessarily W...

Страница 6: ...ld inhibit ventilation Place the kickstand into slot at front of unit and secure in place with supplied screws Installing welding wire Use Flux core steel wire 6mm or 8mm diameter on 102mm spool no more than 1kg Rated wire speed 1 8m min 13m min 1 Open right side panel and remove wingnut from wire spool axle 2 Put spool on axle and replace wingnut 3 Pull 6 of wire off spool and hold firmly 4 Cut o...

Страница 7: ...Installation The welder has a platform on the rear to accommodate a small gas cylinder If you plan to use a large cylinder chain it to a wall or bench or obtain a cart designed specifically for the cylinder 1 Secure the small cylinder to the cart using the straps on the cart 2 Clean the threads on the gas outlet valve and open valve briefly to blow any debris away from the inside of the valve fitt...

Страница 8: ...ervice center to repair or replace power cord Faulty switch Use authorized service center to repair or replace switch Overload protection system engaged Wait for unit to cool then try again Bad wire feed Insufficient pressure Tighten tension nut Loose wing nut Tighten wing nut Wire has become oxidized Replace wire spool Not enough current Low input voltage Make sure input voltage matches input vol...

Страница 9: ...enance neglect or accident or the damage is due to use of the product after partial failure or use with improper accessories Seller will not be liable for labor charges loss or damage resulting from improper operation maintenance or repairs made by persons other than a Star Asia USA LLC Authorized Service Center The use of other than genuine Star Asia USA LLC Repair Parts will void warranty Warran...

Отзывы: