background image

NST-225MX-S3        2.5” Dual SATA 6 Gb/s to USB 3.0 HDD/SSD RAID 


21 

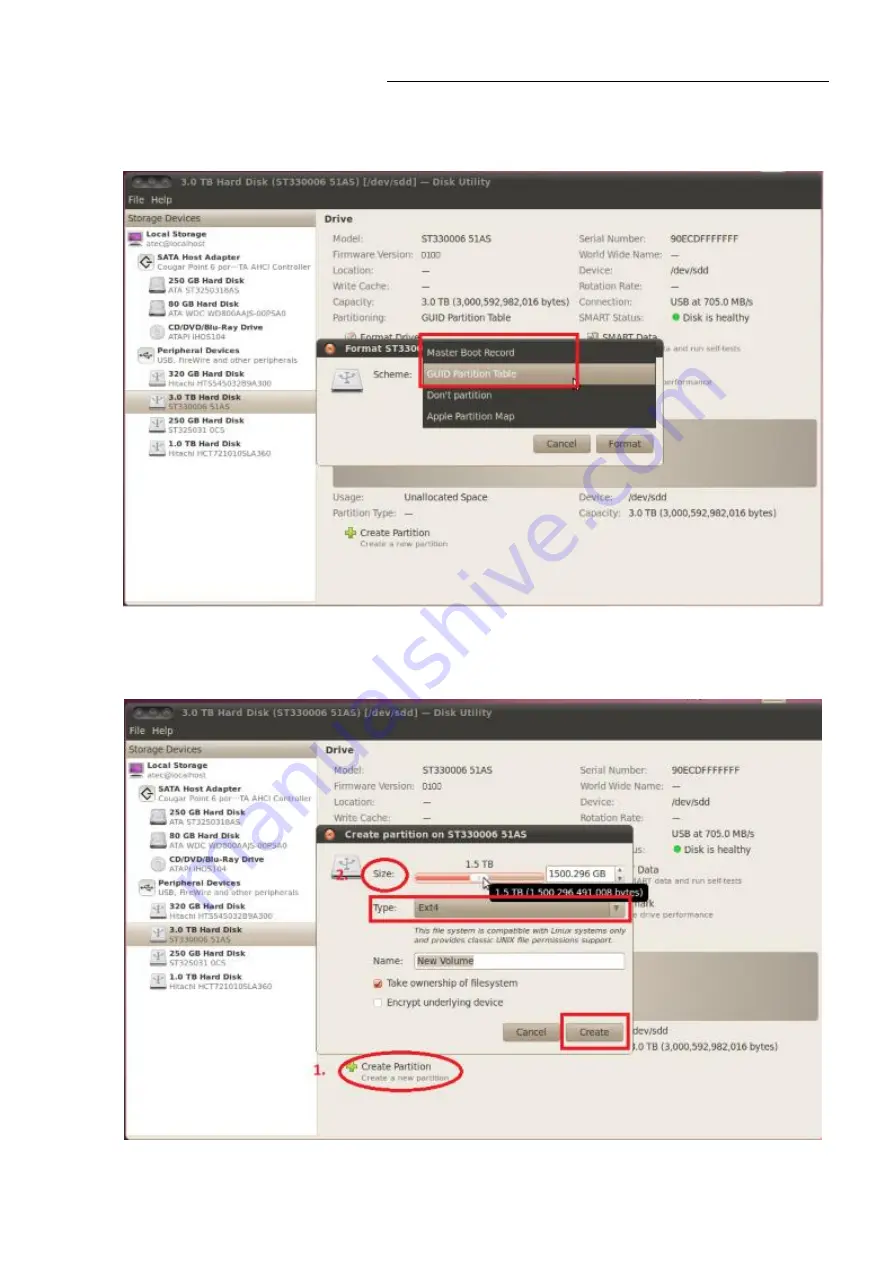
3.


Select 

“Master Boot Record”

 if capacity per HDD does not exceed 2TB. Select 

“GUID Partition Table”

 if capacity per HDD is over 2TB. Press “

Format

” to proceed. 


4.


Select 

“Create Partition”

, and then slide the bar to draw towards the desired 

capacity for the HDD(s). Select “

Type”

 of format and press “

Create

” to proceed. 


Содержание NexStar MX NST-225MX-S3

Страница 1: ...NexStar MX Series NST 225MX S3 2 5 SATA to USB3 0 Dual Bay RAID Enclosure User Manual...

Страница 2: ...RD DRIVE INSTALLATION GUIDE 5 RAID MODE SELECTION 9 RESOURCES 11 DRIVE MAPPING FOR HDD LED RAID AP PCB 11 LED NORMAL STATUS 11 LED ERROR STATUS 12 HARD DRIVE FORMATTING GUIDE 14 PARTITION A VOLUME UND...

Страница 3: ...factor design can houses two small hard drive or Solid State Drive with Individual JBOD RAID0 RAID1 mode capability and can travel with it This RAID in a box simplifies the configuration and at the s...

Страница 4: ...NST 225MX S3 2 5 Dual SATA 6 Gb s to USB 3 0 HDD SSD RAID 4 Front View Rear View A Fan B USB 3 0 Port C Power Switch D Power Socket E Power LED F HDD1 LED G HDD2 LED...

Страница 5: ...NST 225MX S3 2 5 Dual SATA 6 Gb s to USB 3 0 HDD SSD RAID 5 Hard Drive Installation Guide 1 Remove the 4 screws shown 2 Slide out the enclosure cover...

Страница 6: ...to make full contact with the drive interface The screw hole on the drive should align with the tray screw hole 4 Insert the HDD SSD into the top bay and push horizontally for both the SATA interface...

Страница 7: ...D formatting is required whenever RAID mode changes If you have important data on the drive STOP backup your data before you continue Make sure the enclosure is powered on before changing RAID mode Mo...

Страница 8: ...nds while the drive spin up and set the mode change After 15 seconds later you can release the reset button and the mode change is done The Green HDD LED will continue to flash and the Red Power LED w...

Страница 9: ...It enables each HDD to be seen separately as single drives RAID 0 Stripe It s a combination of two physical partitions where the data is striped between them It presents the best data speed but no da...

Страница 10: ...ed hard drive is inaccessible When the offline drive resumes online the appliance begins the rebuild process immediately to restore data redundancy Host access takes precedence in rebuild process If y...

Страница 11: ...Status Situation LED status HDD1 HDD2 Power PC in Sleep Mode S3 S4 S5 OFF OFF RED USB HDD1 2 connected ON ON GREEN Normal Individual HDD1 access Flashing ON GREEN HDD2 access ON Flashing GREEN RAID 0...

Страница 12: ...d HDD 1 HDD 2 System Power HDD1 Power HDD2 Power LED HDD1 LED HDD2 LED PWR FAN Comments HDD1 Error Sector Error HDD Failure ON Linked Error D C ON OFF OFF Flash at fix 0 5Hz Flash Green OFF HDD1 error...

Страница 13: ...error Source HDD1 Target HDD2 ON D C Old New ON ON Stop Flashing Slow Flash at 0 5Hz Green ON Rebuilding reconstructing HDD2 Rebuild error Source HDD2 Target HDD1 ON D C New Old ON ON Slow Flash at 0...

Страница 14: ...t Computer Management From the Computer Management window select Disk Management under Storage to start this process 2 Right click on the Unallocated space and select New Simple Volume If this option...

Страница 15: ...15 3 Click Next to start the New Simple Volume Wizard 4 Specify the partition size If you are not sure by default the partition occupies the entire volume Click Next 5 Assign a drive letter If you ar...

Страница 16: ...vailable drive letter click Next 6 Change the Volume name if you are not sure by default the system will assign a volume you can change it later Click Next to start the formatting 7 Review the file sy...

Страница 17: ...USB 3 0 HDD SSD RAID 17 Initialize a Disk 1 New disk need to be initialize before they can be used Here are the steps for initializing a new disk before you can create a volume to format the drive 2 R...

Страница 18: ...6 Gb s to USB 3 0 HDD SSD RAID 18 3 Select Initialize Disk 4 Windows 7 8 1 provides options for MBR or GPT Please select MBR if your drive capacity is less than 2TB If the capacity is over 2TB please...

Страница 19: ...NST 225MX S3 2 5 Dual SATA 6 Gb s to USB 3 0 HDD SSD RAID 19 5 Online message will replace Not Initialized message when disk is initialized and ready for disk partitioning and formatting...

Страница 20: ...5MX S3 2 5 Dual SATA 6 Gb s to USB 3 0 HDD SSD RAID 20 Partition a volume under Linux Ubuntu 1 Click Disk Utility on the Desktop 2 Find HDD s under Peripheral Devices choose the HDD s and click Format...

Страница 21: ...Record if capacity per HDD does not exceed 2TB Select GUID Partition Table if capacity per HDD is over 2TB Press Format to proceed 4 Select Create Partition and then slide the bar to draw towards the...

Страница 22: ...Dual SATA 6 Gb s to USB 3 0 HDD SSD RAID 22 NOTE some formats cannot be used under popular OS i e Windows Refer to the circled block for details 5 New Volume appears after partitioning completes sele...

Страница 23: ...NST 225MX S3 2 5 Dual SATA 6 Gb s to USB 3 0 HDD SSD RAID 23 6 Select Mount Point to access the HDD...

Страница 24: ...NST 225MX S3 2 5 Dual SATA 6 Gb s to USB 3 0 HDD SSD RAID 24 Partition a volume under Mac OS 1 Right click on the Go icon and select Utilities from the drop down window 2 Select Disk Utility...

Страница 25: ...NST 225MX S3 2 5 Dual SATA 6 Gb s to USB 3 0 HDD SSD RAID 25 3 Select Partition on the top of the window then select 1 partition from the Partition Layout 4 Select Options at the bottom of the window...

Страница 26: ...5 Select GUID Partition Table Currently most of the Mac computers are Intel based To enhance the best compatibility make sure GUID Partition Table is selected Note For PPC Mac please select Apple Par...

Отзывы: