PURE BREEZE FUME HOOD
120V
25799 Jefferson Ave.
Murrieta, CA 92562
1-800-VANIMAN (826-4626)
www.vaniman.com
10370-11/21 PAGE 3
Page 3
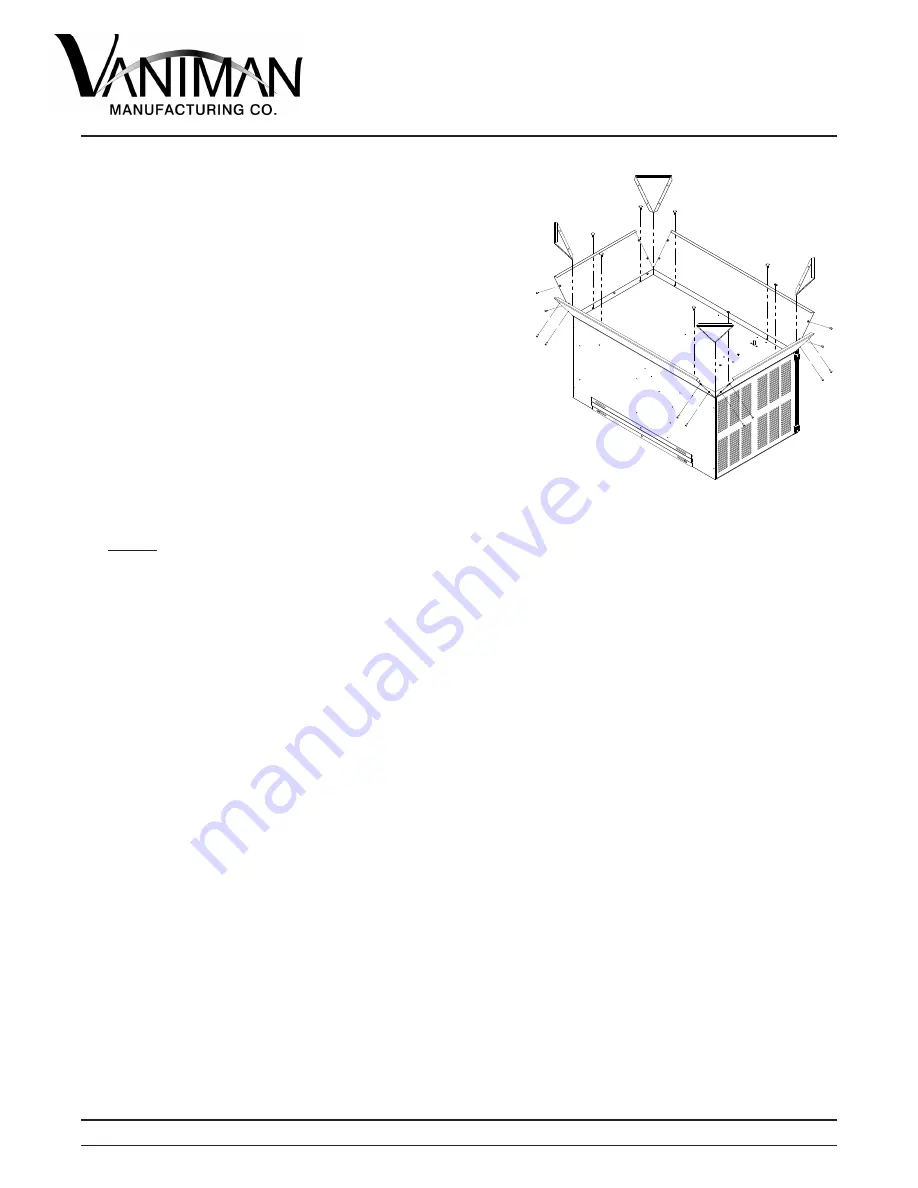
a. Turn the unit over on to the top or side being careful to protect the switches.
b. Mount the
Hood Skirt
side(s) pieces and hood skirt
center(s) pieces needed to the bottom of thecase with
the provided thumb screws and the star lock nuts on the
exhaust side.
c. Align a
Hood Skirt
corner piece behind the skirt-side
holes and the skirt-center holes. Attach the pieces to
each other with four of the hood skirt assembly screws
provided. Repeat as necessary to complete the assembly
to the desired configuration.
4. The Fume Hood can be positioned over the work area in three
ways: a) mounted against a wall with the brackets provided,
b) hung from the ceiling with the eyebolts provided, c) or by
an optional bench stand (see application instructions below).
The following must be considered when mounting the Fume
Hood on a wall or from the ceiling:
Note:
When installed over a furnace some precautions apply, please see application instructions
section below for more information.
a. Wall Mount:
Make sure the Fume Hood has at least three inches of clearance on each side for
proper exhausting ventilation and access to the door latches.
i. One piece of the bracket is mounted on the back of the unit at the factory.
ii. Mount the second bracket piece with the open side facing up and level to the ground. One
screw must be used at both slots at each end of the bracket. (Figure B) The screws must
go into or through a wall stud that can support at least 100 pounds. If the wall studs do not
line up with both slots at either end, use drywall anchors rated for 100 pounds or more to
secure the bracket to the wall. Alternatively, a 3/4” thick plywood sheet can be mounted
to the wall using the wall studs, and the bracket can be mounted to the plywood sheet.
iii. Remove backing from from the two adhesive rubber feet and stick them on the back of
the case near the bottom (not on the skirt),so they will bump against wall. This will keep
the unit parallel to the wall.
iv. With help, lift the unit until the bracket attached is above the other bracket screwed to
the wall or board. Then, allow the bracket on the unit to drag down into the wall mounted
bracket. Double check to ensure that the unit is fully seated in the wall mounted bracket,
and centered from side to side.
v. Open the door. Put one screw through the existing hole on the left side beneath the filters.
This must also screw into a wall stud to keep the
Fume Hood
from lifting off of bracket.
(See figure B)
Fig A


