background image

ENGLISH 

MD 950

 / NanoPak 

Data input 

Chapter 3 

Page GB 22 

9.694.038 

V 4.02 

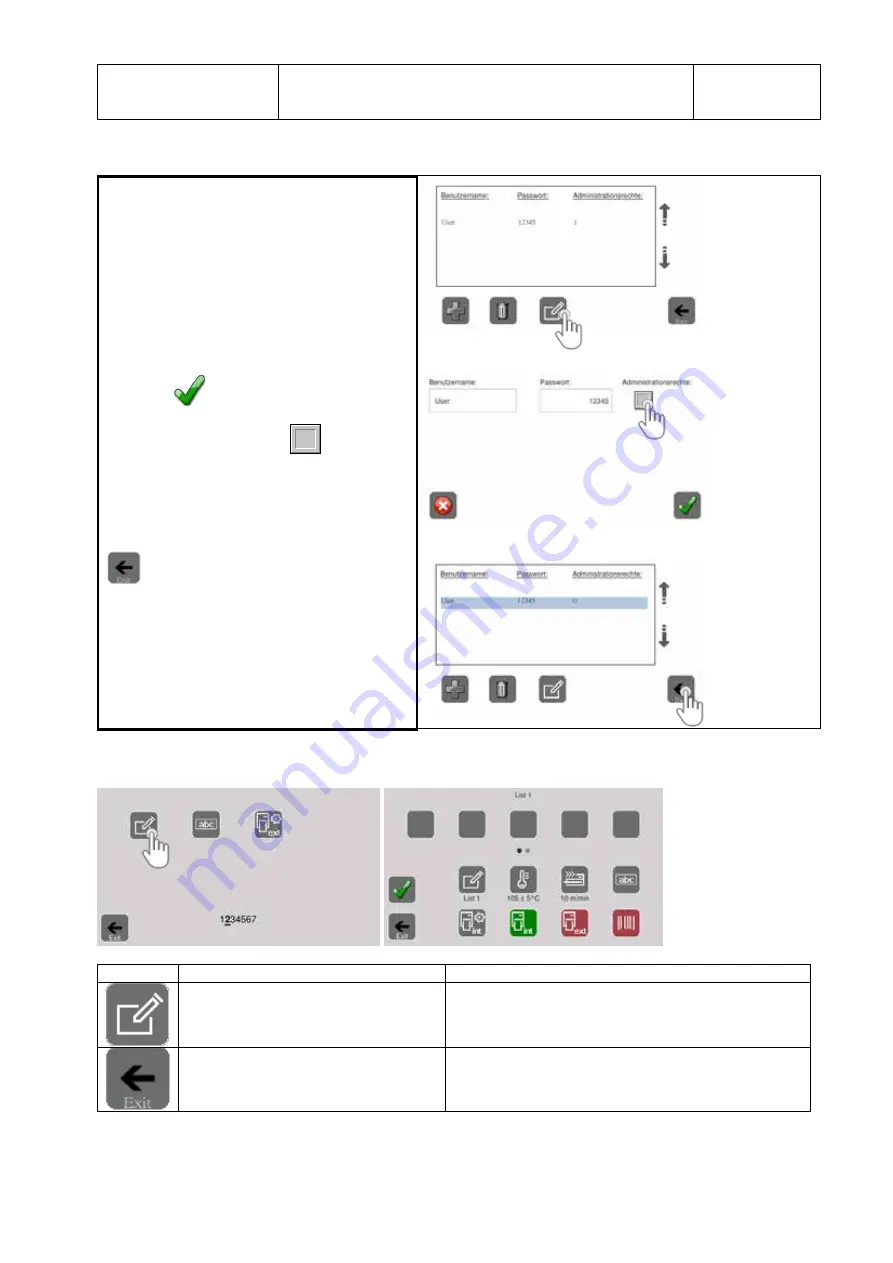
3.2.3  Removing administrator rights 

1. Select a user name,

e.g. "User"

2

.

Press the symbol to edit selected user data.

3. Remove the administrator data and confirm by

pressing the 

 key. 


Administrator rights inactive


Exit this menu level 

3.3  Packaging lists 

Menu  

Key 

Function 

Note 

Select the packaging list menu 

Exit menu level 

back to the home screen 

Содержание MD-950 NanoPak Series

Страница 1: ...www vanderstahl com Printed SEP 2018 4th Edition 4 02E MEDICAL DEVICE POUCH SEALER MD 950 NanoPak SERIES OPERATING INSTRUCTIONS...

Страница 2: ...SEAM TEST 17 2 2 1 Locked machine due to failed Seal Check 18 2 2 2 Printing of the test parameters on a package 19 2 2 3 Printing of the test parameters on a label 19 3 DATA INPUT 20 3 1 CREATING DA...

Страница 3: ...9 2 Counter status 0 44 5 9 3 Display of the set test interval 44 5 9 4 Maintenance indicator 45 5 9 5 RS 232 data interface active display 45 5 9 6 Display of password startup interlock 45 5 9 7 The...

Страница 4: ...1 2 Important notice In accordance with the intended use the CE marking is displayed based on the following EU directives 2006 42 EC 2014 30 EU and 2011 65 EU Medical device directive 93 42 EEC is not...

Страница 5: ...operating instructions which must absolutely be observed This warning sign refers to measures that could result in danger to human health if they are not observed It is compulsory to observe it A hand...

Страница 6: ...t operate correctly or it is damaged in any way If the mains cable or the device have been damaged the device must be repaired by the manufacturer or by one of the manufacturer s authorised service pa...

Страница 7: ...can be recycled and reused The device should therefore be disposed of at a public disposal facility near you The device has been labelled in accordance with Directive 2012 19 EU WEEE on waste electri...

Страница 8: ...5 of film and uncoated nonwoven materials of polyolefines according EN 868 9 1 x approval and or tests necessary Aluminium laminate film x approval and or tests necessary Sealable PA PE on request on...

Страница 9: ...ing the packaging and the air conditioning bag check the device and its accessories for damage and completeness Sealing device Power supply Power cable Operating instructions Test report s Replacement...

Страница 10: ...ning Chapter 2 Page GB 10 9 694 038 V 4 02 2 1 3 Step 3 Connecting the device Insert the 24V cable of the power supply into the device Insert the power cable into the power supply and insert the mains...

Страница 11: ...11 9 694 038 V 4 02 2 1 4 Step 4 Turning on the device Press the Power button The colour changes from red to green The device operating system is loaded When the device is turned on for the first tim...

Страница 12: ...sealing temperature of 190 C The sealing parameters temperature contact pressure and throughput speed are checked If their safe function is guaranteed the main menu is displayed and the device heats u...

Страница 13: ...hecking the functions of heating DMS module and motor as well as the device informations Display of the preselected languages For better operation the device can be switched to different languages usi...

Страница 14: ...y adjusted by between 0 mm and 35 mm by moving the infeed section A sufficient overhang must be present between the sealing seam and the reel interface on the extraction side in accordance with DIN 58...

Страница 15: ...the internal printer on off External printer Switching the external printer on off 2 1 9 2 Level 2 Printer Symbol Function Note Packaging lists Creation of packaging lists Prefixes Changing data name...

Страница 16: ...ial used by means of an aid Not activated until unlock Key lock Locks the settings on the home screen so that data can only be selected but not deleted or edited UDI Creating editing and deleting UDI...

Страница 17: ...d during the tests Activating and starting the sealing seam test 1 If a user has been created in the user list an user code must be entered before a test is carried out Otherwise this is not necessary...

Страница 18: ...on as the Seal Check has been done twice without passed result the machine asked for lock function Seal Check result confirmation Message in the screen if two Seal Check result hasn t been passed If t...

Страница 19: ...inter connected If the ValiPrint label printer is connected and switched on a label is also printed with each test selected Date and time Sealing temperature Contact pressure Sealing speed User name w...

Страница 20: ...password entered into the list i e they can also log out when their task is complete If the User standby function was activated in the Settings menu the user is automatically logged out after a set ti...

Страница 21: ...ghts 1 Activate ID List menu 2 Enter new ID 3 Enter user name e g User It is not possible to enter a name without a password 4 Enter password e g 12345 and administrator rights can be assigned if desi...

Страница 22: ...s 1 Select a user name e g User 2 Press the symbol to edit selected user data 3 Remove the administrator data and confirm by pressing the key Administrator rights inactive Exit this menu level 3 3 Pac...

Страница 23: ...stable character spacing Distance from start of printing to page margin 1 mm 100 mm Illustration of the print data relative to the upper packaging edge rotated by 180 Activate printer activity by pres...

Страница 24: ...ince the first sealing Time Process STEAM EO FORM VH2O2 IRRAD DRY Sterilizer Only with previously setup list how to create described in 3 3 Quantity 1 10 S N Printout of the current device serial numb...

Страница 25: ...ing designation Pouch Colour identification Sealing temperature Switch off tolerance Sealing time Blue 180 C 5 C 10 0 m min Representation of print data as text Print data of the internal printer 5 pr...

Страница 26: ...Press the button several times until the background colour of the packaging designation appears in the desired colour 4 Confirm the packaging designation by pressing the Enter button activate Cancel...

Страница 27: ...able 1 mm 100 mm default setting 5 mm Print direction Representation of the print image to the upper edge of the packaging 0 or flipped 180 default setting 0 Barcode type Data marked in the print sequ...

Страница 28: ...ling default setting Label printing after every second seal Label size 55 x 33 mm Number of lines of print without HIBC data 5 with HIBC data 4 60 x 44 mm Number of lines of print without HIBC data 7...

Страница 29: ...3 3 4 4Display the packaging list 1 Activate the Packaging lists menu 2 Select the packaging list If no list has been created this is displayed accordingly 3 Select and activate the packaging list act...

Страница 30: ...idual entry or one after another List with LOT data Lot names lot numbers Number would be overwritten after every input List with sterilizer data Steriliser designation or serial number Length of list...

Страница 31: ...0 NanoPak Data input Chapter 3 Page GB 31 9 694 038 V 4 02 3 4 2 The Processing menu Example of an Info List Key Function Re enter a list text Delete a list text Delete a list text Confirm activate Ex...

Страница 32: ...ets the counter to 000000 Confirms the settings Counting backwards Key Function Note 0 0 0 0 1 9 Displays the current value 0 0 0 0 1 0 Select the individual digits of the counter the respective numbe...

Страница 33: ...is not affected Key Function Note Lock deleting and editing settings All symbols stored on the home screen can be selected by users but not deleted or edited An administrator is required for this The...

Страница 34: ...ice display using a text editor such as the Windows Text Editor or Windows WordPad or using a spreadsheet program such as Windows Excel If the DataMatic function is activated a sealing process can onl...

Страница 35: ...piry date LOT Info Process Optional recording data Sterilizer data CE data Package content quantity Data of the barcode scanner Reference data 5 1 3 Show the DataMatic data on the device display Only...

Страница 36: ...on the USB stick 1 Activate the TraceLog menu 2 Activate the USB memory data view Appears if not USB is plugged confirm 3 Select the USB slot where the stick was inserted confirm 3 Select the year of...

Страница 37: ...such as the tenth confirm 5 Select the serial number of the recordings such as confirm Change display by swiping Status of the event Date and time Event Temp Press Speed dwell Counter Selected packagi...

Страница 38: ...5 1 4 Show the DataMatic data on a PC USB stick directory with the recording data for example PC with Windows 7 Display of a standard DataMatic recording e g using Windows Excel Recording year 2017 Re...

Страница 39: ...ed No EMERGENCY STOP must be carried out by holding the Power off button 5 2 1 1The display menu 5 2 1 2Interpretation of entries State Date and time Event T F v OK 10 01 2019 15 31 53 Change DataMati...

Страница 40: ...ator this must be created beforehand The prefix is defined in the individual packaging lists See Chapter 3 3 2 Using the packaging date as an example The selection and entry of the data is confirmed w...

Страница 41: ...al printer and the label printer The following data are NOT printed as a barcode Data Data Time reuse Temperature Note Contact pressure Speed dwell 1 Activate packaging list 2 Press the Barcode button...

Страница 42: ...ged directly without calling up any menus 5 6 1 Changing the sealing temperature 1 Press and hold to select the temperature Press to activate the display 2 Select the desired temperature 3 Confirm the...

Страница 43: ...ne label To create or activate a UDI marking the coding key Art No 1 561 007 must be inserted in one of the USB sockets 5 7 1 The Processing menu Function is not activated without special dongle Key F...

Страница 44: ...ent temperature Reactivate device function The display is darker and the device cools down to the default set temperature of 80 C 5 9 2 Counter status 0 If the counter was configured to count backward...

Страница 45: ...hs Customer setting via the Service menu see device technical manual 5 9 5 RS 232 data interface active display This symbol appears if an external PC has made contact with the sealing device via the R...

Страница 46: ...4 02 5 9 7 The display of control center Tap the control center symbol Monitoring screen Symbol Display Checking of the temperature sensor positive Checking of the contact force sensor positive Checki...

Страница 47: ...5 Page GB 47 9 694 038 V 4 02 5 9 8 Display of operating data 1 Exit Symbol Display Device operating hours Device software version Device serial number Unit counter TOTAL Firmware version of the CPU...

Страница 48: ...te the setting menu 2 Press and hold to select any symbol 3 The size of the symbol can be changed by activating the size XL key 4 The symbols can only be freely positioned on the home screen Only the...

Страница 49: ...ge GB 49 9 694 038 V 4 02 If the symbol in the home screen is to be deleted again or the position is to be changed the respective symbol can be edited by holding it down for a long time The position o...

Страница 50: ...aling device scope of delivery A connected barcode scanner that has not been approved by the device manufacturer can cause the device to fail 7 1 Commissioning the barcode scanner 7 1 1 Step 1 Unpacki...

Страница 51: ...0 NanoPak Barcode scanner Chapter 7 Page GB 51 9 694 038 V 4 02 7 1 2 Step 2 Connecting the device 1 Switch off the device 2 Connect the barcode scanner s connection cable to a free USB slot 2 Switch...

Страница 52: ...t data Data source Note ID data Scan list with user names Info Scan list with texts Assignment of general barcode data possible LOT Scan list with LOT data Assignment of general barcode data possible...

Страница 53: ...ters 3 3 2 and 3 3 3 Key Function Note Name of the external printer formulas Print mode Manual Each seal Every 2nd seal Label quantity Freely selectable from 1 10 Label size 55 x 33mm 60 x 44mm Width...

Страница 54: ...Page GB 54 9 694 038 V 4 02 9 Switch off the device Short press the Power button The device is switched off directly by holding the Power button Do not use if a USB stick is connected Data loss The co...

Страница 55: ...Service monitoring function check The sealing temperature is not reached after switch on or it is outside of the set tolerance limit Temperature sensor defective Control card defective Heating cartrid...

Страница 56: ...regularly by a competent person and cleaned serviced and calibrated at least once per year by the manufacturer or by one of the manufacturer s authorised service partners 10 3 Service Your Van der St...

Страница 57: ...4 038 V 4 02 To Sender E mail Fax no Your order No Date Device type Serial number Designation Art No Qty Device printer ink ribbon 6 813 104 Device printer ink ribbon red 6 813 224 Signature _________...

Страница 58: ...the sealing device ink ribbon cassette Switch off the device and DISCONNECT THE POWER SUPPLY Step 1 Sliding the infeed section forward and opening the front flap Step 2 Removing the ink ribbon cassett...

Страница 59: ...tenance Chapter 10 Page GB 59 9 694 038 V 4 02 Step 3 Installing a new ink ribbon cassette Press and hold down the lever Insert a new ink ribbon cassette Check to ensure that the cassette is engaged T...

Страница 60: ...ess parameters sealing parameters Sealing temperature max C 220 Tolerance for sealing temperature C 2 5 adjustable Contact pressure N 100 Contact pressure deactivation tolerance 20 Throughput speed m...

Отзывы: