13
General setup Menu
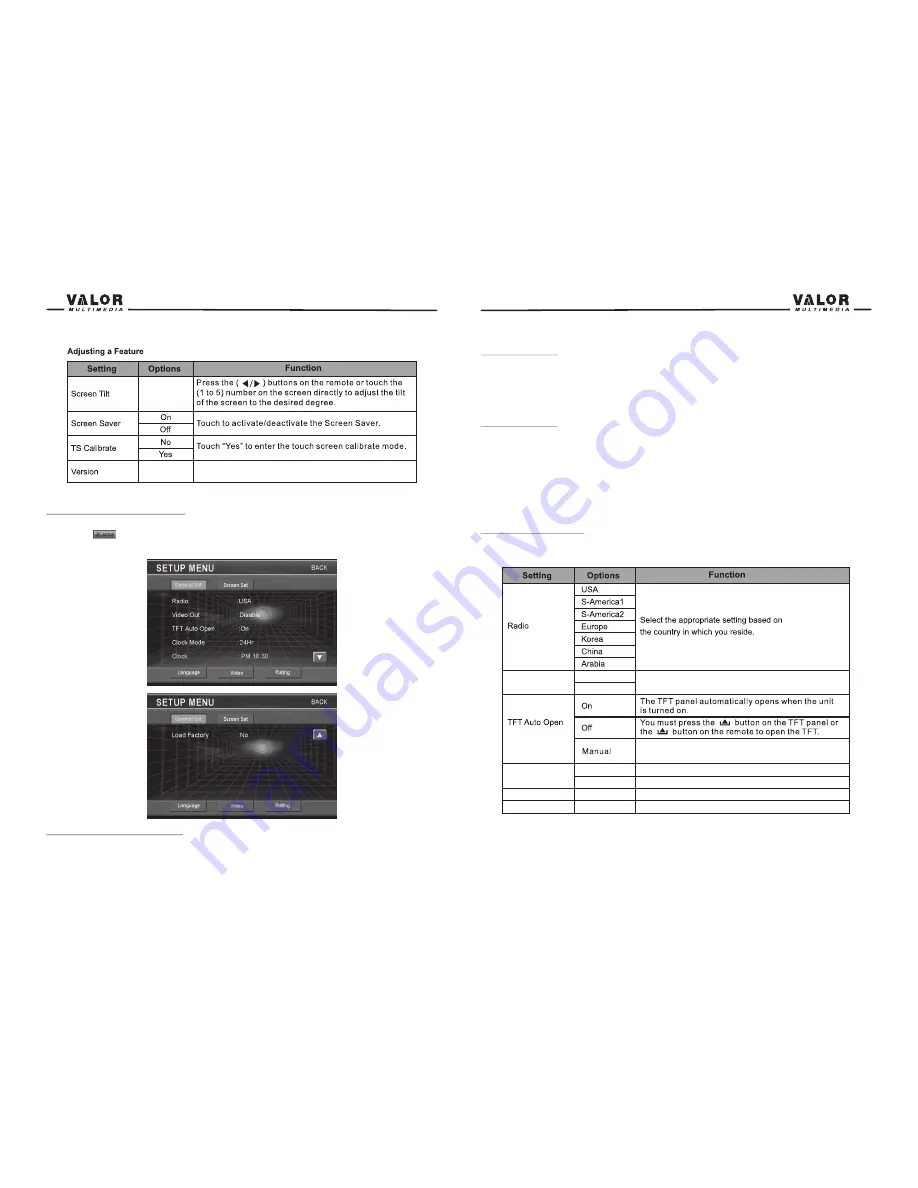
Accessing the General Setup Menu
•Press the (MENU) button on the remote control to access MAIN menu.
•Select the button on the bottom of the screen and select General menu to access the
General setup.
Selecting a Feature for Adjustment
Press the direction buttons on the remote control or touch the option directly on the screen to select
the feature to be adjusted.
1 to 5
Displays the software version of unit
14
Adjusting a Feature
1. Enter the option field for the feature you want to adjust by pressing the (OK) button on the
remote. A submenu appears in a second row with the selected option.
2. Select a new value by pressing the direction button.
3. Confirm your selection by pressing (OK) button. The new value setup is complete.
Adjusting the Clock
1. Access the “Clock” setting under the General Setup menu.
2. Press the direction button on the remote to move the cursor to the “Hour” or “Min” position, and
press the (OK) button. You also can touch the “Hour” or “Min” position directly.
3. The numeric keypad will pop up.
4. Press the numeric button on the remote control or touch the numeric keypad on the screen to
adjust the hour or minutes.
5. Press the (OK) button on the remote control or on the keypad of the screen to confirm setup.
Return to normal playback
The system will automatically return the previous playback mode you were in before accessing the
setup menu after setting with no operation.
Load all factory parameters to their original settling
Video out
Disable
Enable
Select whether to video out
The monitor does not open or close when the unit is
turned on or turned off.
Clock Mode
Clock
Load Factory
12Hr
24Hr
Clock displays 12 hour time using AM and PM.
Clock displays 24 hour time up to 23:59
00:27
present time
No/Yes
Содержание ITS-700W
Страница 1: ...ITS 700W ...


