background image

9

4. Exit Picture Quality Setting Mode:

Press the PIC button on the remote or press and hold the INFO button on the unit.

NOTE:

 A video source must be connected to the AUX input and be playing to access the above 

adjustments.

Parking Brake Interlock

1. When the “PARKING” lead is connected to the brake switch, the display on the TFT monitor will 

display video only when the vehicle is stopped and the parking brake is applied.

2. When the “parking brake inhibit” is active, the front monitor displays a caution message with blue 

background, preventing the driver from watching video while driving to reduce the risk of a traffic 

accident. 

Please see “INSTALLATION SECTION” for installation.

Monitor Movement Mechanism

If an obstruction occurs in the monitor path, the motion will stop automatically to prevent damage to 

the mechanism or monitor.

Normal operation is resumed by pressing the (OPEN) button or disconnecting and reconnecting the 

power.

10

Basic Operations

Power On / Off

Press the POWER OFF /VOL button to turn the unit on. The buttons on the front of the unit are 

illuminated and start up message is briefly displayed on the LCD screen, and then displays the 

current mode status. You can also turn on the unit by pressing the POWER button (           ) on the 

remote control.

Press and hold the POWER OFF /VOL button on the front panel for more than 1 second or press the 

POWER button (           ) on the remote to power off the unit. The monitor is drawn back into the main 

compartment and the LCD screen displays “BYE BYE”.

Playing Source Selection

Press the MODE button on the front panel or the (SRC) button on the remote to change among 

available playing sources: TUNER, DVD, AUX IN. The playing mode is displayed on the TFT 

display.

Volume Adjustment

To increase or decrease the volume level, turn the POWER OFF /VOL on the front panel or press 

the (VOL+/ VOL-) buttons on the remote control. The volume ranges from “0” to “40”. The default 

volume is “10” when the unit is powered on each time. Default volume memory setup: Rotate Power 

Off/VOL knob on the front panel to select volume value and then press and hold the Power Off/VOL 

button until you hear a single beep. When you hear the beep, setup is completed.

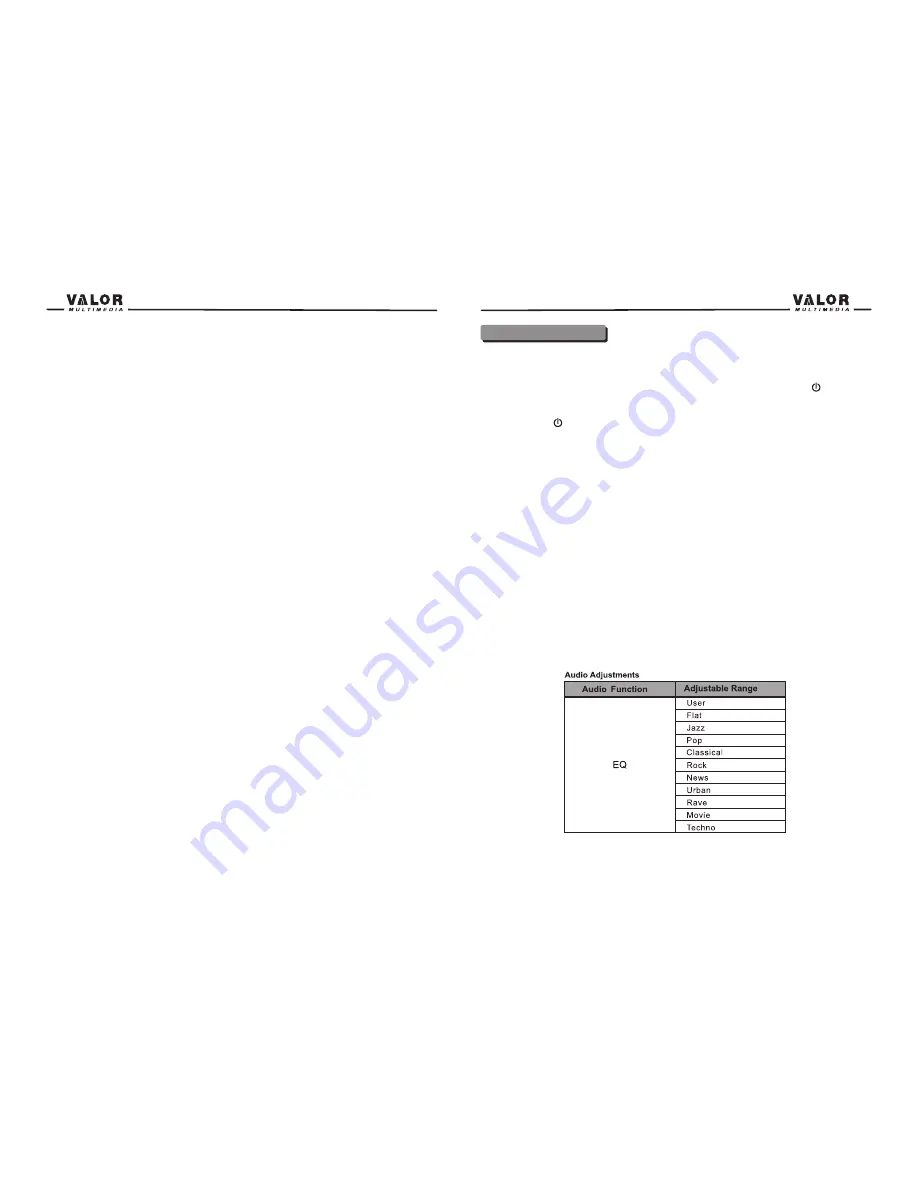
Audio Control Menu

The Audio Control feature allows you to easily adjust your audio system to meet the acoustical 

characteristics of your vehicle, which vary depending on the type of vehicle and its measurements. 

To get the best possible sound quality from your new system, be sure to adjust the settings for the 

speakers as well. Proper setting of the Fader and Balance boosts the effects of the cabin equalizer.

Содержание ITS-700W

Страница 1: ...ITS 700W ...

Страница 2: ...easy to follow If you take a few minutes to look through it you ll learn how to use all the features of your new ITS 700W for maximum enjoyment 1 1 1 1 2 3 3 4 5 6 6 8 8 8 8 8 9 9 10 10 10 10 10 11 11 11 12 12 12 13 15 15 16 17 17 17 18 18 18 18 NOTE 1 certain description in the book may differ from the actual unit 2 Some pictures or icons in the book may differ from actual display 3 Specification...

Страница 3: ...ra never use the video display function while driving the vehicle This is a violation of law 4 To reduce the risk of a traffic accident never driving with the sound at a level that prevents you from hearing sounds outside around the vehicle 5 Never disassemble or adjust the unit without the assistance of a professional For details please consult your local car stereo specialty shop 6 To prevent in...

Страница 4: ...one step at a time Press and hold this button to continuously adjust the upward tilt Press this button to adjust the picture settings in picture setup 16 ANGLE Press the button to adjust the downward tilt angle of the screen one step at a time Press and hold this button to continuously adjust the downward tilt Press this button to adjust the picture settings in picture setup 17 TFT DISPLAY 18 OPEN...

Страница 5: ... 27 28 Select FM AM band on Tuner mode Stop playback Power Open Mute SRC Numeric button VOL up VOL down Information GOTO search Stop Band Select ESC Menu Picture Repeat A B OK Direction buttons Turn the power on off Open close the motorized screen Toggle on off audio output Select playing mode Directly access certain chapter track preset station in current band Increase the volume Decrease the vol...

Страница 6: ...the remote control or press the OPEN button on the front panel to open the monitor into the desired viewing position If TFT Auto Open is Manual when the unit is turned on or turned off the monitor has no movement See General setting for more instructions Monitor Tilt Angle Adjustment The monitor angle can be adjusted for optimum viewing using one of the following methods Press the or buttons on th...

Страница 7: ...o turn on the unit by pressing the POWER button on the remote control Press and hold the POWER OFF VOL button on the front panel for more than 1 second or press the POWER button on the remote to power off the unit The monitor is drawn back into the main compartment and the LCD screen displays BYE BYE Playing Source Selection Press the MODE button on the front panel or the SRC button on the remote ...

Страница 8: ...ain to restore the volume Adjusting the volume or using any of the audio set up features will cancel the mute function Master Volume Front Left Channel Volume Front Right Channel Volume Center Channel Volume Item 00 to 40 10 to 10 10 to 10 10 to 10 4 Channel Audio Adjustments System Setup Menu 12 MAIN Menu There are three methods to access the MAIN menu Press the MENU button on the remote control ...

Страница 9: ...Access the Clock setting under the General Setup menu 2 Press the direction button on the remote to move the cursor to the Hour or Min position and press the OK button You also can touch the Hour or Min position directly 3 The numeric keypad will pop up 4 Press the numeric button on the remote control or touch the numeric keypad on the screen to adjust the hour or minutes 5 Press the OK button on ...

Страница 10: ...t desired disc audio language Select desired disc menu language Subtitle Audio DVD Menu English French Spanish Auto off English French Spanish English French Spanish TV Shape View Mode 4 3 16 9 Fill Original Auto Fit Pan Scan Select desired view mode 16 Rating Setting Accessing the Rating Setup Menu Press the MENU button on the remote control to access MAIN menu Select the button on the bottom of ...

Страница 11: ...e button on the screen or press the BAND button on the remote control on the front panel to change among the following bands FM 1 FM 2 FM 3 AM Auto Tuning Press the button on remote control or touch the button on the screen to seek the next available channel by increasing the tuning frequency Press the button again to stop searching Press the button on the remote control or touch the button on the...

Страница 12: ...screens if applicable will operate normally Opening Closing the TFT Video Screen Opening the TFT Screen To open the TFT video screen press the OPEN button on the unit or press the button on the remote control Closing the TFT Screen Press the OPEN button on the unit or press the button on the remote control again to close the TFT screen Insert Eject Disc Inserting a Disc When inserting a DVD disc D...

Страница 13: ...enu 1 You can touch the area F and then touch the button to recall the main DVD menu 2 Use the arrow buttons on the remote to select a title from the menu 3 Press the TITLE button on the remote control to select a different title for playback 4 Press the OK button on the remote control or touch the item directly to confirm your selection and begin playback 22 Moving Through Chapters Press the butt...

Страница 14: ...Language If you are watching a disc recorded in multiple languages with subtitles press the SUBT button on the remote control to choose the language in which you would like the subtitles to appear You also can touch area E and then touch the button Playback Information During DVD playback press the INFO button on the remote control or touch area B to display playback information on the screen incl...

Страница 15: ...c 7 Elapsed playing time 8 Current source indicator touch this area to access MAIN menu 9 Volume indicator 10 Touch to stop disc playback 11 Touch to turn to the previous page 12 Touch to turn to the next page 13 Touch to activate deactivate Scan Mode 14 Touch to display the numeric keypad on the screen and then you can use the numeric keypad to access a track directly 15 Touch to activate deactiv...

Страница 16: ...all correctly Flashing image or interference appears on screen DVD is not compatible with current TV system settings Improper video signal connections Change setup to accommodate disc Check wiring and correct Error Messages Message Displayed Cause Corrective Action Loading No Disc Bad Disc Unknown disc Region Error Error Disc is being read Disc is dirty Disc is upside down Disc not present in load...

Страница 17: ...1 Only use a piece of clean silicone cloth and neutral detergent to clean the front panel or monitor A rough cloth and non neutral detergent such as alcohol may result in scratching or discoloration 2 Keep off water and other liquid things 3 If the temperature inside the player gets too high a protective circuit automatically stops playing the disc And then please wait for the unit to cool down be...

Страница 18: ...VDC negative ground Speaker output impedance 4 8 ohms Line output voltage 2 Volts Line output impedance 200 ohms Chassis dimensions 7 x 7 x 2 178 x 178 x 51 mm Design and specifications subject to change without notice CEA 2006 Power Standard Specifications reference 14 4VDC 0 2V 20Hz 20kHz Power Output 17 Watts RMS x 4 channels at 4 ohms and 1 THD N Signal to Noise Ratio 80dBA reference 1 watt in...

Отзывы: