3
© Vallox Oy - All rights reserved
MANU
AL
WARNING
The unit is not intended for use by
children under 8 or by persons with
reduced sensory, physical or mental
capabilities, or whose lack of knowledge
and experience do not ensure safe
operation of the unit. Such persons can
use the unit under supervision, or by
following the instructions of someone who
is responsible for their safety. Do not let
children play with the unit or to clean or
maintain it without supervision.
MAINTENANCE
Keep the cooker hood clean. Wipe outer surfaces
regularly with water containing a small amount of a mild
detergent. Clean off any grease stains immediately. Do
not use abrasive or corrosive detergents or tools.
Keep the grease filter clean to ensure an adequate
extract air flow. The grease filter must be washed with
warm water and detergent by hand or in a dishwasher
at least 1-2 times a month.
Replacing the lamp
• Remove the protective glass of the lamp by moving
it to the left (Figure 3).
• Remove the lamp by pulling it to the left (Figure 4).
• Lamp type: G23 LED.
Removing and mounting the grease
filter
• Open the quick connectors of the bottom plate of
the cooker hood by turning (Figure 1).
• Turn the bottom plate down.
• Remove the grease filter from its holder (Figure 2).
1
2
3
4
WARNING
A G23 PL lamp will cause damage!
1
2
4
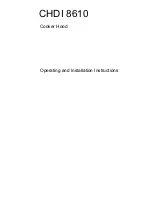
min. 500 mm /
650 mm
3
CAUTION
The minimum distance of the
bottom edge of the grease filter to
an electric cooker is 500 mm, and
to a gas cooker 650 mm.
CAUTION
• The cooker hood must not be
connected to a flue that is used for
removing combustion gases (e.g. from
a wood- or gas-burning fireplace,
cooker, or stove).
• The cooker hood must not be
fastened through the side panels to
the cabinets.
• Fans that are controlled through the
cooker hood must have an engine
cover and their maximum power must
not exceed 340 W.
• Regulations on leading extraction air
outdoors must be observed.
INSTALLATION
Use the mounting accessories included in the package
to fasten the cooker hood in place.
1. Shorten the extract air duct to be connected to the
hood (125 mm spiral duct) to the correct length.
2. Where required, install a Vallox cover strip, for
instance, (2142400 cover strip 500 or 2142500
cover strip 600) to cover the opening in the rear
wall.
3. Lift the hood so that it is in contact with the duct.
4. Fasten the cooker hood with the mounting
brackets or by other means, so that the hood is
firmly in place and cannot move (figures 1, 2 and
3). The mounting screws included in the accessory
bag are suited to walls made of wood, chipboard,
cement or stone. Use appropriate mounting
devices for other materials.
5. Check the tightness of the extract air duct system.
6. Plug the cooker hood into the mains. Ensure that
the plug can be unplugged, where required.