background image

Quick-Connect CCU Kit for BRC-H900 Camera 


© 2012 Vaddio - All Rights Reserved.  Document Number 342-0507 Rev A                                                                                    Page 6 of 16


Anatomy of the CCU Controlled Camera System 

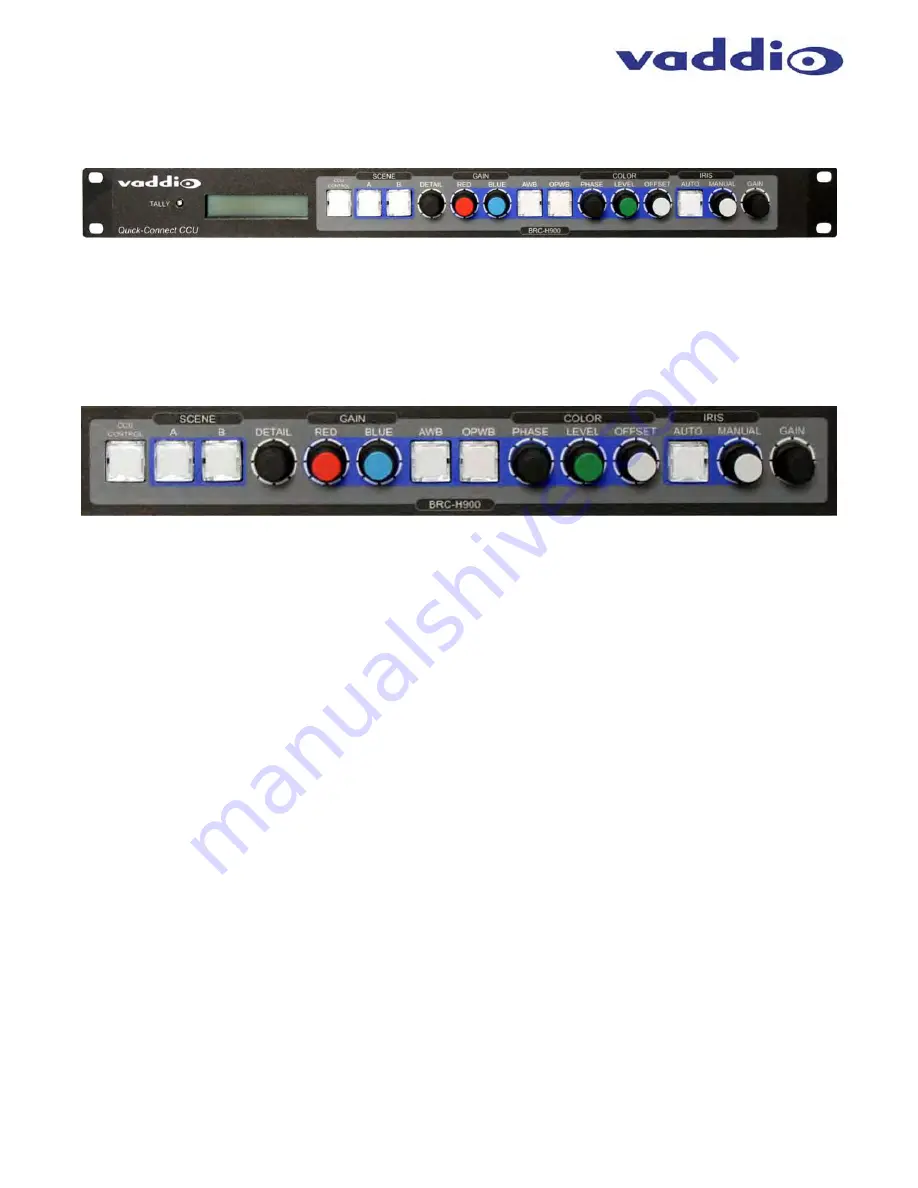
Image:  The Quick-Connect CCU Front Panel Controls (left to right) 


Tally Light:  

The blue LED tally light on the front panel is tied to the tally contacts on the rear panel allowing the 

user to easily track which camera interface is being used in a multi-camera system by supplying a simple contact 
closure (i.e. from ProductionVIEW Super Joystick or ProductionVIEW HD).


LCD Display:  

Backlit (blue) display indicates which mode is active (CCU CONTROL or PTZ CONTROL).  In 

CCU CONTROL mode, when a rotary encoder is touched, the name of the control being actuated and the value 
of that assigned parameter will be displayed.  


Image:  Magnification of control Buttons and Rotary Encoders (from left to right)  


CCU Control Switch:  

Backlit (blue) SPDT switch, lit when activated, blocks the incoming PTZ controls on the 

RS-232 input and allows the end user to make adjustments to the camera image characteristics.  When off or 
deactivated, PTZ information is passed to the camera and the front panel controls are deactivated to avoid 
latency.


Scene A and B:  

Two camera adjustment scenes (A & B) can be stored into microprocessor memory.  When lit 

(backlit blue SPDT switch), the scene is activated.  To store a scene, the user adjusts the camera and then 
touches and holds the scene button down until the button blinks.


Detail:  

The Detail control sharpens or softens objects in the frame.  


Red and Blue Gain Control:  

The Red and Blue Gain encoders adjust the red gain or blue gain of the signal 

when AWB is disengaged.


AWB:  

The Automatic White Balance controls/adjusts the color levels automatically when engaged.  Turn off 

AWB to manually adjust the Red and Blue levels, as well as Red, Green and Blue Enhance.


OPWB:  

One-Push White Balance control allows the user to set the white balance with one push (the camera 

must see 60% of the image as white in order to operate).  OPWB overrides AWB and Red/Blue controls when 
activated.


Color Phase:  

Adjusts the tint of the entire image. 

 
Color Level:  

Adjusts the color intensity of the image.


Color Offset:  

Shifts the white balance focusing point when white balance is set to Auto or One Push.  The white 

balance focusing point switches to blue in the - direction and to red tint in the + direction.


Auto Iris:  

The Auto Iris mode automatically adjusts the iris and gain of the camera.  To manually adjust the iris 

or gain, turn off this control.


Manual Iris:  

The manual iris control allows the user to set the iris manually. 


Gain:  

The Gain control adjusts the overall gain of the camera.  To manually adjust the gain Auto Iris must be off.   


Содержание Quick-Connect CCU H900

Страница 1: ...IEW CCU H900 camera Included Part Numbers without Camera 998 6897 000 Quick Connect CCU Kit for the BRC H900 Camera camera not included North America 998 6897 001 Quick Connect CCU Kit for the BRC H90...

Страница 2: ...Quick Connect CCU Kit for BRC H900 Camera 2012 Vaddio All Rights Reserved Document Number 342 0507 Rev A Page 2 of 16 Inside Front Cover Blank...

Страница 3: ...Connect CCU Front Panel Controls left to right 6 Image Magnification of control Buttons and Rotary Encoders from left to right 6 Image Rear Panel Connections and Controls left to right 7 Image EZIM CC...

Страница 4: ...Connect CCU H900 Kit without the camera Important Safeguards Read and understand all instructions and warranty statements before using Do not operate any device if it has been dropped or damaged In t...

Страница 5: ...Connect CCU Kit NO CAMERA for the BRC H900 Camera International Carefully remove the device s and all parts from the packaging Please do not toss the packaging yet just set it aside where it won t be...

Страница 6: ...into microprocessor memory When lit backlit blue SPDT switch the scene is activated To store a scene the user adjusts the camera and then touches and holds the scene button down until the button blin...

Страница 7: ...black burst generators to externally sync the cameras This input is transmitted through a differential amplifier to a receiver at the EZIM CCU The G L gain adjustment is on the EZIM CCU or the receiv...

Страница 8: ...bracket All cabling is routed to the head end using Cat 5 cables using standard straight through RJ 45 connectors 568B termination Pass thru type RJ 45 connectors should never be used Before Installin...

Страница 9: ...ll Mount Image Heavy duty wall mount The wall mount may be mounted directly to a 3 gang wall box or to drywall with the appropriate wall anchors Step 2 Connect the break out cable to the EZIM CCU Moun...

Страница 10: ...mount interface that breaks out the signals from the Cat 5 cables back to the standard connectors Connect the other side of the appropriate Cat 5 cable to the CCU except for power The basic system co...

Страница 11: ...ill have a grainy video image Adjust the detail settings for a smoother image Adjust Color to Taste Required adjustments will vary based on the environment The CCU allows the set up of several scenes...

Страница 12: ...nt request an RMA from Vaddio s technical support Provide a technician with a return phone number e mail address shipping address and product serial numbers and describe the reason for repairs or retu...

Страница 13: ...at may cause undesired operation of the device Changes or modifications not expressly approved by Vaddio can affect emission compliance and could void the user s authority to operate this equipment IC...

Страница 14: ...Power 7 Power 8 Power RS 232 IN Connector RJ 45 Pin Signal RS 232 1 Not Used 2 Not Used 3 Not Used 4 Not Used 5 Not Used 6 GND 7 RXD from TXD 8 TXD to RXD RS 232 G L OUT Connector RJ 45 Pin Signal RS...

Страница 15: ...CVBS 2 CVBS GND CVBS GND 3 Y Y 4 C PB 5 C GND PB GND 6 Y GND Y GND 7 Not Used PR 8 Not Used PR DB 25 Connector Pins Signal 1 CVBS GND 14 CVBS 2 G L GND 15 G L 3 NC 16 GND IN 4 TXD IN 17 RXD IN 5 NC 1...

Страница 16: ...1 4464 www vaddio com 2012 Vaddio All Rights Reserved Reproduction in whole or in part without written permission is prohibited Specifications and pricing are subject to change without notice Vaddio Q...

Отзывы: