AV Bridge CONFERENCE
5
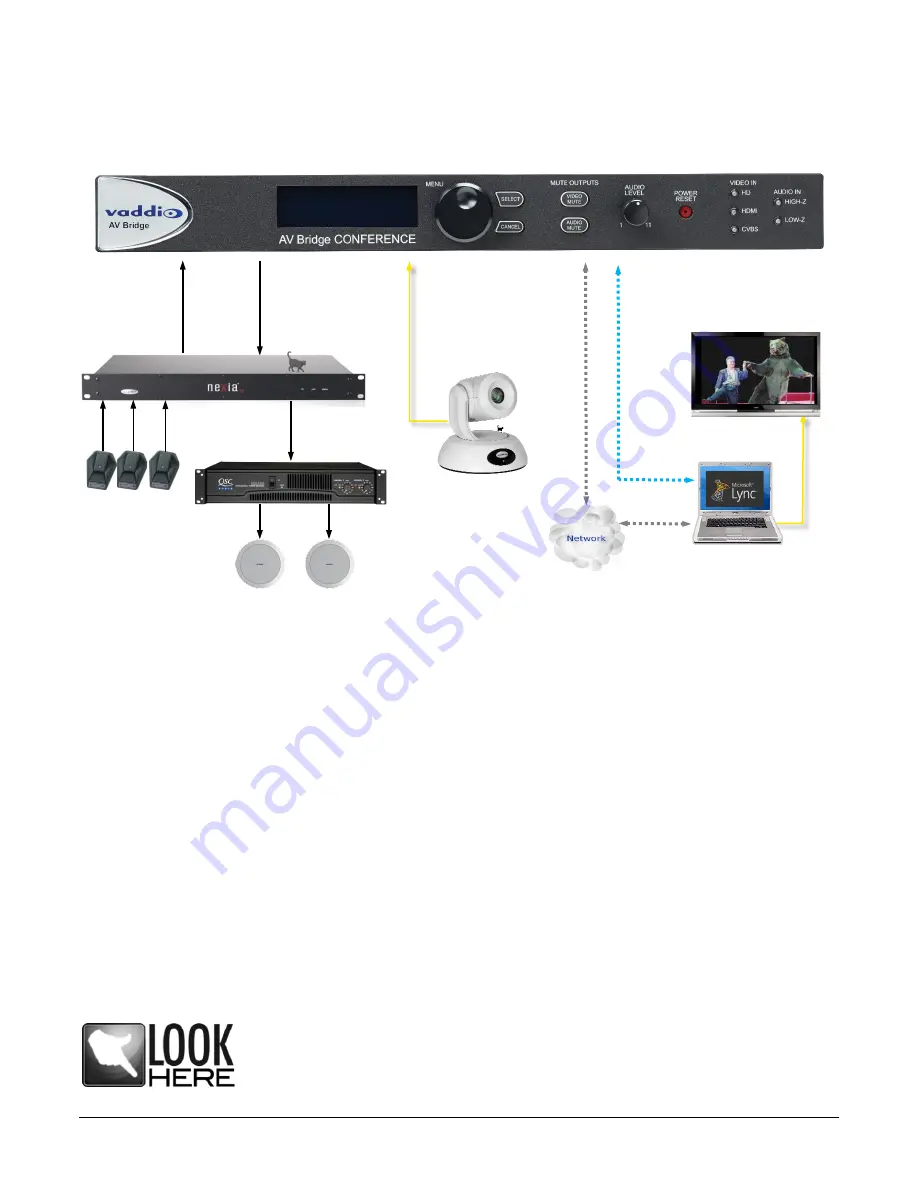
Diagram: UC Conferencing Application Example
This system diagram depicts the AV Bridge CONFERENCE in a UC Conferencing application using an existing or
new room audio system (providing for 2-way audio), video source, a PC, network and room monitor. The AV
Bridge CONFERENCE will output USB 2.0 streams or IP streams, but not simultaneously.
Installation Instructions
To install the AV Bridge CONFERENCE, follow the steps below to attach various pieces of equipment.
Step 1:
Plug in the 18VDC, 2.75 Amp power supply included with the AV Bridge CONFERENCE system
package. The front panel LCD display will illuminate blue when the power is applied. The menu is now active
and ready for configuration.
Step 2:
Connect the Video Content Source(s) to the AV Bridge CONFERENCE for USB 2.0 Streaming. More
than one source can be attached and selected from the front panel or web page menu.
Step 3:
Connect the Audio Content Source(s) to the AV Bridge CONFERENCE. A DSP mixer with AEC and
good mics are generally a good idea. Use either the balanced or unbalanced audio input or output. Audio ins
and outs are needed for a UC Conferencing application to get the near end audio to the far end, and receive far
end audio for connection to the room’s audio system.
Step 4:
For USB streaming, connect the Host PC with the conferencing application to the AV Bridge
CONFERENCE with the provided USB 2.0 Type-A Male to Type-B Male cable.
Step 5
: For IP configuration and control, connect the AV Bridge CONFERENCE to the LAN, which will allow set-
up, configuration and control of the AV Bridge CONFERENCE via the internal web pages in from any of the
approved browsers. The system configuration is an important step in the installation.
This manual contains a Web Page Screen Shot Tour of the embedded web pages in the AV Bridge
CONFERENCE. This tour is provided to help the Administrator and User navigate the system.
Important Note:
The AV Bridge CONFERENCE will use DHCP by default to obtain an
IP address when connected to the LAN. If no DHCP server is available, the AV Bridge
CONFERENCE will default to 169.254.1.1.The IP address will be viewable on the front
panel menu.
Simulated
Dancing Bear
Video Feed
Room
Speakers
Room Mics
Balanced or
Unbalanced
Audio Line IN
Balanced or
Unbalanced
Audio Line
OUT
Mic Inputs
Line Level
Audio OUT
Room’s PRO
DSP Mixer
w/AEC
PRO
Amplifier
Speaker
OUTPUTS
2-Way
Analog
Audio
HD Video Camera or
Video Switcher
HD Video
HDMI or YPbPr
USB 2.0, with UVC (video) &
UAC (audio) Standard Drivers
USB 2.0
Network,
Control or
Streaming
Ethernet
Room Monitor
HD Video Out
(HDMI, DVI or
RGBHV) from
computer


