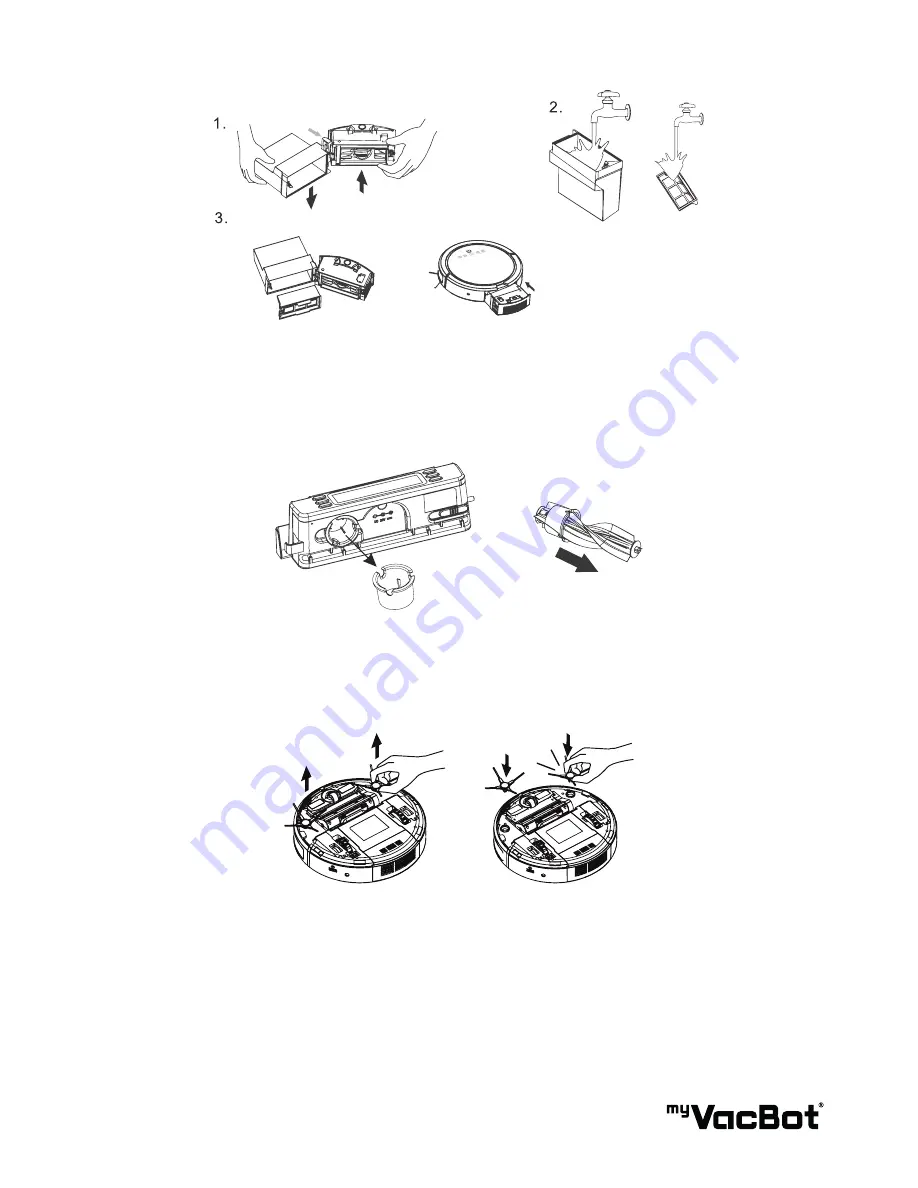
VACBOT S200 Скачать руководство пользователя страница 19

19

Main Brush

1. 

Remove the Main Brush from its holder.

2. 

Take out the cleaning tool included on the rear side of the dock.

3. 

Slide the cleaning tool through the rolling brush.

Side Brushes

1. 

Remove the side brushes from their holders.

2. 

Clean the side brush and install them back.

Wheels and Sensors

1.  Check and remove all debris and dirt.

2.  The myVacBot S200 is equipped with four ground sensors. Please clean them gently using a wet cloth 

or tissue. Do not use any solvents as they may damage the sensors. 

3.  Please check the side brushes for damages and debris. If hair or other debris are trapped please 

unclick the brushes and remove them. Please change the side brushes if they are damaged. Only use 

the parts provided by the manufacturer.

Содержание S200

Страница 1: ...USER MANUAL Vacuum and Floor Mopping Robot myVacBot S200...

Страница 2: ......

Страница 3: ...SONIC WALL 17 SPINNING SIDE BRUSHES 18 CONTROL PANEL 19 REMOTE CONTROL 20 SCHEDULING THE VACUUM AND FLOOR MOPPING ROBOT 21 SETTING YOUR LOCAL TIME 22 SCHEDULING THE VACUUM AND FLOOR MOPPING ROBOT 23 A...

Страница 4: ...re five advanced programs in operation that will advance from spot cleaning around the wall cleaning and pattern cleaning According to the set timer the programs will be intelligently combined for max...

Страница 5: ...not leave children or animals unsupervised with this appliance Only use original battery or charger form manufacturer any third party components may damage the unit Any service other than regular cle...

Страница 6: ...g robot 2 Home Base 3 User Manual 4 Remote Control 5 Room Limiter Sonic Wall 6 Power Supply Adaptor 7 Battery 8 Spare Parts Box 9 Cleaning Brush 10 Hair Removal Tool inside the Home Base 11 Wet Moppin...

Страница 7: ...ust bin button Function display Bumper Charger Inlet Power switch Start Stop switch Drop Sensor 4 Side Brush Main Brush Universal Wheel Charging Pad Side Brush Wheel set Dust bin unit Air outlet Power...

Страница 8: ...vers all the dead spot while having full suction power 3 Dust Filter HEPA type Filter Dust Filter holds normal debris and extends HEPA Filter s life span High efficiency particulate air filter traps t...

Страница 9: ...breakables on the floor 5 Do not use in tight spaces less than 38cm wide as the vacuum and floor mopping robot may get blocked 6 Do not use on wet or greasy dust The vacuum and floor mopping robot ba...

Страница 10: ...is charging normally The Home Base must be positioned on an even floor surface against a wall with at least a 60cm 2ft clearance around Connect the AC adaptor to the power socket on the rear side of t...

Страница 11: ...battery as soon as the vacuum and floor mopping robot is used Keep the robot charged when not in use If the vacuum and floor mopping robot will not be used for a longer period of time remove the batte...

Страница 12: ...ow blue LED light 4 The best effective distance of Sonic Wall barrier is about 2M 10ft 5 The LED light will blink when the Sonic Wall is low in battery If you use 2 rechargeable batteries you could ch...

Страница 13: ...to OFF position When the vacuum and floor mopping robot detects the invisible barrier it will turn around and move to another direction 17 SIDE BRUSHES MAIN BRUSH Side Brushes Installation Insert eac...

Страница 14: ...20 mins 80 mins The selected setting will be shown on the display When the vacuum and floor mopping robot is activated the default cleaning time setting is the last previous time set 3 Display of Time...

Страница 15: ...activate or to shut down the robot Start Stop Button Press this button to activate the vacuum and floor mopping robot to perform or to stop the cleaning process Direction Buttons Left Right Reverse F...

Страница 16: ...6 Users may interrupt the robot s cleaning cycle at any time by pressing the Start Stop button either on the robot panel or the remote control By pressing the button again the vacuum and floor mopping...

Страница 17: ...9 When all settings are finished the selected cleaning date and time will be shown on the LCD display 10 After 10 Seconds the LCD display will go back to the clock display mode Local current time will...

Страница 18: ...le the unit following the instructions and charge it before the next use 6 Store the vacuum and floor mopping robot in a cool and dry place Basic Cleaning 1 Press the Dust Bin Release Button to remove...

Страница 19: ...them back Wheels and Sensors 1 Check and remove all debris and dirt 2 The myVacBot S200 is equipped with four ground sensors Please clean them gently using a wet cloth or tissue Do not use any solvent...

Страница 20: ...l cap and fill the reservoir with water If needed add small amount of mild cleaning solution to improve cleaning performance Close the fill cap Place the dry mop along the Velcro and the edge of the b...

Страница 21: ...l heard DI DI sounds and the display panel shows Cd This means the main unit has turned into study mode already 2 Let the Charging Station Start to Study There are two and display symbols to locate tw...

Страница 22: ...ompleted the study Note If there are more sonic walls need to study please operate above steps again and at most you can play three sonic walls at the same time 4 Let the Main Unit Exit Study Mode Pus...

Страница 23: ...ttom 2 App starting 5 Confirm host into networking stat 3 Click in the upper light corner 6 Enter WIFI password and click Next Step 7 Connecting 8 Successfull Wi Fi Connection 1 Scan QR Code to downlo...

Страница 24: ...g day then click the arrow to confirm and return 9a Choose the connected device then jump to Step 10 9b Click to view firmware version and delete online information 13 Click in the upper light corner...

Страница 25: ...or myVacBot S200 to operate Tip 3 Do not let loose edges of rugs drapes table cloths etc to get caught by myVacBot S200 brushes Roll the loose edges of rugs underneath Remove vases glasses or small la...

Страница 26: ...ff certain areas with Sonic Walls or other objects to get better cleaning results The space under some furniture may not be high enough for the myVacBot S200 to get underneath myVacBot S200 will make...

Страница 27: ...ave sufficient clearance space for the vacuum and floor mopping robot to return it Remove any obstacles in front of the Home Base Check and clean the vacuum and floor mopping robot s wheels The vacuum...

Страница 28: ...anty service provider E5 Left Wheel Overloaded Check the left wheel and remove any objects stuck E6 Right Wheel Overloaded Check the right wheel and remove any objects stuck E7 Side Brushes Overloaded...

Страница 29: ...29...

Страница 30: ...30...

Страница 31: ...31...

Страница 32: ...you can deposit your old electrical products Customers will be able to take any old electrical equipment to participating civic amenity sites run by their local councils Please remember that this equi...

Отзывы: