background image

4 Operation

Operation

4.1 

Operating the display

Switching the appliance on

The appliance is operated using the display.
The clock is only visible in EcoStandby if enabled in the user settings.
▸ Long touch the display.

The start screen appears.

Changing the start screen view 

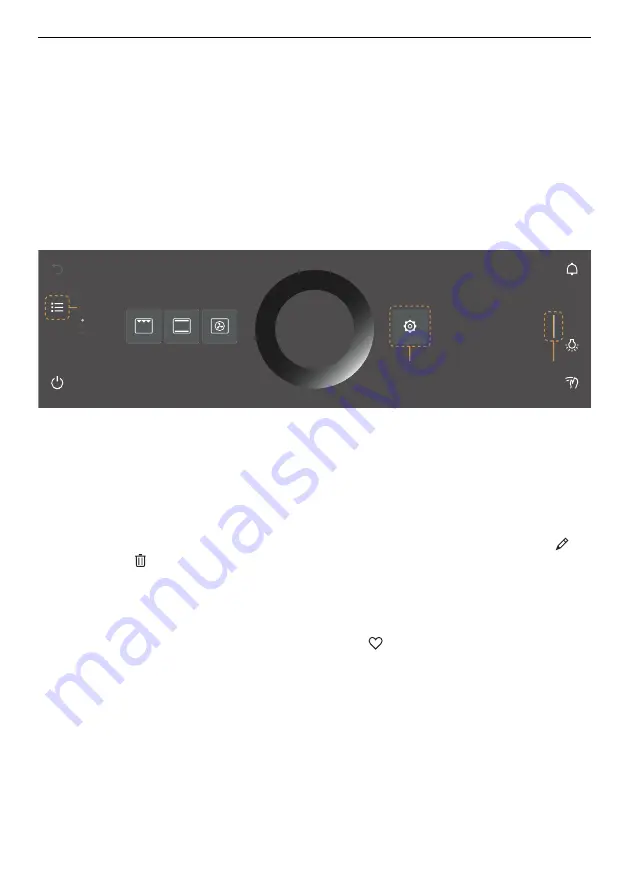
The start screen can be displayed in one of two ways: as an app view (see page 10) or
as a list view. The app view is the factory setting.

1

3

2

▸ To temporarily change the view, touch the 

1

 function button.

The view is retained only until the display goes dark.

The change is then discarded.

When the display is called up again, the view set in the user settings appears.

▸ To permanently change the view, go in the user settings to «Individual settings» and

select the desired start screen view (see page 45).

Displaying quick information

The app view displays the names of the apps as well as the two favourite functions 
«Rename» and   «Remove».
▸ Press and hold the desired app 

2

.

Quick information and the favourites function in Favourites appear above the app
(see page 22)
.

▸ Release app 

2

.

Quick information disappears. In the Favourites 

 application, Quick information

does not disappear in order that Rename or Remove can be selected.

Moving an app

The apps can be moved and reordered in the app view.
▸ Press and hold the desired app 

2

 and move it to change the app order.

The apps are spread over several pages; only one app can be moved at a time.

▸ Release app 

2

.

The new app order is saved.

14

Содержание Combair V4000 45

Страница 1: ...Operating instructions Combair V4000 Oven V ZUG Home Install the app network your appliances and benefit from a wide range of useful functions ...

Страница 2: ...ns Modifications Text diagrams and data correspond to the technical standard of the appliance at the time these operating instructions went to press The right to make technical modifications for the purpose of the further development of the appliances is reserved Validity These operating instructions apply to Model designation Type Size system Combair V4000 45 C4T 21049 60 450 Combair V4000 45P C4...

Страница 3: ...ding before time 27 4 20 End of operation 28 4 21 Subsequent steps 29 4 22 Switching the appliance off 29 4 23 Appliance tips 30 5 Applications 30 5 1 Top Bottom heat 30 5 2 Top Bottom heat humid 31 5 3 Top bottom heat eco 31 5 4 Bottom heat 31 5 5 PizzaPlus 32 5 6 Grill 32 5 7 Grill forced convection 33 5 8 Hot air 33 5 9 Hot air humid 33 5 10 Hot air eco 34 5 11 Sabbath applications 34 5 12 Soft...

Страница 4: ...helf guides 54 9 Trouble shooting 54 9 1 Error messages 54 9 2 Other possible problems 55 9 3 After a power failure 56 10 Accessories and spare parts 57 10 1 Accessories 57 10 2 Special accessories 57 10 3 Spare parts 57 11 Technical data 57 11 1 Note for testing institutes 57 11 2 Temperature measurement 58 11 3 Product fiche 58 11 4 EcoStandby 58 12 Tips and tricks 58 12 1 Unsatisfactory cooking...

Страница 5: ...e safe use of the appliance and have understood the haz ards involved Children shall not play with the appliance Cleaning and user mainten ance shall not be undertaken by children without supervi sion If an appliance is not equipped with a mains cable and a plug or other means for disconnecting from the mains with a contact opening on each pole complying with the conditions of overvoltage cat egor...

Страница 6: ...e oven door as they could scratch the surface This can destroy the glass For appliances with pyrolytic self cleaning Excessive soil ing and any and all accessor ies tableware baking trays runners shelf guides must be removed before carrying out pyrolytic self cleaning Only use the food probe re commended for this oven Under no circumstances use a steam cleaner to clean the appliance WARNING Before...

Страница 7: ...vices If the appliance is not functioning prop erly disconnect it from the power sup ply immediately Ensure there are no foreign bodies or pets in the cooking space before clos ing the appliance door Objects that could pose a danger if the appliance were accidentally switched on should not be stored in the cooking space Do not store food or any temper ature sensitive or inflammable materials e g c...

Страница 8: ...on Keep packaging material e g plastic film and poly styrene away from children Packaging material can be dangerous for children How to avoid damaging the appliance Close the appliance door carefully Do not place any protective insert or aluminium foil on the floor of the cook ing space with appliances with no vis ible bottom heating element Do not use objects that can rust in the cooking space Us...

Страница 9: ... one after the other Make the settings and confirm Remove all the accessories from out of the cooking space Start the initial burn in If the initial burn in step is skipped it must be carried out manually after completing the initial set up Heat the empty cooking space without wire shelves baking trays etc to 200 C for about 30 minutes using the application Hot air As there is likely to be some sm...

Страница 10: ... 3 2 Operating and display elements App view 1 3 5 1 7 2 3 List view 1 4 5 1 7 2 6 EasyCook Here is where you can make all key settings and customize your appliance OK User settings Favourite for bread 1 Function bars with function buttons 5 CircleSlider 2 Scroll bar position 6 Information 3 Apps 7 Bar for expanding the function bar 4 List of applications 10 ...

Страница 11: ...rt screen Cooking space illumination List view Display lock App view Quiet mode Switch off Clock V ZUG Home Ready to start 1 2 3 15min 13 21 Hot air Start 1 Application 3 Start operation 2 Main value Setting options Options Operating time Application tips End Favourite Core temperature 11 ...

Страница 12: ...ng 3 4 Accessories Incorrect handling can cause damage Do not use knives or cutting wheels on the accessories Do not store the accessories in the cooking space Remove all non ovenproof ac cessories before use Baking tray Certain foods can damage the surface coating Foods such as lye breads e g pretzels dough or mixture with a high egg white content and chicken can affect the non stick properties o...

Страница 13: ...s as a cooling rack For large bulky food Place the wire shelf directly on the floor of the cooking space 3 point food probe Not suitable for temperatures of over 230 C There must be a distance between the food probe and the grill top heating element of at least 5 cm The food probe has three measuring points for particularly precise temperature measure ment These also help to record the food probe ...

Страница 14: ... settings appears To permanently change the view go in the user settings to Individual settings and select the desired start screen view see page 45 Displaying quick information The app view displays the names of the apps as well as the two favourite functions Rename and Remove Press and hold the desired app 2 Quick information and the favourites function in Favourites appear above the app see pag...

Страница 15: ... Release the CircleSlider 4 Press Start to start an application or a function Start 4 4 2 Selecting and starting an application Long touch the display The start screen appears Selecting an application group Either In the app view touch the desired application group The submenu with the associated applications appears in the display Or In the list view select the desired application group using the...

Страница 16: ...Start Adjusting values If necessary adjust the main value 1 using the CircleSlider see page 20 If necessary touch and define adjust or activate the values of other options see page 20 Saving values Permanently save and pin the adjusted main value 1 for the selected application if re quired see page 23 Touch and create a favourite if required see page 22 Starting an application Press Start to start...

Страница 17: ...te preheating time plus the set duration The operating time set only starts to run when preheating has finished Press Start to start the application The application starts and the time remaining is displayed The application ends automatically when the set duration is up see page 28 If subsequent steps are available for an application these can be selected when the set duration is up see page 29 If...

Страница 18: ... corresponding message ap pears Before setting the delayed start in the value range touch End The colour of the value range changes to amber Set the desired end time using the CircleSlider The desired duration and the set end time ap pear in the display 15min 13 21 Press Start to start the delayed start The time set or remaining to the start of opera tion and the end of operation appear in the dis...

Страница 19: ...the desired temperature using the CircleSlider In the value range touch Food probe temperature The colour of the value range changes to amber Set the desired target temperature using the CircleSlider Press Start to start the application Operation can only be started when the food probe is plugged in the socket in the appliance Check and change the settings When cooking the current food probe tempe...

Страница 20: ...ge and set the desired value using the CircleSlider Each defined option is marked with a Confirm the setting with OK Several settings can also be confirmed at once with OK The ready to start screen appears in the display Press Start to start the application The Food probe temperature option can be set directly in the ready to start screen if the food probe is plugged in 4 8 Checking and changing t...

Страница 21: ...ting is shown in the CircleSlider Introducing food As soon as the cooking space has preheated an acoustic signal is emitted and a message is displayed If set the operating time does not start to run until the message has been acknowledged Place the food in the cooking space Close the appliance door and confirm the message with OK The application starts 4 10 Setting to start later With Start later ...

Страница 22: ...the particular applications are shown Hiding application tips To hide tips touch The ready to start screen or the running operation appears in the display 4 12 Favourites Creating a favourite Favourites can be created from all applications with the exception of the cleaning pro grammes And all options with the exception of End can be saved Up to 50 favour ites in total can be created Select the de...

Страница 23: ... Press OK to save the new favourite name Deleting favourites The favourite can only be deleted in the app view If required touch The start screen appears as an app view Press and hold the favourite 1 Quick information appears above the app Touch Clear The following appears in the display Do you really want to clear or reset To keep favourites touch No To delete favourites touch Yes Starting favour...

Страница 24: ...nges to white The main value for the desired application is no longer fixed Whenever the application is called up the recommended default value appears To reset all pinned main values go to the user setting Pinned values see page 46 4 14 Timer The timer functions like an egg timer It can be used independently of other functions and applications Setting and starting the timer Touch the Timer functi...

Страница 25: ... time The cooking space illumination switches on automatically 3 minutes before the set duration is up If the cooking space illumination is turned either on or off when a Sabbath applica tion is started it will remain unchanged until the end of operation Switching the cooking space illumination on Touch the Illumination function button The colour of the function button changes to amber The cooking...

Страница 26: ...ouch the Quiet mode switch Quiet mode is turned on The colour of the Quiet mode changes to amber in the function bars Turning off the quiet mode Expand the function bar Touch the Quiet mode function button The quiet mode is shown in the display Touch the Quiet mode switch Quiet mode is turned off The colour of the Quiet mode changes to white in the function bars 4 18 Time The clock can be shown at...

Страница 27: ...tion with another application see page 29 Select the function button to access the parent application menu Select the function button to access the start screen see page 15 Press and hold the function button to switch the appliance off see page 29 If the application has been running for less than 1 minute when cancelled the ready to start screen appears Sabbath applications can only be cancelled u...

Страница 28: ...heat in the cooking space In EcoStandby if the food probe is plugged in The food probe temperature is displayed The food can be kept warm with residual heat for some time As soon as the tem perature falls below 80 C all the displays go out If at this point the food probe is still plugged in the displays only go out when the food probe is unplugged The cooling fan can continue to run After 3 minute...

Страница 29: ...ectly from the applica tion that has ended or been cancelled With subsequent steps 2 the main values available are independent of the applica tion that has just ended or been cancelled Confirm the selection with OK The ready to start screen with reduced setting options appears in the display If required touch and set the options see page 20 Press Start to start the subsequent step Cancelling opera...

Страница 30: ...Favourites Pinning EasyCook Cleaning Preheating Calling up appliance tips In the start screen touch Appliance tips The appliance tips menu appears in the display Select the desired topic Information on the desired topic appears in the right content pane of the display 5 Applications 5 1 Top Bottom heat Temperature range 30 280 C Temperature range for pyrolytic appliance 30 300 C Recommended value ...

Страница 31: ...mperature range 30 250 C Recommended value 200 C Level 2 This application is particularly energy efficient The cooking space is heated by the top and bottom heating elements Any moisture that escapes from the food is retained in the cooking space so the food dries out less Uses Roasts gratins savouries and biscuits When baking using this application do not preheat This lowers the energy con sumpti...

Страница 32: ...ely Uses Pizza flans and quiches Use a dark enamelled tray without baking paper for very crispy results 5 6 Grill Temperature range 4 levels Recommended value High level 3 Level 3 The cooking space is heated by the grill element Application Flat food for grilling e g chicken parts and sausages Gratinate Toast Place the food to be grilled directly on the wire shelf Line the baking tray with alumini...

Страница 33: ...nge for pyrolytic appliance 30 300 C Recommended value 180 C Level 2 or 1 3 A heating element behind the back wall of the cooking space heats up the air inside the cooking space which is circulated evenly Uses Particularly suitable for baking savouries and biscuits on several levels at the same time Cakes bread and roasts Select a lower temperature reduce by approximately 20 C than for as the heat...

Страница 34: ...cooking time can be longer than with classical hot air Select a lower temperature reduce by approximately 20 C than for as the heat transfer is more efficient 5 11 Sabbath applications In order to use the applications Sabbath top bottom heat and Sabbath top bottom heat humid the Sabbath mode must be activated in the user settings see page 45 Food can be kept warm for up to 78 hours without having ...

Страница 35: ...cation that is running can be cancelled or ended before time see page 27 Hold the function button depressed The running application ends The display goes dark The appliance switches off see page 29 After restarting the appliance the start screen appears End of operation When the set duration is up operation ends as normal see page 28 Power interruption How the appliance behaves after a power inter...

Страница 36: ...t dry out warm on one level Vegetables meat pasta baked dishes and roasts 5 12 Soft roasting How it functions The Soft roasting function allows high quality cuts of meat to be prepared gently The end of operation can be set precisely irrespective of the weight and thickness of the meat The temperature is automatically controlled For long operating times the temper ature is controlled such that it ...

Страница 37: ...iploin medium 57 well done 64 Rump of beef medium 63 well done 69 Rib eye or prime rib of beef medium 60 well done 68 Shoulder of beef medium 72 well done 75 Rump or loin of pork medium 61 well done 72 Neck of pork well done 76 Shoulder of pork well done 76 Leg of lamb medium 65 well done 74 Soft roasting seared Season or marinate the meat Remove any marinade made with herbs mustard etc from the m...

Страница 38: ...splay The start screen appears Select the Soft roasting application group and confirm with OK if required see page 15 Select the desired type of meat Select the desired cut of meat Select the desired soft roasting method and confirm with OK If the desired type of meat or cut is not available for selection select Freely se lect meat type Select the degree of doneness not possible for Freely select ...

Страница 39: ...pace If the cooking space is already hot open the appliance door and allow the cooking space to cool down for 3 to 4 minutes before starting the Plate warmer function This is to protect the tableware from damage through stress cracking Long touch the display The start screen appears Place the tableware in the cooking space Ideally put the wire shelf in and place the tableware on it Touch the Plate...

Страница 40: ...d confirm with OK That step is applied to the ready to start screen and the recipe can be started as usual by touching Start A recipe can be started from any step i e steps can be skipped If you want to start the recipe from a later step select the action before it to get in formation about shelf position There are steps and actions Steps are preheating or cooking steps actions are in structions o...

Страница 41: ...he appliance suggests suitable applications including settings and accessories Overview of food groups Foodstuffs are grouped into different categories a foodstuff may be included in more than one group The following food groups can be selected Baked dishes and gratins Fruit and berries Bakery products Poultry Accompaniments Vegetables Fish and seafood Flans and pizzas Meat Selecting and starting ...

Страница 42: ...ethods can be activated as a package The following national cuisines are available Italian Australian French Ukrainian German Turkish Lebanese Belgian Chinese Russian All activated national cuisines are highlighted in amber They can be deactivated by touching the switch The activated foods and basic recipes in each packet are then integrated into the struc ture of the EasyCook menu Any number of n...

Страница 43: ...nute and the V ZUG Home LED flashes quickly All available wireless networks appear in the V ZUG App Select your wireless network Enter the password for your wireless network The appliance is connected to your wireless network 7 User settings 7 1 Adjusting user settings Long touch the display The start screen appears Select User settings and confirm with OK if required see page 15 Select the desire...

Страница 44: ...ll tones are set at the lowest volume This setting is deactivated when the appliance goes into the EcoStandby mode The volume of the feedback tones and acoustic signals cannot be changed when in quiet mode Sound worlds The tonality of the acoustic signals and feedback tones can be changed Feedback tones The volume of the feedback tones can be adjusted up or down or turned off completely Certain fe...

Страница 45: ...one is emitted when it is time to put the food into the cooking space 7 8 Date and time Time synchronization The Internet setting is set automatically when connecting to V ZUG Home The time date and time zone are then synchronized directly from the app Date The date can be called up and changed Time The time can be called up and changed Date and time format The time can be displayed in the Europea...

Страница 46: ...ched on and off in the service menu Contacting Customer Services The contact information for our Customer Services is displayed 7 11 Factory settings Pinned values Resets all pinned values Start screen Resets the start screen to the app view Favourites remain unchanged Favourites Entering OK clears all existing favourites V ZUG Home Disconnects all connections to mobile devices Factory settings Re...

Страница 47: ...er and a little washing up liquid Dry with a soft cloth When cleaning the display the display lock can be used to protect the operating ele ments from being unintentionally activated 8 2 Cleaning the cooking space Incorrect handling can result in damage to the appliance Do not bend the temperature sensor or heating elements Do not scour the surface Scouring will damage the surface Remove any soili...

Страница 48: ...er 300 C the illumination and the heatable appli ance drawer turn off and cannot be turned back on Selecting and starting pyrolytic self cleaning Damage to accessories from self cleaning Remove accessories shelf guides fully extending runners cookware and any other objects from out of the cooking space Otherwise they can become discol oured and their surface rough The rolling properties of full ex...

Страница 49: ...ng The door seal therefore requires gentle cleaning 8 5 Cleaning the appliance door Clean the appliance door with a soft cloth dampened with water and a little washing up liquid Dry with a soft cloth Removing the appliance door The appliance door is heavy When removing and reinstalling the appliance door hold it at the sides firmly with both hands Open the appliance door as far as it will go Fold ...

Страница 50: ...get damaged when it is closed Cleaning the door glass Lay the appliance door on a clean flat surface covered e g with a tea towel with the handle facing down Make sure the handle does not come into contact with the surface Lean against the appliance door Carefully push the glass 1and raise it slightly up and away from the hinges 1 Remove the seal 2 Gently push the door glass 3 and raise it slightl...

Страница 51: ...rds the hinges The markings on the glass must be legible Fit the seal 2 2 3 Insert the door glass 1 into the door frame and gently push it back towards the hinges The door glass 1 can only be put back if po sitioned correctly with the shiny surface on the outside 1 8 6 Cleaning the door seal Clean the door seal with a soft cloth dampened with water but do not use any clean ing agent Dry with a sof...

Страница 52: ...rners at the top Insert the clip from the outside to the inside at a 30 angle into the slot Once the seal is fitted at the top insert the bottom two clips Press the door seal into the groove all around i e at the top bottom left and right 1 2 3 4 X 8 8 Replacing the door seal in pyrolytic appliances We generally recommend the door seal be replaced by our service staff However you can also replace ...

Страница 53: ...halo gen light bulb Risk of burns from hot surfaces Allow the halogen light bulb and the appliance to cool down before replacing the halogen light bulb Do not touch the halogen light bulb with bare hands Instead use a fine dry grease free cloth Overhead illumination Carefully turn the glass light cover 1 clockwise and remove Take out the faulty halogen light bulb Carefully fit the new halogen ligh...

Страница 54: ...ull message F and E numbers and call Customer Services 9 1 Error messages Message Possible cause Solution FX EXX Various situations can lead to an error mes sage Acknowledge the error message by touching OK Switch the power supply off for about 1 minute Switch the power supply back on If the error appears again note down the error message in full along with the serial number SN of the appli ance s...

Страница 55: ...usehold fuse or circuit breaker has tripped Change the fuse Reset the circuit breaker The fuse or circuit breaker keeps blow ing Contact Customer Services Interruption in the power supply Check the power supply Demo mode is switched on The demo mode can only be switched off with the security code Contact Customer Services Appliance is faulty Contact Customer Services Appliance door does not open a...

Страница 56: ...e internet The time is automatically synchron ized Internal pulse gener ator is imprecise when mains syn chronization is turned off Contact Customer Services 9 3 After a power failure The user settings remain unchanged Brief power failure during operation The current operation of the appliance is cancelled The following appears in the display when the appliance is switched on Process was cancelled...

Страница 57: ...2 Special accessories Information at www vzug com 10 3 Spare parts Shelf guides left right Door seal 11 Technical data External dimensions See installation instructions 1 Electrical connection See identification plate 1 11 1 Note for testing institutes Placing thermocouples between the appliance door and the seal can cause lack of leak tightness and thus measuring errors The usable volume within t...

Страница 58: ...mption in conventional mode 1 kWh cycle 0 74 0 75 Energy consumption in hot air forced convection mode 2 kWh cycle 0 7 Energy Efficiency Index per cavity 3 95 8 Measurement and calculation methods used SN EN 60350 1 2016 1 Required to heat a standardized load per cavity 2 Required to heat a standardized load per cavity 3 Measurement methods see EU Regulation No 66 2014 Annex II Chpt 1 11 4 EcoStan...

Страница 59: ...nd to those recommended in EasyCook Do not push baking tins or bulky foodstuff right to the back of the cooking space The baking has come out lighter on one baking tray than on the other Check that the settings used correspond to those recom mended in EasyCook Some uneven browning is normal More even browning is generally achieved at lower temperatures 12 2 Saving energy The Hot air humid and espe...

Страница 60: ...be carried out by a qualified electrician Then cut the mains cable off flush with the appliance 13 3 Disposal The crossed out wheeled bin symbol requires the separate collection of waste electrical and electronic equipment WEEE Such equipment can contain hazardous environmentally harmful materials These appliances are to be handed over to a designated collection point for the recyc ling of electri...

Страница 61: ...6 Using 15 Cleaning Accessories 54 Appliance door 49 Baking tray 47 Cooking space 47 Door glass 50 Door seal 51 Shelf guides 54 Cleaning the exterior 47 Clock 26 Hiding 26 Hiding during operation 18 Showing 26 Showing during operation 17 Construction 10 Cooking space 12 Temperature measurement 58 Cuisines from around the world 42 D Date and time Clock 45 Clock synchronization 45 Date 45 Date and t...

Страница 62: ... dietary style 44 Sabbath mode 45 Start screen 45 Temperature unit 45 K Keep warm 39 L Lateral illumination 53 Levels 12 List view 10 Long cooking time 55 M Malfunctions 54 Model designation 2 N Notes 64 O Operating and display elements 10 Operating time 17 Setting 17 Operation 14 Options 20 Selecting 20 Starting 20 Other possible problems 55 Overhead illumination 53 P Pinning 23 Main value 24 Res...

Страница 63: ...1 Setting 21 Starting 22 Start screen 14 Subsequent steps 29 Cancelling operation 29 Continuing operation 29 Symbols 5 T Target temperature 19 Technical data 57 Technical questions 67 Temperature sensor 12 Testing institutes 57 Timer 24 Changing 25 Checking 25 Setting 24 Starting 24 Switching off before time 25 Tips and tricks 58 Top bottom heat 30 Top bottom heat eco 31 Top bottom heat humid 31 T...

Страница 64: ...64 15 Notes ...

Страница 65: ...65 ...

Страница 66: ...66 ...

Страница 67: ... You will require the serial number SN and appliance designation to register your appliance You will find them on the identification plate of your appliance My appliance information SN __________________________ Appliance ________________________________ Please have this appliance information to hand when contacting V ZUG Thank you Open the appliance door The identification plate is located on the...

Страница 68: ...The temperature can be set using the CircleSlider Adjustable value On Off Touch the display to switch the appliance on Long press and hold the function button to switch the appliance off Operation The appliance is operated using the display Place your finger on the CircleSlider and move it in a circle Favourite V ZUG Ltd Industriestrasse 66 CH 6302 Zug info vzug com www vzug com 1094184 04 ...

Отзывы: