V-fit ARTEMIS III DELUXE AIR ROWER Скачать руководство пользователя страница 27

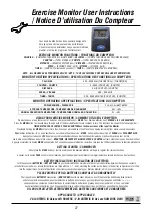
Exercise Monitor User Instructions

/ Notice D’utilisation Du Compteur

CALORIES 

0.00 - 999.9 Kcal (THEORETICAL) - (THEORIQUE) 

COUNTER – COMPTE 

0 – 9999 (COUNT UP) - (COMPTE) 

DISTANCE 

Km (COUNT UP) - (COMPTE) 

SPEED – VITESSE 

0.00 – 99.9 Km/h 

TIMER – TEMPS 

0.00 - 99.59 MINUTES (COUNT UP) - (COMPTE) 

MONITOR OPERATING SPECIFICATIONS / SPECIFICATIONS DU COMPTEUR

POWER SOURCE – PUISSANCE 

2 x AA (1.5v) BATTERIES 

STORAGE TEMPERATURE - TEMPERATURE DE RANGEMENT 

-10c - +60c 

NORMAL OPERATION TEMPERATURE - TEMPERATURE NORMALE D’UTILISATION 

0c - +50c 

Your Exercise Monitor has been specially designed to 
help you plan and view your exercise performance.
Ce compteur est spécialement conçu pour permettre de 
planifier et suivre les progrès de l’entraînement.

EXERCISE MONITOR FUNCTIONS / FONCTIONS DU COMPTEUR

CALORIES ~ 

(COMPUTED THEORETICAL CALORIE BURN) / 

CALORIES ~

 (COMPTE THEORIQUE DES CALORIES BRULEES)

COUNTER ~

 (TOTAL STROKES) / 

COMPTE ~

 (TOTAL DES COUPS DE RAME)

DISTANCE ~

 (EXERCISE DISTANCE km) / 

DISTANCE ~

 (DISTANCE D’EXERCICE km)

SPEED ~

 (ROWING SPEED - km/h) / 

VITESSE ~

 (VITESSE - km/h)

TIMER ~

 (COUNT UP [minutes and seconds]) / 

TEMPS ~

 (COMPTE [MINUTES ET SECONDES])

NOTE: - ALL FIGURES ARE APPROXIMATE VALUES / NOTE: - TOUS LES CHIFFRES SONT DES VALEURS APPROXIMATIVES

MONITOR FUNCTION SPECIFICATIONS / SPECIFICATIONS DES FONCTIONS DU COMPTEUR

USING YOUR EXERCISE MONITOR / COMMENT UTILISER LE COMPTEUR

To

 provide ease of use, there is only 1 button on your Exercise Monitor: 

- MODE

.  Your Exercise Monitor has 

1 SCREEN

 with 

3 LCD SEGMENTS

.

Press the 

MODE

 button to manually move through each of the Exercise Monitor's main functions in turn. The functions are shown in the following order: -

TIMER, DISTANCE & CALORIES.  SPEED & COUNTER have their own screens at the top of the Monitor

Pressing & holding the 

MODE

 button for more than 3 seconds will enable you to set to zero any figures remaining from previous exercise sessions.

Pour

 faciliter l'utilisation, il n'y a qu'un seul bouton sur votre moniteur d'exercice:

 - MODE.

 Votre moniteur d'exercice a 

1 ÉCRAN

 avec

 3 SEGMENTS LCD.

Appuyez sur le bouton MODE pour parcourir manuellement chacune des fonctions principales du moniteur d'exercice à tour de rôle.

Les fonctions sont affichées dans l'ordre suivant: 

- MINUTERIE, DISTANCE ET CALORIES. SPEED & COUNTER

 ont leurs propres écrans en haut du moniteur.

Appuyer et maintenir le bouton 

MODE

 pendant plus de 3 secondes vous permettront de remettre à zéro tous les chiffres restants dans la fonction précédente.

GETTING STARTED / COMMENCER

Either press the 

MODE

 button or start to exercise and the Exercise Monitor will begin to register the various functions.

Appuyer sur le bouton 

PAGE

 ou commencer l’exercice pour faire démarrer le compteur et l’enregistrement des valeurs de chacune des fonctions.

BATTERY INSTALLATION / INSTALLATION DES BATTERIES

To fit the necessary 

BATTERIES - (NOT SUPPLIED)

 to your Exercise Monitor, simply place the correct size batteries between the exposed contacts 

in the battery compartment.  Ensure that batteries are fitted with the '+' / '-' ends matching the outline on the sticker in the battery compartment or etched

into the compartment.  Failure to fit batteries correctly may result in damage to your Exercise Monitor, which is not covered by our guarantee.

PLEASE DISPOSE OF OLD BATTERIES CAREFULLY & CONSIDERATELY

Pour répondre aux 

BATTERIES

 nécessaires -

 (NON FOURNI) 

à votre moniteur d'exercice, il suffit de placer les batteries de taille correcte

entre les contacts exposés dans le compartiment de la batterie.  Assurez-vous que les piles sont équipées des extrémités «+» / «-»

correspondant au contour de l’autocollant dans le compartiment à batteries ou gravées dans le compartiment.  Si vous ne montez

pas correctement les batteries, vous risquez d'endommager votre moniteur d'exercices, qui n'est pas couvert par notre garantie.

S'IL VOUS PLAÎT JETER ATTENTIVEMENT DES BATTERIES ANCIENNES ET CONSIDÉRÉES

APPLICABLE TO / APPLICABLE À

V-fit ARTEMIS III Deluxe AIR ROWERS / V-fit ARTEMIS III De Luxe RAMEURS D'AIR

Содержание ARTEMIS III DELUXE AIR ROWER

Страница 1: ...ARTEMIS III DELUXE AIR ROWER SERIAL NO GT3078 UK...

Страница 2: ...tart 5 Informations G n rales General Information 3 3 Safety 6 Exercise Information 7 Assembly 12 Ajustements et Maintenance 21 Adjustments Maintenance 21 Dessin Eclat 24 Exploded Drawing 24 Liste des...

Страница 3: ...e des pi ces manquent veuillez ne PAS le retourner votre revendeur mais contactez nous d abord pour obtenir de l aide L un des moyens suivants signifie Tel 44 0 1535 637711 Email support benysports co...

Страница 4: ...usage domestique uniquement pendant une p riode de 1 an compter de la date d achat certifi e d origine Pendant cette p riode nous avons le droit de a Fournir des pi ces l acheteur pour effectuer la r...

Страница 5: ...de bien v rifier avant de contacter notre SERVICE CLIENT Tools If required most of our products are supplied with basic tools which will enable you to successfully assemble your product However you ma...

Страница 6: ...dans un environnement propre et sec Eviter de le ranger dans un endroit trop froid ou humide Ceci pourrait provoquer la corrosion ou d autres probl mes n tant pas sous notre contr le Before you undert...

Страница 7: ...e and by definition unfit refer to the left column If you exercise regularly and have good aerobic fitness refer to the right column of the basic Aerobic Training Programme P7 People who have a greate...

Страница 8: ...rm as high as you can for one count gently stretching the muscles of the stomach and lower back Repeat the action with your left arm Repeat 3 4 times Inner Thigh Stretch Sit on the floor and pull your...

Страница 9: ...nt 5 10 minutes Retour au Calme 5 minutes Semaine 3 4 Echauffement 5 10 minutes Retour au Calme 5 minutes Semaine 5 6 Echauffement 5 10 minutes Retour au Calme 5 minutes Semaine 7 8 Echauffement 5 10...

Страница 10: ...e d utiliser votre Air Rower de deux fa ons diff rentes pour augmenter votre capacit cardiovasculaire et augmenter la puissance de tous vos groupes musculaires haut et bas du corps ENTRAINEMENTAEROBIC...

Страница 11: ...xtr mit du rameur Revenir en position de d part et recommencer EXERCISE No 1 THE COMPLETE ROWING ACTION This exercise will help tone and strengthen the muscle groups in your legs arms shoulders back a...

Страница 12: ...ies you will need to complete the assembly of your product Item 11 Qty 2 Item 54 Qty 1 Item 44 Qty 3 Item 45 Qty 2 Item 48A Qty 2 Item 50 Qty 2 Item 14 Qty 1 Item 13 Qty 1 Item 41 Qty 2 Item 48 Qty 4...

Страница 13: ...bly Montage The Front Frame Stabiliser Roller Wheels 5 must face forward to ensure ease of transportation for storage Do not remove pin 52 until assembly stage 9 Note Le stabilisateur de ch ssis avant...

Страница 14: ...ctez l extr mit avant de l aviron principal rail sur le rail d aviron Pivot support 12 sur le dessus du ch ssis principal avec le pr mont 1 x M8 x 135mm Boulon Allen 43 1 x M8 Petit OD Rondelle 48 et...

Страница 15: ...l arri re de la Aviron principal Rail ou tourner l Air Rower sur le c t et fixez le Chord retour 36 l int rieur du principal Aviron ferroviaire la courroie d entra nement 34 passant par l arri re de l...

Страница 16: ...aites pivoter le rail d aviron dans sa position d utilisation en prenant soin de ne pas coincer les c bles du capteur 21 et 23A et le rail d aviron s curis 2 en place avec 1 x rondelle plate de grand...

Страница 17: ...Cap d aviron 13 Assembly Montage 11 8 9 44 54 48A 2 11 48 48 44 13 44 Compliance to BS EN 957 requires that an additional alternative seat stop to be fitted If desired please fit the 1 x M8 x 20mm Hex...

Страница 18: ...51 and 2 x M10 Nylon Locknuts 47 Pour votre commodit le style de velcro de repose pied r glable 16 sont pr mont sur les repose pieds 15 dans la partie inf rieure de la 2 options de positionnement Fai...

Страница 19: ...xercise Monitor 19 into place in the top of the Monitor Support Mount 20 Ins rez 2 piles AA non fournies dans le support de batterie du moniteur d exercice 19 puis connectez le c ble du capteur de ven...

Страница 20: ...tation DO NOT refit when in regular use Place the Row Arm 24 into the Row Bar Support 10 Assembly Montage FULLY TIGHTEN all Bolts Nuts and Fittings now ensuring that your Air Rower in located on a cle...

Страница 21: ...il vous pla t toujours veiller ce que votre Air Rower est positionn sur un solide plat surface Si n cessaire utilisez un tapis de caoutchouc en dessous pour r duire la possibilit de glissement dans l...

Страница 22: ...the Rowing Rail 2 3 D placer le si ge 8 vers l avant afin qu il soit juste l cart du contr leur de tension 61 4 Pliez le support arri re 4 en d vissant le bouton du stabilisateur arri re 7 1 Rabattez...

Страница 23: ...not work First check the above step regarding Drive to Fanwheel If this does not work then check and remake the connections between all of the Sensor Cables 37 21 and 23A Fold the Rowing Rail 2 over...

Страница 24: ...3 56 25 64 24 19 55 20 47 57 52 43 21 12 44 11 15 9 8 59 48 11 36 35 53 23A 48A 14 5L 44 13 42 7 48 46 4 6 40 2 54 48A 1 37 22 39 38 58 10 61 26 32 49 60 23 62 34 48 46 45 50 48 3 41 5R 28 29 29A 17 1...

Страница 25: ...LISATEUR DE CADRE AVANT 4 STABILISATEUR DE CADRE ARRI RE 5L R CAPUCHON DE ROULEAU STABILISATEUR AVANT 6 BOUCHONDESTABILISATEURARRI RE 7 BOUTONDUSTABILISATEURARRI RE 8 SI GE 9 CHARIOT DE SI GE 10 SUPPO...

Страница 26: ...1 1 48A M8 LARGE OD FLAT WASHER 2 49 SUPPORTDESUPPORTDEMONITEUR RONDELLE DE RESSORT M8 51 50 RONDELLE PLATE M10 GRAND OD 52 GOUPILLE DE VERROUILLAGE 53 MANCHON DU CORDON DE RETOUR 54 BOULON M8 x 20mm...

Страница 27: ...il n y a qu un seul bouton sur votre moniteur d exercice MODE Votre moniteur d exercice a 1 CRAN avec 3 SEGMENTS LCD Appuyez sur le bouton MODE pour parcourir manuellement chacune des fonctions princi...

Страница 28: ...s Park Cross Hills West Yorkshire BD20 7BW CUSTOMER SUPPORT Open from 9 00am to 5 00pm from Monday to Friday Tel FREEPHONE in the UK 0800 3 101 202 or 44 0 1535 637711 outside the UK E mail support be...

Отзывы: