V-fit ARTEMIS III DELUXE AIR ROWER Скачать руководство пользователя страница 23

Adjustments and Maintenance

/ Ajustements et Maintenance

Il ne semble pas y avoir de «lecteur» au 

ventilateur

La chaîne de transmission (31) est sortie de la broche 
de transmission (32) à l'avant de la souffleuse. Retirez 
les 2 vis mécaniques M5 x 12mm qui fixent le capot 
du mécanisme d'entraînement (33) et tirez-le vers 
vous. Avec le ventilateur à air (27) à gauche et le siège 
(8) à droite, faites face au rameur à air par le côté 
gauche. Soulevez le bras de la rangée (24) verticalement 
et avec votre main droite sous le cadre 1) Tirez la chaîne 
de transmission de la droite vers la gauche afin de 
pouvoir rentrer la chaîne de transmission avec précaution 
sur la broche de transmission à l'avant de la souffleuse. 
Une fois fixé, abaissez lentement le bras de la rangée 
dans son emplacement de stockage. 

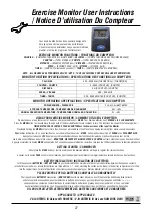
ILe compteur Strokes per Minute ne 

fonctionne pas

Commencez par vérifier l’étape ci-dessus concernant le 
passage en roue libre. Si cela ne fonctionne pas, vérifiez 
et refaites les connexions entre tous les câbles du capteur 
(37, 21 et 23A). Pliez le rail de rameur (2) sur le dessus 
du cadre principal (reportez-vous à la page 22 pour les 
instructions de pliage) et tournez légèrement le capteur 
de siège (23A) autour de sa vis de fixation, puis déplacez 
le siège (8) Le moniteur d'exercice (19) répond. 
Continuez à vous déplacer jusqu'à ce que le moniteur 
indique un nombre de traits ou un chiffre SPM.

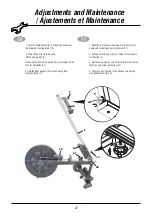
There does not appear to be any 

“drive” to the Air Fan

The Drive Chain (31) has come off the Drive Gear   
Spindle (32) at the front of the Air Rower. Remove the 
2 x M5 x 12mm Machine Screws that are securing 
the Drive Gear Cover (33) and pull it towards you.  
Facing the Air Rower from the side with the Air Fan (27) 
on the left and the Seat (8) on the right, with your LEFT 
hand, lift the Row Arm (24) vertically and with your 
right hand underneath the Main Frame (1) pull the Drive 
Chain from right to left so that you can carefully feed 
the Drive Chain back onto the Drive Gear Spindle at the 
front of the Air Rower. When secured, slowly lower the 
Row Arm into its storage location.

The Strokes per Minute Counter does not work

First, check the above step regarding Drive to Fanwheel. 
If this does not work then check and remake the 
connections between all of the Sensor Cables (37, 21, 
and 23A). Fold the Rowing Rail (2) over the top of the 
Main Frame (see Page 22 for Folding Instructions) and 
slightly rotate the Seat Sensor (23A) about its fitting
screw and then move the Seat (8) up and down to check 

if the Exercise Monitor (19) responds. Continue to move 
until the Monitor indicates a Stroke Count or SPM figure.

The Speed Counter does not work

Unscrew the 6 (3 inside, 3 outside) x M4 x 63mm S/T   

Le compteur de vitesse ne fonctionne pas

Dévissez les 6 (3 à l'intérieur, 3 à l'extérieur) x M4 x 63mm 
S/T qui retiennent les couvercles de ventilateur (28) 
ensemble. Retirez le capot du ventilateur extérieur et les 4 
inserts du capot du ventilateur (29). Vérifiez si l’aimant du 
ventilateur d’air est toujours en place dans un évidement 
vers le centre du ventilateur. S'il est sécurisé, faites pivoter 
la pointe du câble du capteur de ventilateur d'air (23) sur 
son point de fixation jusqu'à ce que le ventilateur d'air (27) 
fasse enregistrer le moniteur d'exercice.

Le siège «cogne» lors de l'utilisation

Assurez-vous que la partie inférieure du rail de rameur 
(2) est toujours propre et que la poussière et les débris 
sont libres de poussière et que, par conséquent, les 
rails et les roues de chariot (59) sont endommagés. 
Nettoyez la rainure avec un chiffon propre et humide et, 
si nécessaire, retirez l’ensemble du siège et nettoyez 
chaque roue avant de la remettre en place.

Screws holding the Fan Covers (28) together. Remove 
the Outer Fan Cover and the 4 x Air Fan Cover Inserts 
(29). Check to see if the Air Fan Magnet is still in place 
in its location in a recess towards the centre of the Air 
Fan. If it is secure, rotate the tip of the Air Fan Sensor 
Cable (23) about its fixing point until spinning the Air 
Fan (27) causes the Exercise Monitor to register.

The Seat “bumps” when in use

Make sure that the lower part of the Rowing Rail (2) is 
always kept clean and dust / debris free as dust will 
become compacted and as a consequence damage the 
Rail and the Seat Carriage Wheel Assemblies (59). 
Clean the groove with a clean damp cloth and if 
necessary remove the complete Seat Assembly and 
clean each Wheel before refitting.

Содержание ARTEMIS III DELUXE AIR ROWER

Страница 1: ...ARTEMIS III DELUXE AIR ROWER SERIAL NO GT3078 UK...

Страница 2: ...tart 5 Informations G n rales General Information 3 3 Safety 6 Exercise Information 7 Assembly 12 Ajustements et Maintenance 21 Adjustments Maintenance 21 Dessin Eclat 24 Exploded Drawing 24 Liste des...

Страница 3: ...e des pi ces manquent veuillez ne PAS le retourner votre revendeur mais contactez nous d abord pour obtenir de l aide L un des moyens suivants signifie Tel 44 0 1535 637711 Email support benysports co...

Страница 4: ...usage domestique uniquement pendant une p riode de 1 an compter de la date d achat certifi e d origine Pendant cette p riode nous avons le droit de a Fournir des pi ces l acheteur pour effectuer la r...

Страница 5: ...de bien v rifier avant de contacter notre SERVICE CLIENT Tools If required most of our products are supplied with basic tools which will enable you to successfully assemble your product However you ma...

Страница 6: ...dans un environnement propre et sec Eviter de le ranger dans un endroit trop froid ou humide Ceci pourrait provoquer la corrosion ou d autres probl mes n tant pas sous notre contr le Before you undert...

Страница 7: ...e and by definition unfit refer to the left column If you exercise regularly and have good aerobic fitness refer to the right column of the basic Aerobic Training Programme P7 People who have a greate...

Страница 8: ...rm as high as you can for one count gently stretching the muscles of the stomach and lower back Repeat the action with your left arm Repeat 3 4 times Inner Thigh Stretch Sit on the floor and pull your...

Страница 9: ...nt 5 10 minutes Retour au Calme 5 minutes Semaine 3 4 Echauffement 5 10 minutes Retour au Calme 5 minutes Semaine 5 6 Echauffement 5 10 minutes Retour au Calme 5 minutes Semaine 7 8 Echauffement 5 10...

Страница 10: ...e d utiliser votre Air Rower de deux fa ons diff rentes pour augmenter votre capacit cardiovasculaire et augmenter la puissance de tous vos groupes musculaires haut et bas du corps ENTRAINEMENTAEROBIC...

Страница 11: ...xtr mit du rameur Revenir en position de d part et recommencer EXERCISE No 1 THE COMPLETE ROWING ACTION This exercise will help tone and strengthen the muscle groups in your legs arms shoulders back a...

Страница 12: ...ies you will need to complete the assembly of your product Item 11 Qty 2 Item 54 Qty 1 Item 44 Qty 3 Item 45 Qty 2 Item 48A Qty 2 Item 50 Qty 2 Item 14 Qty 1 Item 13 Qty 1 Item 41 Qty 2 Item 48 Qty 4...

Страница 13: ...bly Montage The Front Frame Stabiliser Roller Wheels 5 must face forward to ensure ease of transportation for storage Do not remove pin 52 until assembly stage 9 Note Le stabilisateur de ch ssis avant...

Страница 14: ...ctez l extr mit avant de l aviron principal rail sur le rail d aviron Pivot support 12 sur le dessus du ch ssis principal avec le pr mont 1 x M8 x 135mm Boulon Allen 43 1 x M8 Petit OD Rondelle 48 et...

Страница 15: ...l arri re de la Aviron principal Rail ou tourner l Air Rower sur le c t et fixez le Chord retour 36 l int rieur du principal Aviron ferroviaire la courroie d entra nement 34 passant par l arri re de l...

Страница 16: ...aites pivoter le rail d aviron dans sa position d utilisation en prenant soin de ne pas coincer les c bles du capteur 21 et 23A et le rail d aviron s curis 2 en place avec 1 x rondelle plate de grand...

Страница 17: ...Cap d aviron 13 Assembly Montage 11 8 9 44 54 48A 2 11 48 48 44 13 44 Compliance to BS EN 957 requires that an additional alternative seat stop to be fitted If desired please fit the 1 x M8 x 20mm Hex...

Страница 18: ...51 and 2 x M10 Nylon Locknuts 47 Pour votre commodit le style de velcro de repose pied r glable 16 sont pr mont sur les repose pieds 15 dans la partie inf rieure de la 2 options de positionnement Fai...

Страница 19: ...xercise Monitor 19 into place in the top of the Monitor Support Mount 20 Ins rez 2 piles AA non fournies dans le support de batterie du moniteur d exercice 19 puis connectez le c ble du capteur de ven...

Страница 20: ...tation DO NOT refit when in regular use Place the Row Arm 24 into the Row Bar Support 10 Assembly Montage FULLY TIGHTEN all Bolts Nuts and Fittings now ensuring that your Air Rower in located on a cle...

Страница 21: ...il vous pla t toujours veiller ce que votre Air Rower est positionn sur un solide plat surface Si n cessaire utilisez un tapis de caoutchouc en dessous pour r duire la possibilit de glissement dans l...

Страница 22: ...the Rowing Rail 2 3 D placer le si ge 8 vers l avant afin qu il soit juste l cart du contr leur de tension 61 4 Pliez le support arri re 4 en d vissant le bouton du stabilisateur arri re 7 1 Rabattez...

Страница 23: ...not work First check the above step regarding Drive to Fanwheel If this does not work then check and remake the connections between all of the Sensor Cables 37 21 and 23A Fold the Rowing Rail 2 over...

Страница 24: ...3 56 25 64 24 19 55 20 47 57 52 43 21 12 44 11 15 9 8 59 48 11 36 35 53 23A 48A 14 5L 44 13 42 7 48 46 4 6 40 2 54 48A 1 37 22 39 38 58 10 61 26 32 49 60 23 62 34 48 46 45 50 48 3 41 5R 28 29 29A 17 1...

Страница 25: ...LISATEUR DE CADRE AVANT 4 STABILISATEUR DE CADRE ARRI RE 5L R CAPUCHON DE ROULEAU STABILISATEUR AVANT 6 BOUCHONDESTABILISATEURARRI RE 7 BOUTONDUSTABILISATEURARRI RE 8 SI GE 9 CHARIOT DE SI GE 10 SUPPO...

Страница 26: ...1 1 48A M8 LARGE OD FLAT WASHER 2 49 SUPPORTDESUPPORTDEMONITEUR RONDELLE DE RESSORT M8 51 50 RONDELLE PLATE M10 GRAND OD 52 GOUPILLE DE VERROUILLAGE 53 MANCHON DU CORDON DE RETOUR 54 BOULON M8 x 20mm...

Страница 27: ...il n y a qu un seul bouton sur votre moniteur d exercice MODE Votre moniteur d exercice a 1 CRAN avec 3 SEGMENTS LCD Appuyez sur le bouton MODE pour parcourir manuellement chacune des fonctions princi...

Страница 28: ...s Park Cross Hills West Yorkshire BD20 7BW CUSTOMER SUPPORT Open from 9 00am to 5 00pm from Monday to Friday Tel FREEPHONE in the UK 0800 3 101 202 or 44 0 1535 637711 outside the UK E mail support be...

Отзывы: